I am a self-hosting hobbyist. In a moment of madness, I signed up for a cheap IPv6-only Virtual Private Server (VPS). The consequences of being ipv6-only were a bit more than I had naïvely assumed (although obvious in retrospect). This blog post describes the steps needed to prepare the VPS for my self-hosting adventures.
Read along if you are into self-hosting but new to IPv6.
The Basics
So the thing with an IPv6-only VPS is that by default, it can not access nor can it be accessed by computers on an IPv4-only network. Well, d’uh! Seems dead obvious in retrospect, but the first time it really hit home was when I was unable to ssh into the freshly provisioned VPS.
1sagar@um790-kubuntu:~$ ssh sagar@2602:****:****:****:****:****:0:1
2ssh: connect to host 2602:****:****:****:****:****:0:1 port 22: Network is unreachable
3sagar@um790-kubuntu:~$
Wut?! And that’s when I realized that the devices on my nicely-sanitized home network, sitting behind a fancy multi-WAN OPNSense firewall, did not have IPv6 addresses at all.
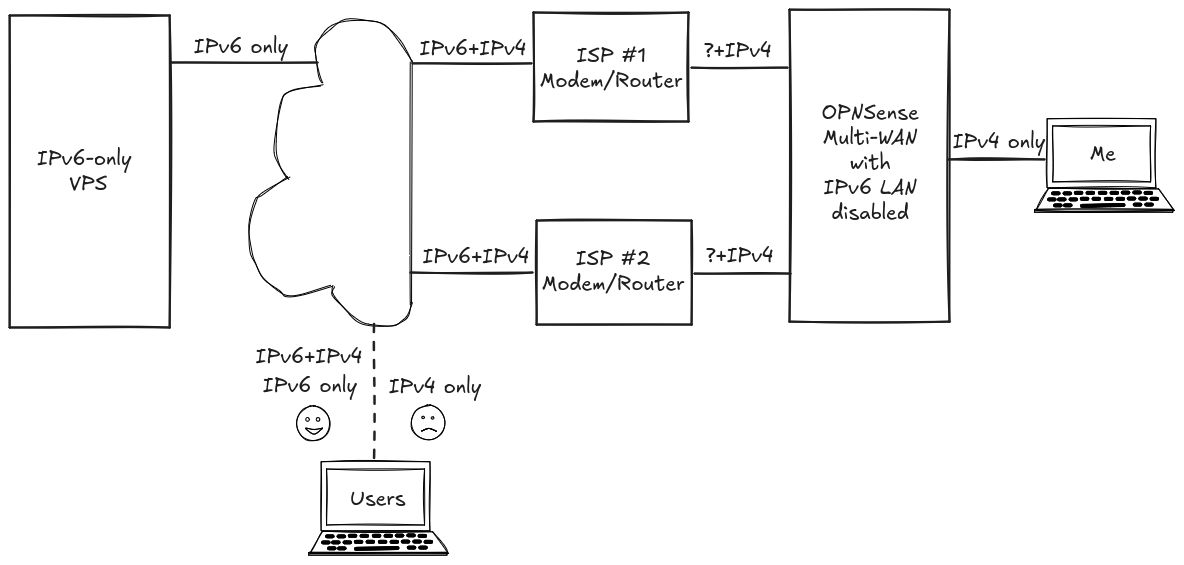
This will not be a problem if you are on a dual-stack or IPv6-only network. But any users who are on IPv4-only networks will be unable to access the VPS and its hosted services. They don’t even need to be active users. For example, if your VPS is hosting some privacy-friendly site analytics for your websites, it is possible that IPv4-only users browsing your website will not be noticed. (Because their browser will attempt, then fail, to send an event to the IPv6-only VPS.)
Furthermore, if the services hosted on the VPS need to access any IPv4-only services on the Internet, that is not going to work. That may not sound like much.. until you realize that some significant parts of the Internet infrastructure are not accessible over IPv6. As of August 20, 2024, neither GitHub nor Backblaze B2 are accessible over IPv6. So if you are cloning repositories from github.com, pulling docker images from ghcr.io, or sending data to B2 buckets.. haha.. none of that is going to work.
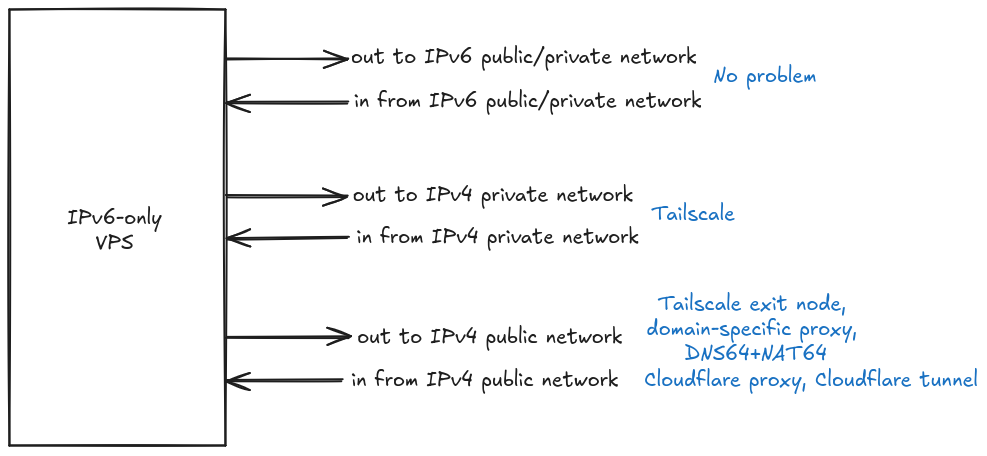
At this point, you can either be an IPv6 purist and shun everything/everyone that insists on using IPv4 only.. or, you need to start thinking of ways to enable bi-directional communication with the IPv6-only VPS over IPv4. Such bi-directional communication needs to consider the following input/outputs because each of them can be enabled in a few different ways
- Connections initiated to/from the VPS via private IPv4-only networks
- Connections initiated to the VPS from IPv4-only networks
- Connections initiated by the VPS to IPv4-only networks
Tailscale
Okay, so your freshly provisioned IPv6-only VPS is up and running and you are unable to even SSH into it from your IPv4-only devices. What to do? There are only two options: Either get your devices to talk to the IPv6 network or somehow find a way to access the IPv6-only VPS over IPv4.
In my case, I briefly tried to configure my OPNSense firewall to distribute IPv6 addresses to the devices on my LAN. That’s yak shaving at its finest. But here, I did not succeed. Configuring IPv6 is far more complicated that IPv4 and I got lost pretty quickly, despite following various Internet guides. That’s a rant for another day.
What was possible though, was to use the VPS provider’s IPv4-accessible website to drop into a console of the VPS. From here, it was possible to install Tailscale and connect the VPS to my Tailnet. And boom! Just like that, it was now possible to access the VPS via its IPv4 Tailscale address/hostname from IPv4-only devices on the same Tailnet.
 1sagar@um790-kubuntu:~$ ssh sagar@dibbuk
 2sagar@dibbuk's password:
 3Linux dibbuk 6.1.0-23-amd64 #1 SMP PREEMPT_DYNAMIC Debian 6.1.99-1 (2024-07-15) x86_64
 4
 5The programs included with the Debian GNU/Linux system are free software;
 6the exact distribution terms for each program are described in the
 7individual files in /usr/share/doc/*/copyright.
 8
 9Debian GNU/Linux comes with ABSOLUTELY NO WARRANTY, to the extent
10permitted by applicable law.
11Last login: Fri Aug 16 03:38:29 2024 from 100.82.29.83
12sagar@dibbuk:~$
If you are only going to access this VPS and its services over devices on your Tailnet, you may be done. Or not. It depends on whether the services hosted on your VPS need to access parts of the Internet that are IPv4-only (for example, GitHub and Backblaze B2, as of August 2024. Shame on them!).
Update Aug. 21, 2024: Reddit user u/Miserable-Sell904 pointed out that for VPS providers who support cloud-init, tailscale has an option for that. By installing Tailscale via cloud-init, the VPS becomes a part of your Tailnet as soon as it is provisioned and starts up. You don’t need to use the VPS provider’s console to manually install Tailscale.
Proxying to GitHub
As of August 20, 2024, GitHub only supports IPv4 connections. If all you need is to access GitHub and ghcr.io from your IPv6-only VPS, a kind person named Daniel Winzen has you covered. He has set up a public proxy server that can be used to access GitHub from an IPv6 network. Go read https://danwin1210.de/github-ipv6-proxy.php and especially note the parts about ssl certificates, decryption and re-encryption of your traffic. Once you have understood and made peace with all that, it is a simple matter of appending the following to your /etc/hosts files
# The following lines are a proxy to be used until github supports ipv6
# See: https://danwin1210.de/github-ipv6-proxy.php

2a01:4f8:c010:d56::2 github.com
2a01:4f8:c010:d56::3 api.github.com
2a01:4f8:c010:d56::4 codeload.github.com
2a01:4f8:c010:d56::5 objects.githubusercontent.com
2a01:4f8:c010:d56::6 ghcr.io
2a01:4f8:c010:d56::7 pkg.github.com npm.pkg.github.com maven.pkg.github.com nuget.pkg.github.com rubygems.pkg.github.com
Now, you can transparently clone git repositories from GitHub and pull docker images from ghcr.io.
VPS => IPv4
Sometimes, you need full access to the IPv4-only Internet from your IPv6-only VPS. It is not enough to use destination-specific proxy hacks (like for GitHub above). For this, there are at least two options:
Tailscale exit node
(Caution: Fiddly stuff ahead) Use a Tailscale exit node. Basically, you can configure a dual-stack machine on your Tailnet as an exit-node on the IPv6-only VPS. Of course, this requires you to install and use Tailscale. With this approach, the outbound traffic from your VPS is routed through the dual-stack exit node. This works decently (modulo bandwidth constraints on your exit node) if all you need to do is initiate connections out to the IPv4-only interwebs. However, you will have issues if IPv6 traffic from the great unwashed Internet is accessing services on your VPS. Because the IN-bound traffic is coming directly to the VPS but the OUT-bound traffic is all going out via the Tailscale exit-node. In principle, this should maybe not be an issue but in practice, it didn’t work well for me. There may be a need to fiddle around with routing etc.
DNS64+NAT64
(Recommended approach) The other way for an IPv6-only computer to access IPv4-only networks is via a DNS64+NAT64 setup. Essentially, when the IPv6-only VPS does a DNS lookup on the FQDN of an IPv4-only domain, instead of returning the corresponding IPv4 address, the DNS server returns a “fake” IPv6 address. The communication to this “fake” IPv6 destination address gets routed to the real IPv4 destination address. Return communication from the IPv4 address then gets sent to the IPv6-only VPS. All of this works transparently from the viewpoint of the IPv6 host. This latter part is NAT64 i.e. NAT from IPv6 to IPv4.
So do you need to set up DNS64+NAT64 on some other dual-stack server? Well, you could.. but you don’t actually need to. Other kind people have set up these things and made them publicly available. See for example, https://nat64.net/ and https://nat64.xyz/.
What does this mean in practice? Well, you just need to use the nameservers offered by the above services. Meaning, configure your IPv6-only VPS to use the DNS nameservers listed by e.g. https://nat64.net. Let’s see how to do that on a Debian 12 VPS.
I always found it a bit daunting to stay up-to-date on how to configure DNS for Linux and Debian-derived distros. Back in the day, you would just specify nameservers for an interface in /etc/network/interfaces and be done with it. Now, there is /etc/resolv.conf and various pieces of software clobber it. The file itself warns against editing it manually, since changes will be overwritten. Here is a way to persistently set DNS servers that works for Debian 12:
- (Optional. Only if you are using Tailscale) First, prevent tailscale from overwriting
/etc/resolv.confwithtailscale set --accept-dns=false.- See this link for more.
sudo apt install resolvconfsystemctl start resolvconf; systemctl enable resolvconf; systemctl status resolvconf- Update the file
/etc/resolvconf/resolv.conf.d/headto have lines likenameserver 2a01:4f9:c010:3f02::1 nameserver 2a00:1098:2c::1 nameserver 2a01:4f8:c2c:123f::1 resolvconf --enable-updates; resolvconf -u- Now, you should be able to see these nameservers in use if you do
cat /etc/resolv.conf
From now on, your IPv6-only VPS will be able to make connections out to IPv4-only domains.
NOTE: Please be nice when using these public DNS64+NAT6 nameservers. They have rate limits. Don’t abuse them and force their owners to take them down. Please don’t turn this into another instance of ‘This is why we can’t have nice things’ :)
IPv4 => VPS
None of the previous steps enables users from arbitrary public IPv4-only networks to connect to your server via an FQDN. To fix that, I know of two solutions, both of which involve Cloudflare. A free Cloudflare account works just fine for this.
The first solution is to use Cloudflare DNS proxying (you may hear this being referred to as ‘orange cloud it’ in some Internet forums). To use this solution, Cloudflare needs to be managing your domain’s nameservers. In the Cloudflare DNS settings, create an AAAA record to point a (sub-)domain to your VPS’ IPv6 address. Turn on DNS proxying for this record (the icon showing that proxying is on is an orange cloud. Hence the term ‘orange cloud-ing’ seen in Internet forums). When DNS proxying in turned on, Cloudflare actually creates a separate A record which returns an IPv4 address for the (sub-)domain. Any connections to this IPv4 address are transparently proxied by Cloudflaro to the VPS’ IPv6 address. Effectively, users of IPv4-only networks won’t even know that your VPS/services are IPv6-only. It’ll “just work” for them.
NOTES:
- DNS Proxying via Cloudflare only works for certain protocols like
http://andhttps://. It does not work for SSH’ing into the VPS from an IPv4 address. - In case you are using SSL (which you should use), you’ll need to configure the servers or your VPS appropriately, with Cloudflare origin SSL certs. That is outside the scope of this post, but you can see some details in this video (around the 17:37 minute mark).
The second solution is to use a Cloudflare Tunnel. With this approach, a secure tunnel is created between your VPS and Cloudflare’s servers. All public traffic intended for your domain hits Cloudflare servers first, which then route it to your VPS via the secure tunnel. I have not used this approach myself, but here is a useful tutorial I came across when researching it.
Docker
If you have been following along, at this point your IPv6-only VPS is able to initiate connections to IPv4-only destinations and users from IPv4-only networks are able to connect to your VPS. You seem to be all set for self-hosting whatever services you wish. Or, maybe not. If, like most avid self-hosters, you are using docker containers, there is one more step.
It seems that docker networks are IPv4-only by default. So if you have a bunch of containers/services specified in a docker-compose.yaml file, then a network is automatically created for you when you run docker compose up. However, this network is IPv4-only and the various containers on this network can talk to each other using IPv4. BUT the services running inside your containers can’t just transparently access the Internet via your host VPS’ IPv6-only stack. One way to maybe avoid this is to use host networking, which simply lets the container have the exact same connectivity as the docker host. But that removes isolation and introduces security worries, so that is not my first choice.
After much reading, fiddling, and puzzling over the official docker page on IPv6 support, I finally settled on the following configuration which “just works”. First, create the file /etc/docker/daemon.json if it does not exist and in it, add the following
{
  "userland-proxy": false,
  "ipv6": true,
  "fixed-cidr-v6": "fd00:1::/64",
  "experimental": true,
  "ip6tables": true,
  "default-address-pools": [
    { "base": "172.17.0.0/16", "size": 16 },
    { "base": "172.18.0.0/16", "size": 16 },
    { "base": "172.19.0.0/16", "size": 16 },
    { "base": "172.20.0.0/14", "size": 16 },
    { "base": "172.24.0.0/14", "size": 16 },
    { "base": "172.28.0.0/14", "size": 16 },
    { "base": "192.168.0.0/16", "size": 20 },
    { "base": "fd00:1::/56", "size": 64 }
  ]
}
Now, in your docker-compose.yaml file, in the networks definition, make sure that enable_ipv6: true is present for the networks that need to connect to IPv6. For example,
1networks:
2  plausible:
3    enable_ipv6: true
At this point, I highly recommend doing a docker system prune or simply rebooting the server to get rid of any existing IPv4-only networks that might be lying around from your fiddling. I faced a whole bunch of weird issues during my experiments which went away after I rebooted and all new networks used the above configuration.
Another cautionary note is to not enable IPv6 on all docker networks without a good reason. Sometimes services in a docker-compose.yaml file will not play nice with each other over an IPv6 network and it can get very hard to debug this. For example, when setting up Seafile, I had a network that was used by Seafile to communicate to a MySQL database created from within the same docker-compose.yaml file. For some reason, Seafile was unable to connect to this database over an IPv6 network. It is probably some minor bug in the implementation that took me hours to figure out. In the end, I created an IPv4 network for Seafile to talk with the MySQL database, and another network with IPv6 enabled for the Seafile container to talk to the reverse-proxy.
Conclusion
- IPv6 has been around since about 1998. It was ratified as an Internet Standard in 2017. Yet, according to Google, IPv6 adoption worldwide is about 45% and in the USA it is about 52%, as of August 2024.
- However, large parts of the Internet are still IPv4 only. This surprisingly includes (as of August 2024) large players like GitHub and Backblaze B2.
- As of this writing, you can get IPv6-only VPSes at cheaper rates.
- If you are self-hosting stuff on IPv6-only VPSes, you need to jump through a bunch of hoops to enable good communication between the IPv6-only VPS services and IPv4-only parts of the Internet. Even in 2024, this isn’t something that “just works”.
- This blog post gave an overview of the hoop-jumping involved. It is the sort of consolidated guide I’d have appreciated having when I started out, but couldn’t find. So I read through a lot of docs, did a lot of tinkering, and assembled this guide. Hopefully, it is useful to someone.