This post explains how I built a Network Attached Storage (NAS) for home use in August 2023. The various hardware build steps are carefully document with lots of photos.
Why a DIY NAS?
I need a low power, silent, always-on NAS at home in order to backup personal computers and store+serve video/audio/image media for streaming on TVs and personal devices.
My initial attempt at this was to plug in 2 4TB 3.5" SATA drives (WD Red NAS) in a USB 3.0 enclosure (WD My Book Duo) in “Just a Bunch of Drives” aka JBOD mode and connect it to my DIY Router. The software side of it consisted of a SAMBA configuration to share the NAS drives and a Jellyfin docker container to serve media. This setup worked quite well for a number of years, until one of the disks developed bad sectors that I became aware of purely by chance. This lead to a deep dive in researching the S.M.A.R.T status and self-test reporting on the drives which should provide better health status warnings and indications of impending drive failures. Curiously, the USB 3 drive enclosure reported the S.M.A.R.T status of Drive 1, regardless of which drive was queried. It was effectively impossible to read S.M.A.R.T status of Drive 2. So there was no way to know whether the second disk in the enclosure was on the verge of failure. Unacceptable! To fix this, I’d need a new USB enclosure that assuredly reported the S.M.A.R.T status of all disks. After looking around a bit, I couldn’t find a physically robust USB disk enclosure that assuredly simultaneously supported i) reading S.M.A.R.T data of all drives ii) sensible power management of drives (sleep/wakeup) iii) high disk read/write speeds and iv) thermal management of the enclosed disks.
Next, I looked into readily available home NAS systems like those from Synology, QNAP, ASUStor etc. and quickly realized that they lacked robust, non-proprietary full-disk encryption capabilities. That made them a non-starter for me. I want my data to be secure in case someone steals the NAS or if/when the disks need to be disposed. So I looked for devices on which I could install Linux and use LUKS for full disk encryption. Essentially, the off-the-shelf devices would be used as pre-assembled, and hopefully optimized, hardware assemblies. It turned out that devices from ASUStor and TerraMaster did indeed support installation of popular Linux distributions. However, at their price point, I couldn’t help but wonder if a DIY solution would provide more value for money. Turns out that this is indeed the case. For a similar cost, I could build a NAS that supported more hard drives, had more RAM, more network ports, and better CPUs. So I decided to go the DIY route and looked for builds that others had already done and liked. In particular, I came across DIY NAS posts from Brian Moses and Thomas Moll and this convinced me that the particular NAS parts they had selected would be good fits for my requirements. I mostly modeled my build on Thomas Moll’s build, but used a different power supply and did not bother with the CPU cooling mods he made.
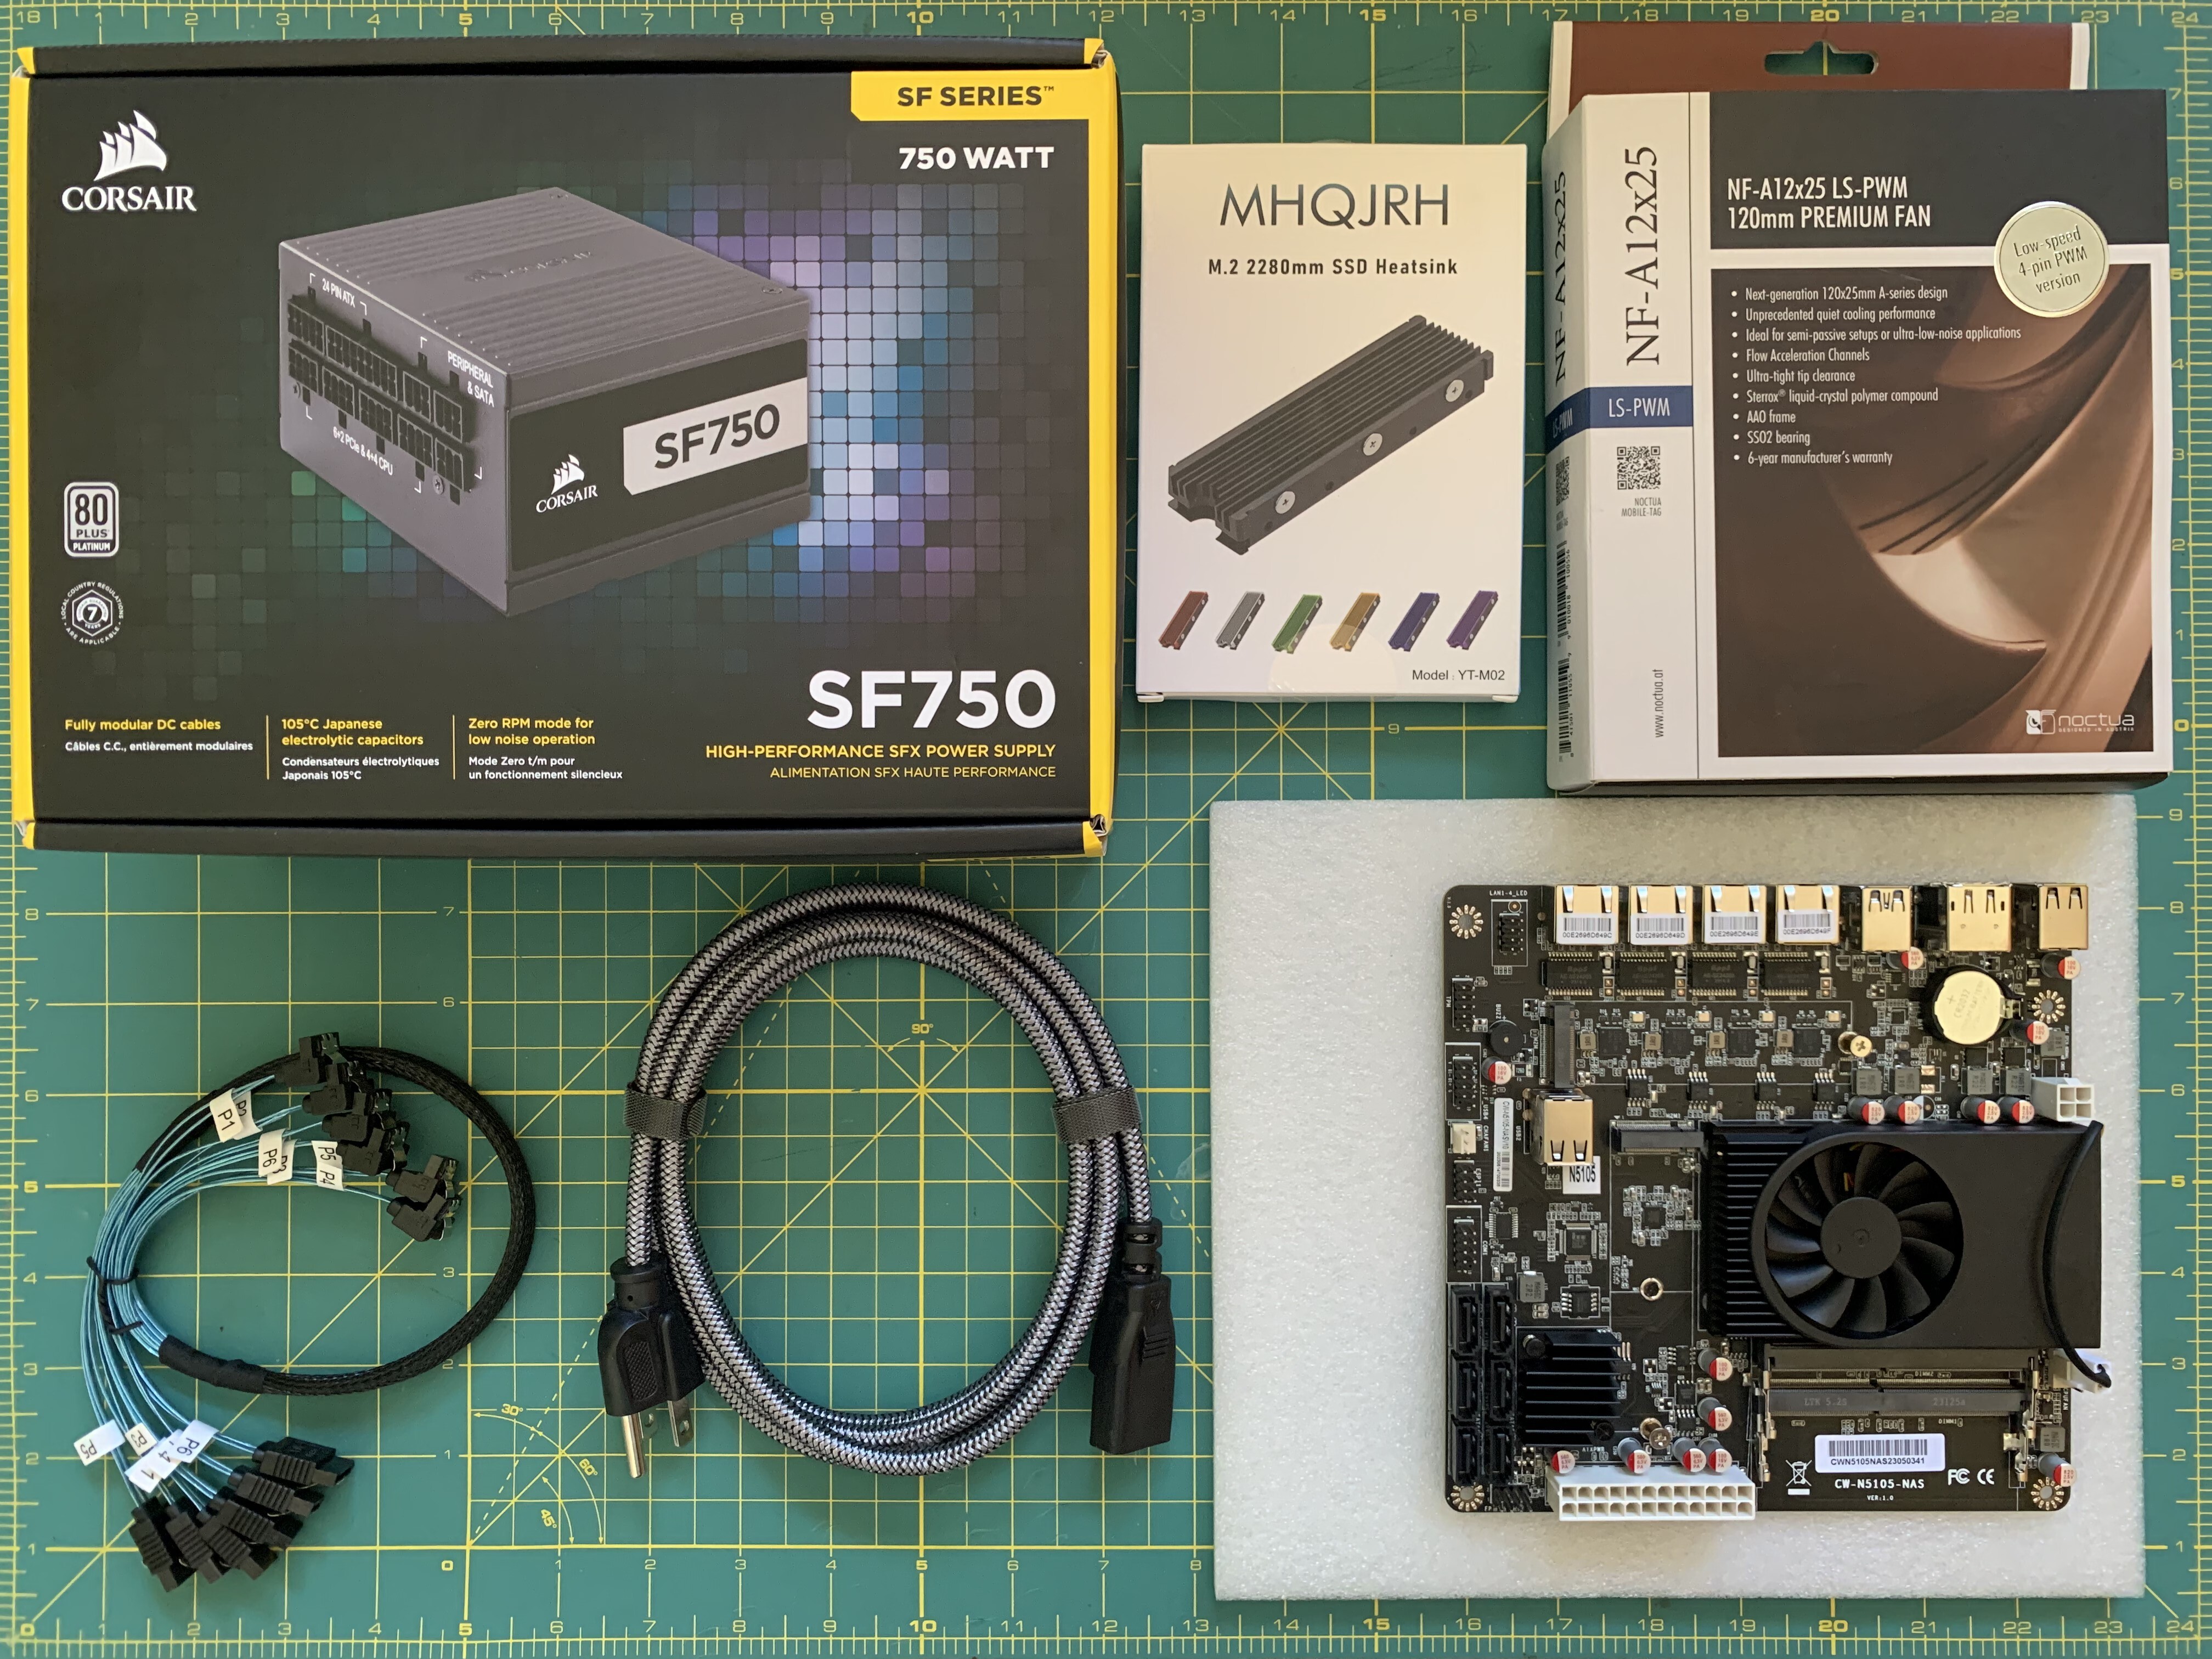
Parts list
| Component | Part | Price USD |
|---|---|---|
| Motherboard | CWWK CW-N5105-NAS | $204.99 (I got a 10% discount coupon) |
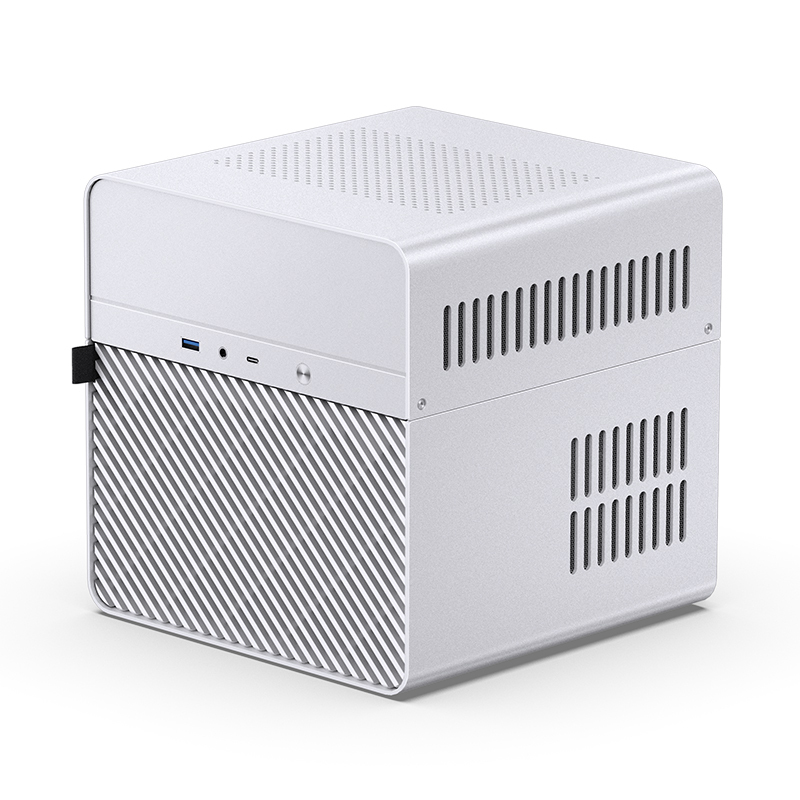
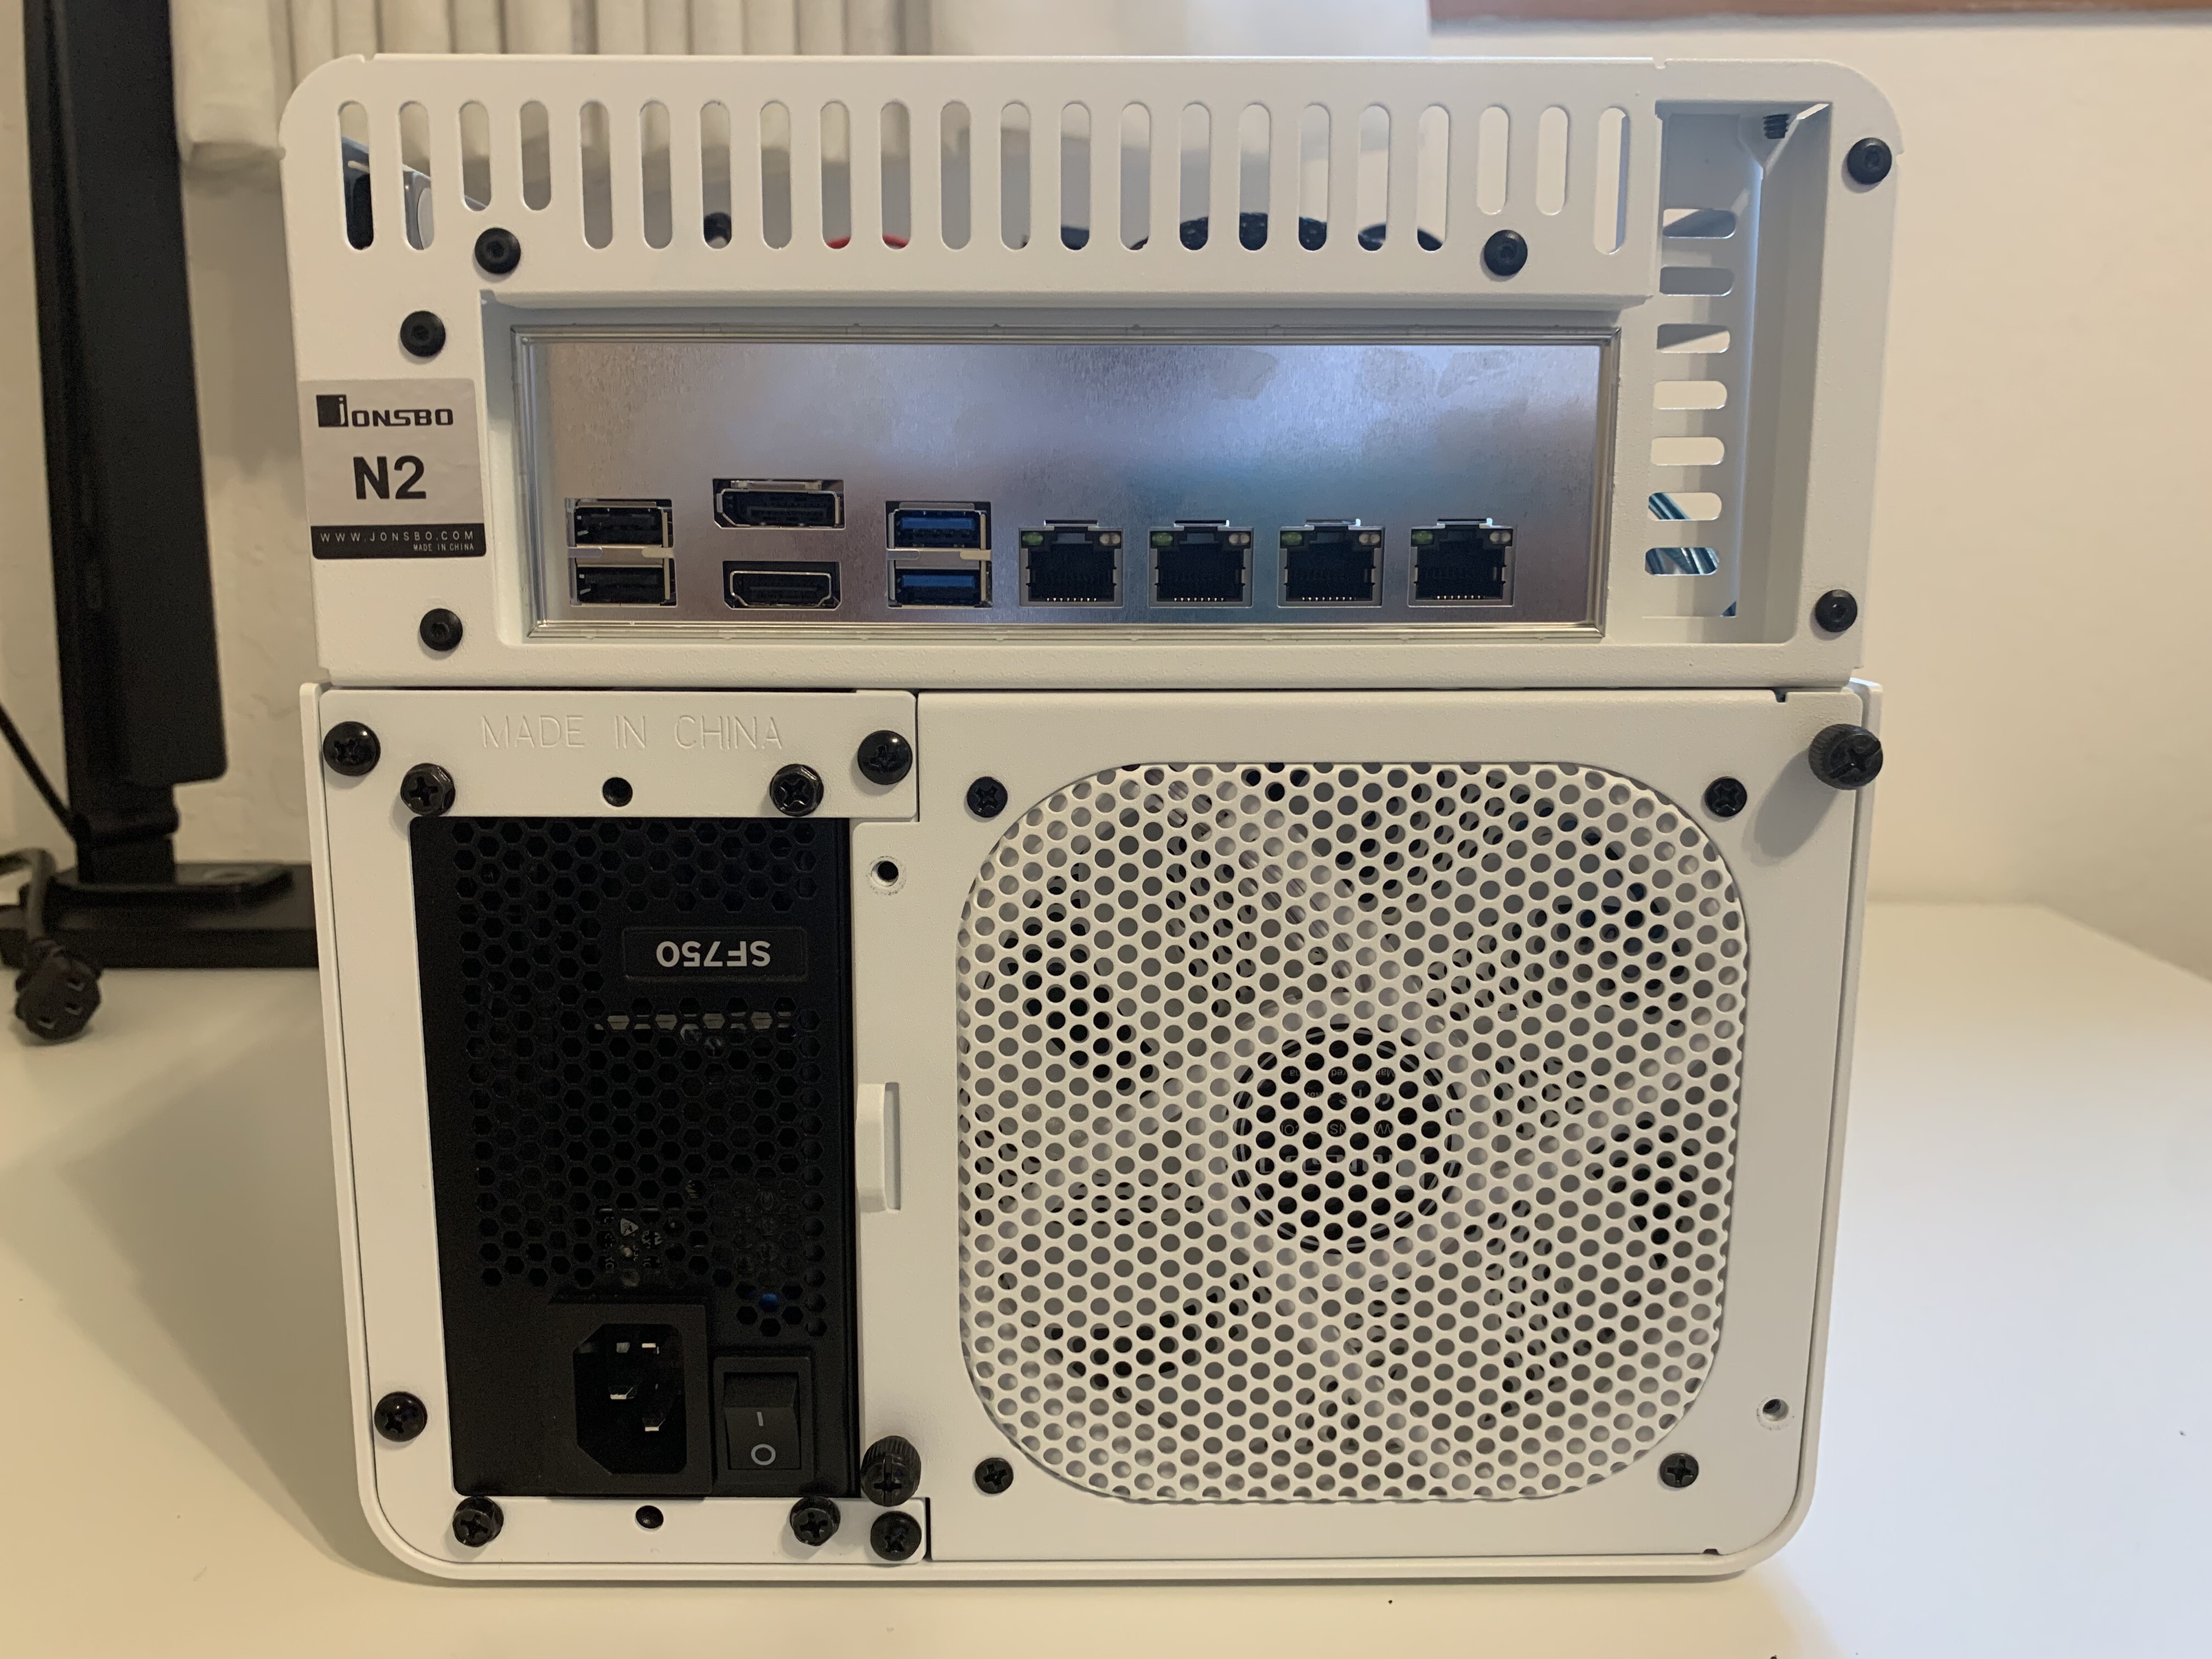
| Case | Jonsbo N2 | $149.98 |
| Power supply | Corsair SF750 | $163.49 |
| SATA Cables | ADCAUDX 90 degree SATA cables | $13.88 |
That sums up to $532.34 before taxes. The power supply is probably overkill and you could save about $100 by going with a lower wattage one. I chose the Corsair SF750 because it was right there in front of me at a local computer parts store and because it does not spin up its fan until it is delivering 300W, implying that the power supply fan will likely never spin up. This eliminates one source of noise.
Additionally, I used 16gig+4gig SO-DIMM RAM sticks, a 500 GB M.2 NVME SSD, and various assorted disk drives all of which I had lying around. These components, excluding the disk drives, may add about $75 to the costs.
Optional
The case fan that comes with the Jonsbo N2 is quite noisy, in my opinion. Replacing it with the Noctua fan below makes the NAS almost silent. The finger grills are probably not needed; I just put them in to increase the airflow ever so slightly compared to the grill mesh that comes with the case.
| Component | Part | Price USD |
|---|---|---|
| Silent case fan | Noctua NF-A12x25 LS-PWM | $32.95 |
| Finger grills | coolerguys 120mm Black Finger Grills | $6.75 |
| Case fan mounting bracket | Custom 3D printed model | $45 (cheaper if you already have a 3D printer) |
| M2 SSD heatsink | MHQJRH M.2 2280 SSD heatsink | $8.99 |
Hardware build
I have not built computers in over a decade. So it took me a while to wrap my head around various power and case connectors and the sequence in which everything should be assembled. I’ll lay out the sequence of assembly steps that ultimately worked for me.
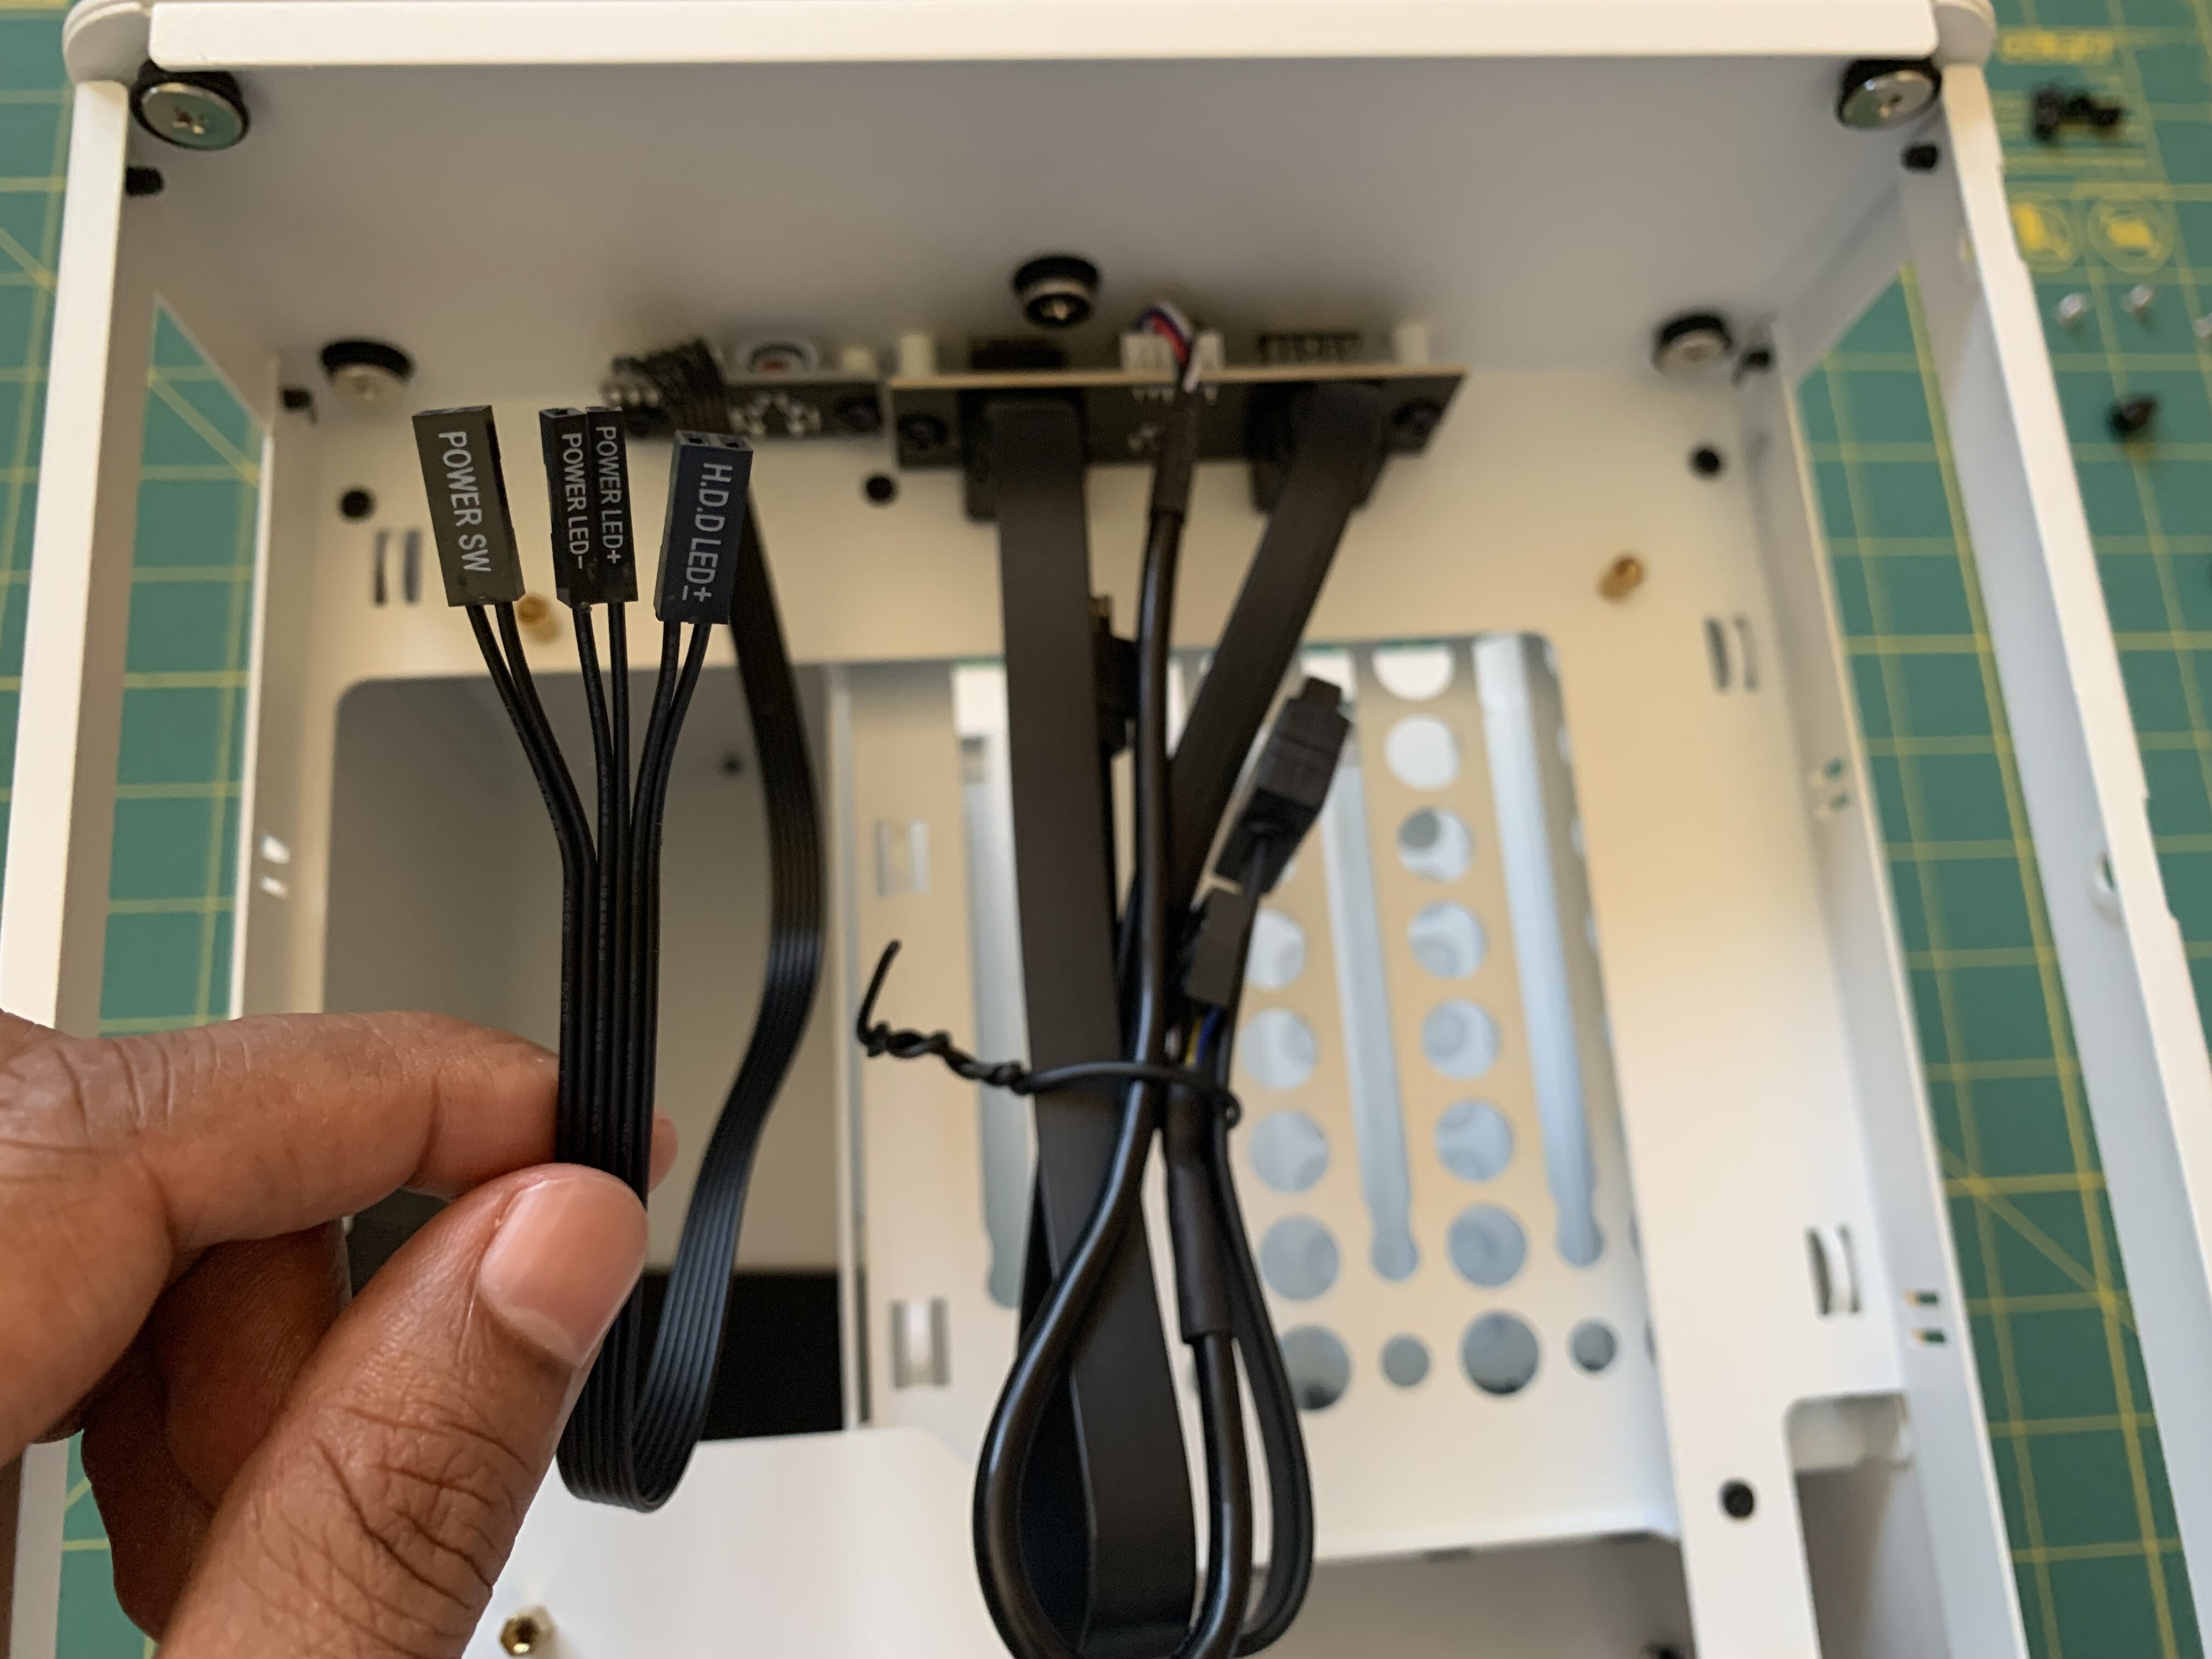
Begin by isolating the cable that connects to the case Power Switch, Power LED, and HDD LED. This is the only case related cable we’ll need since the motherboard does not have connectors for the USB and audio ports at the front of the case.
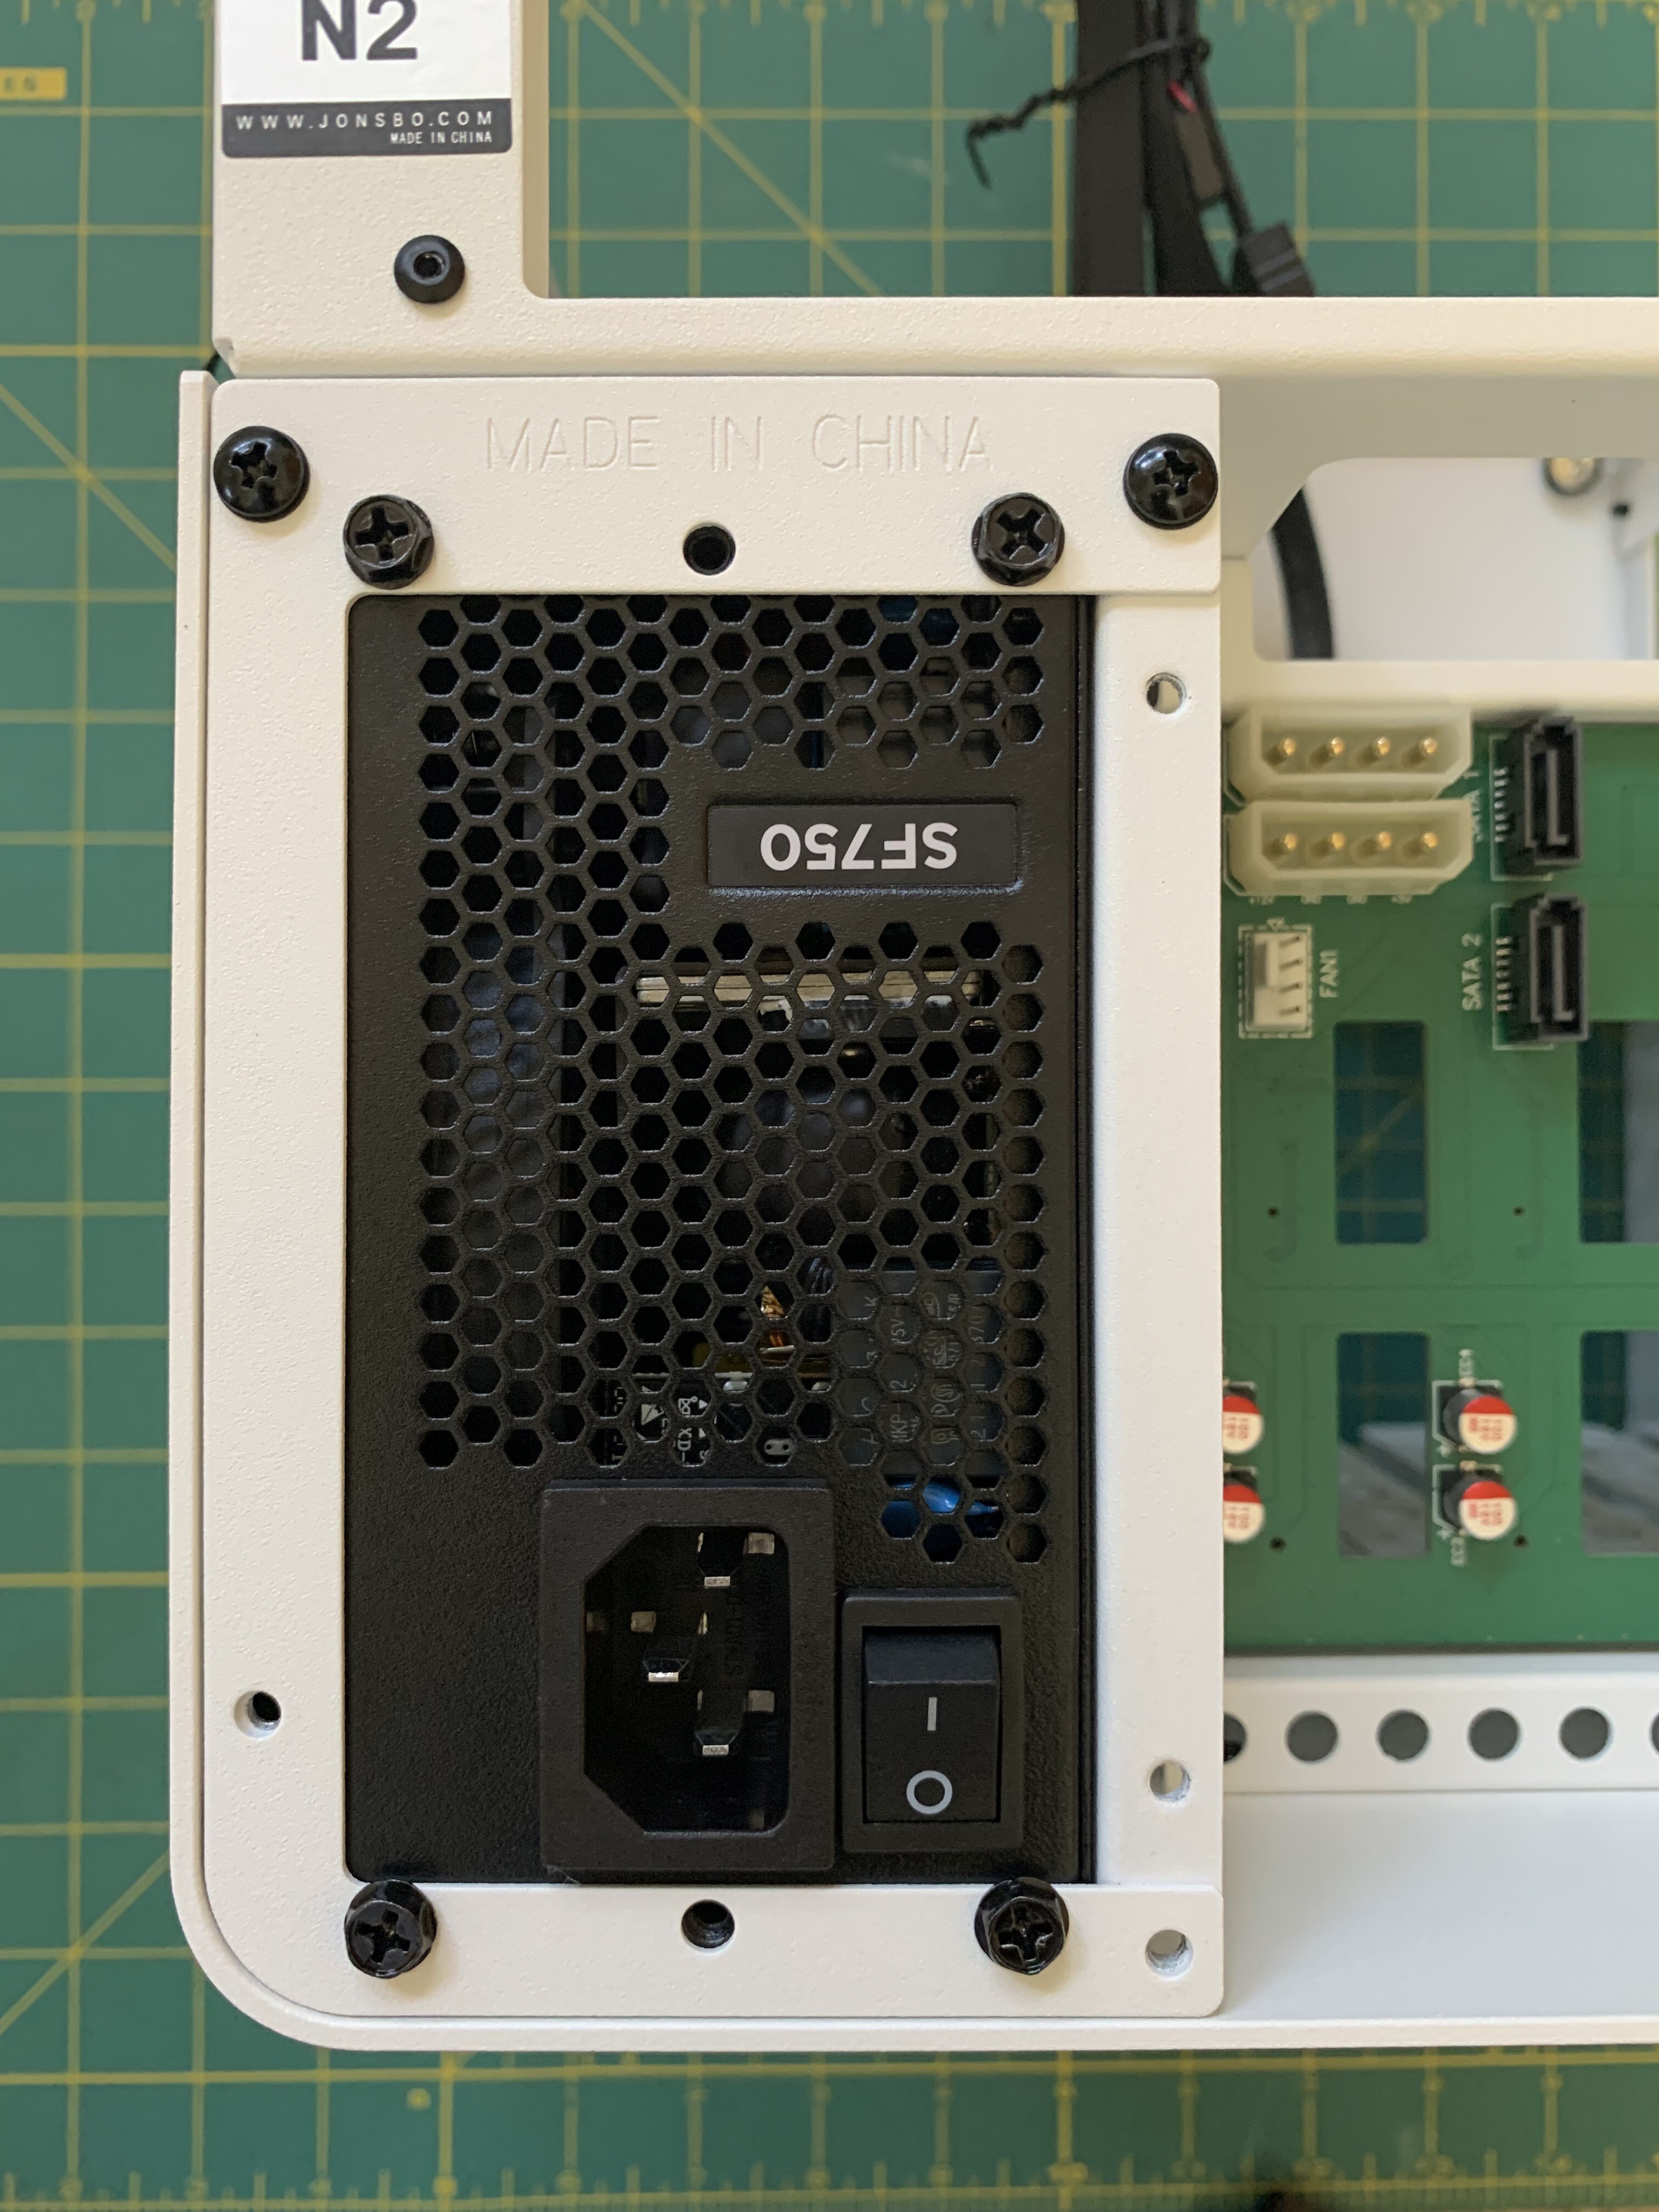
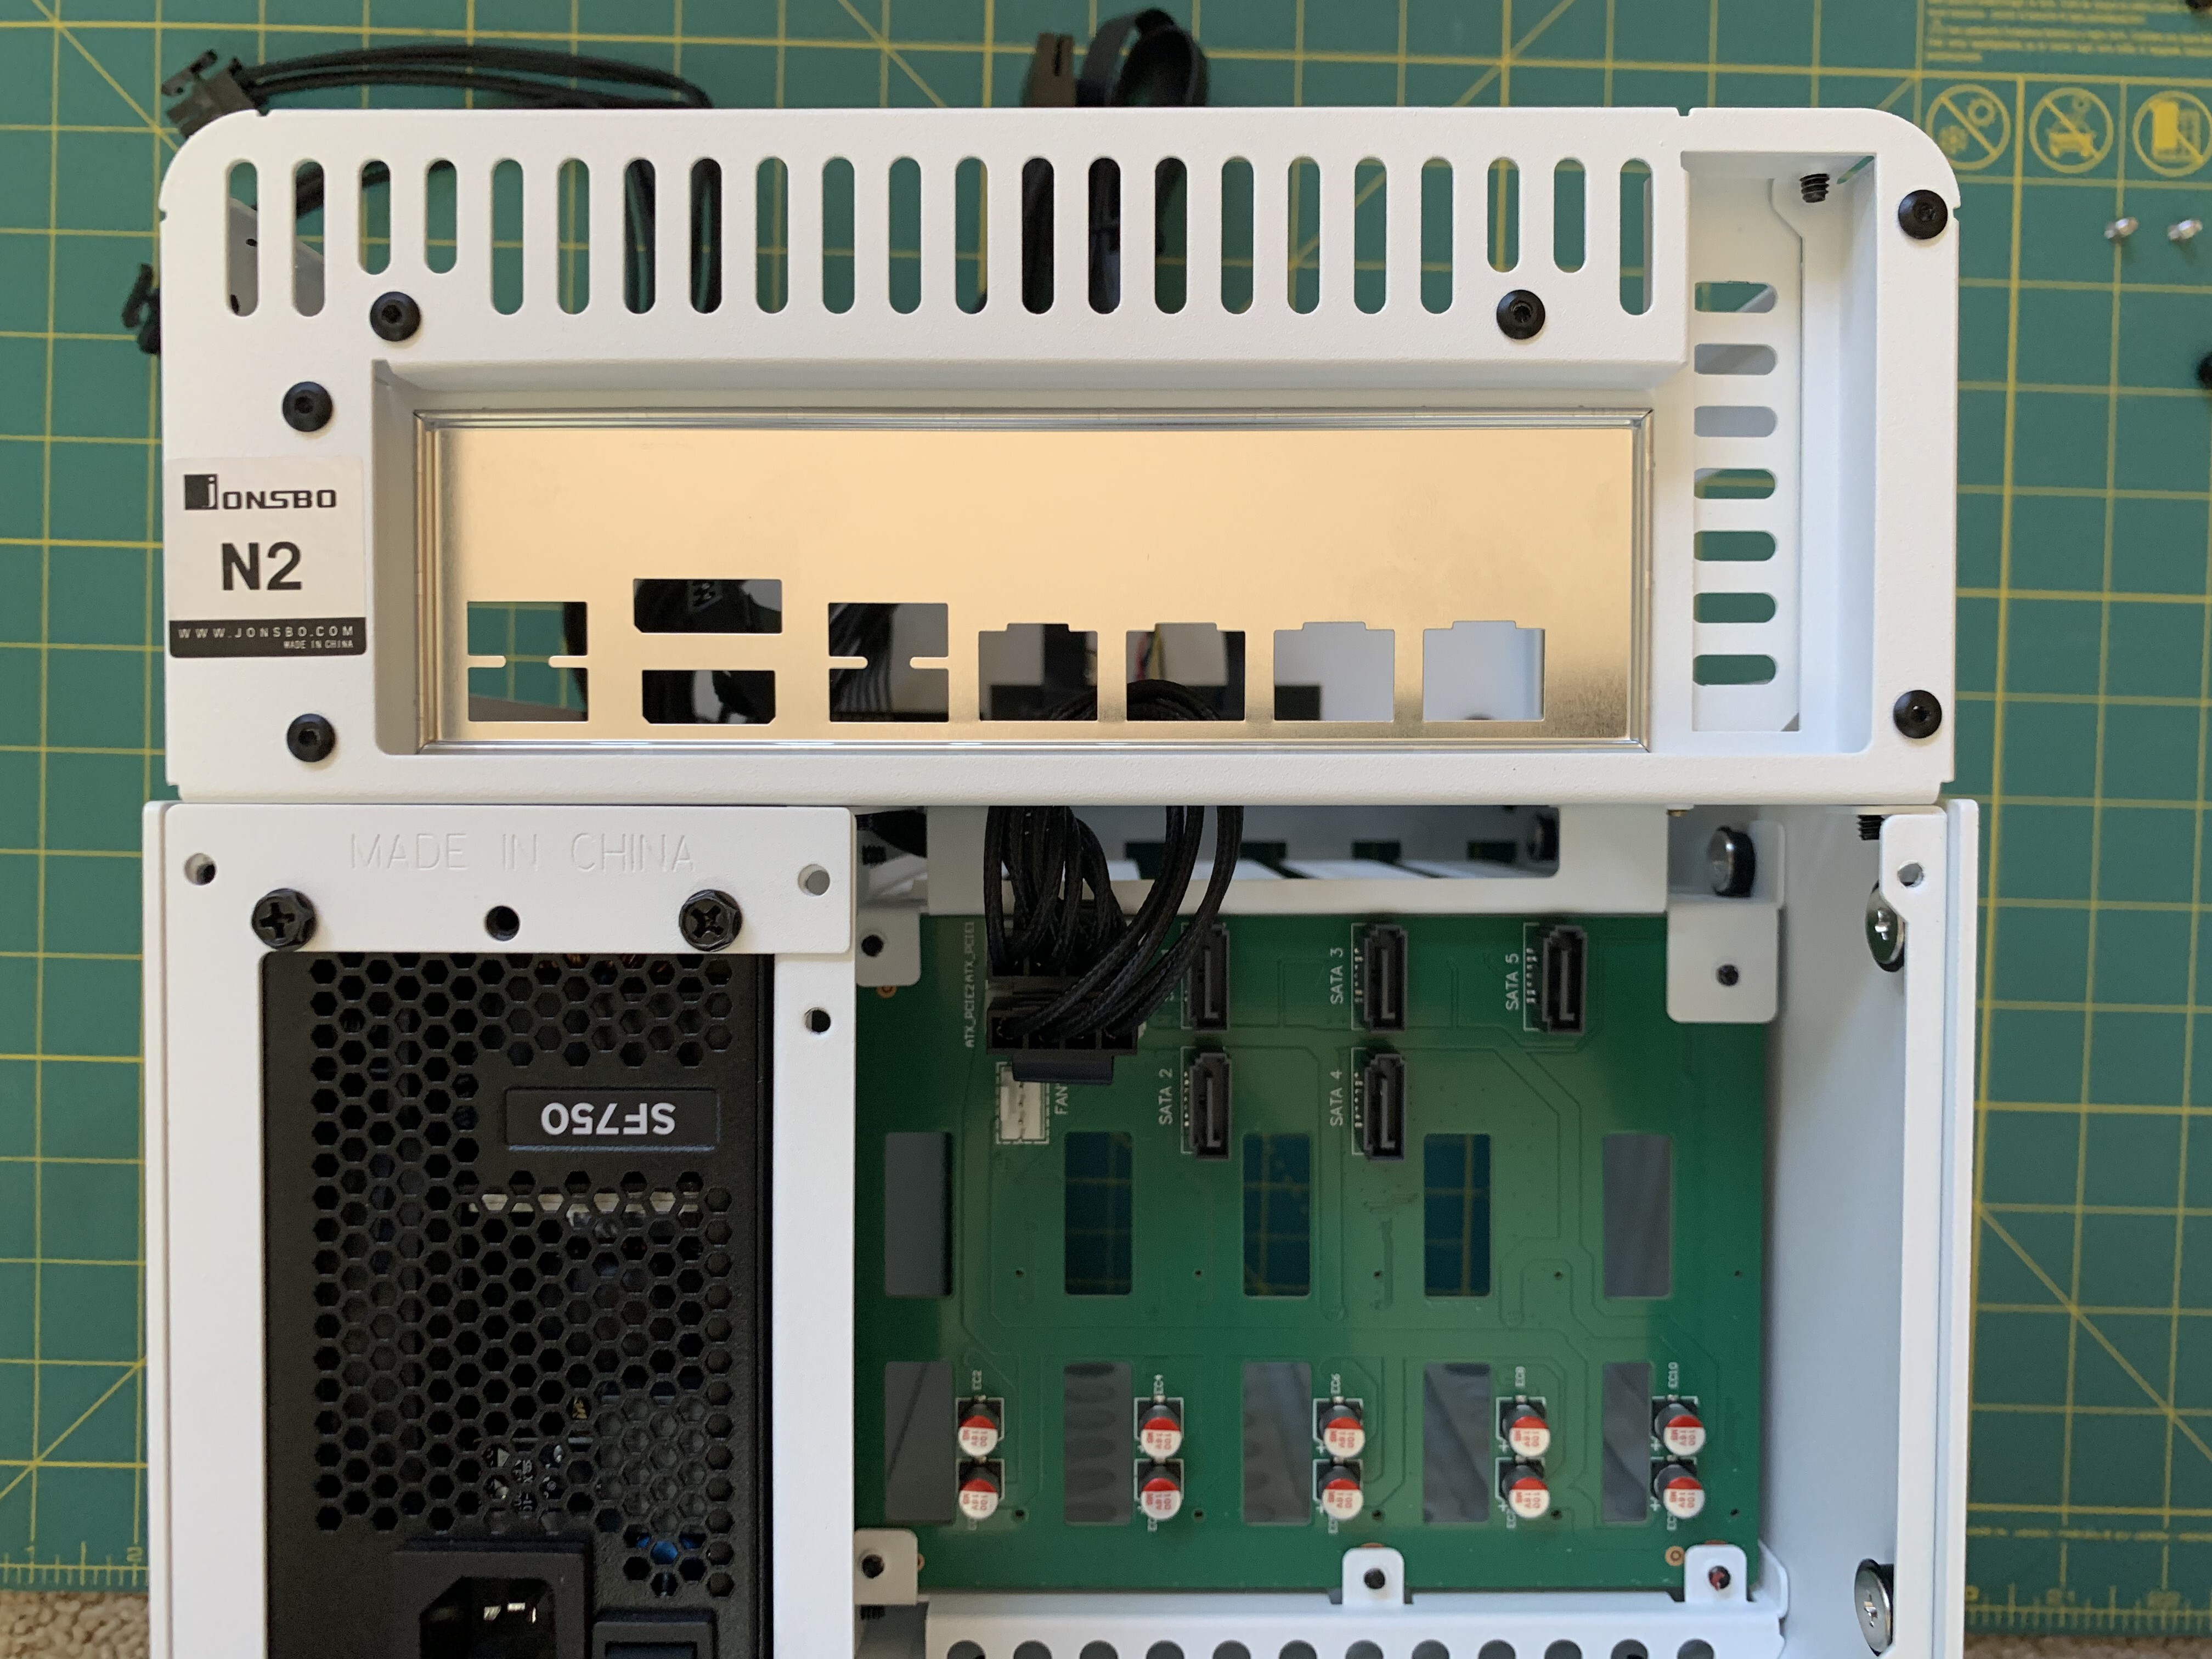
Unscrew the bracket used to attach the power supply from the rear of the case. Attach the power supply to it

and ensure that the power supply + bracket slides freely back into the case as shown below. However, don’t screw it to the case just yet because we first need to attach various power supply cables to the rear of the power supply.
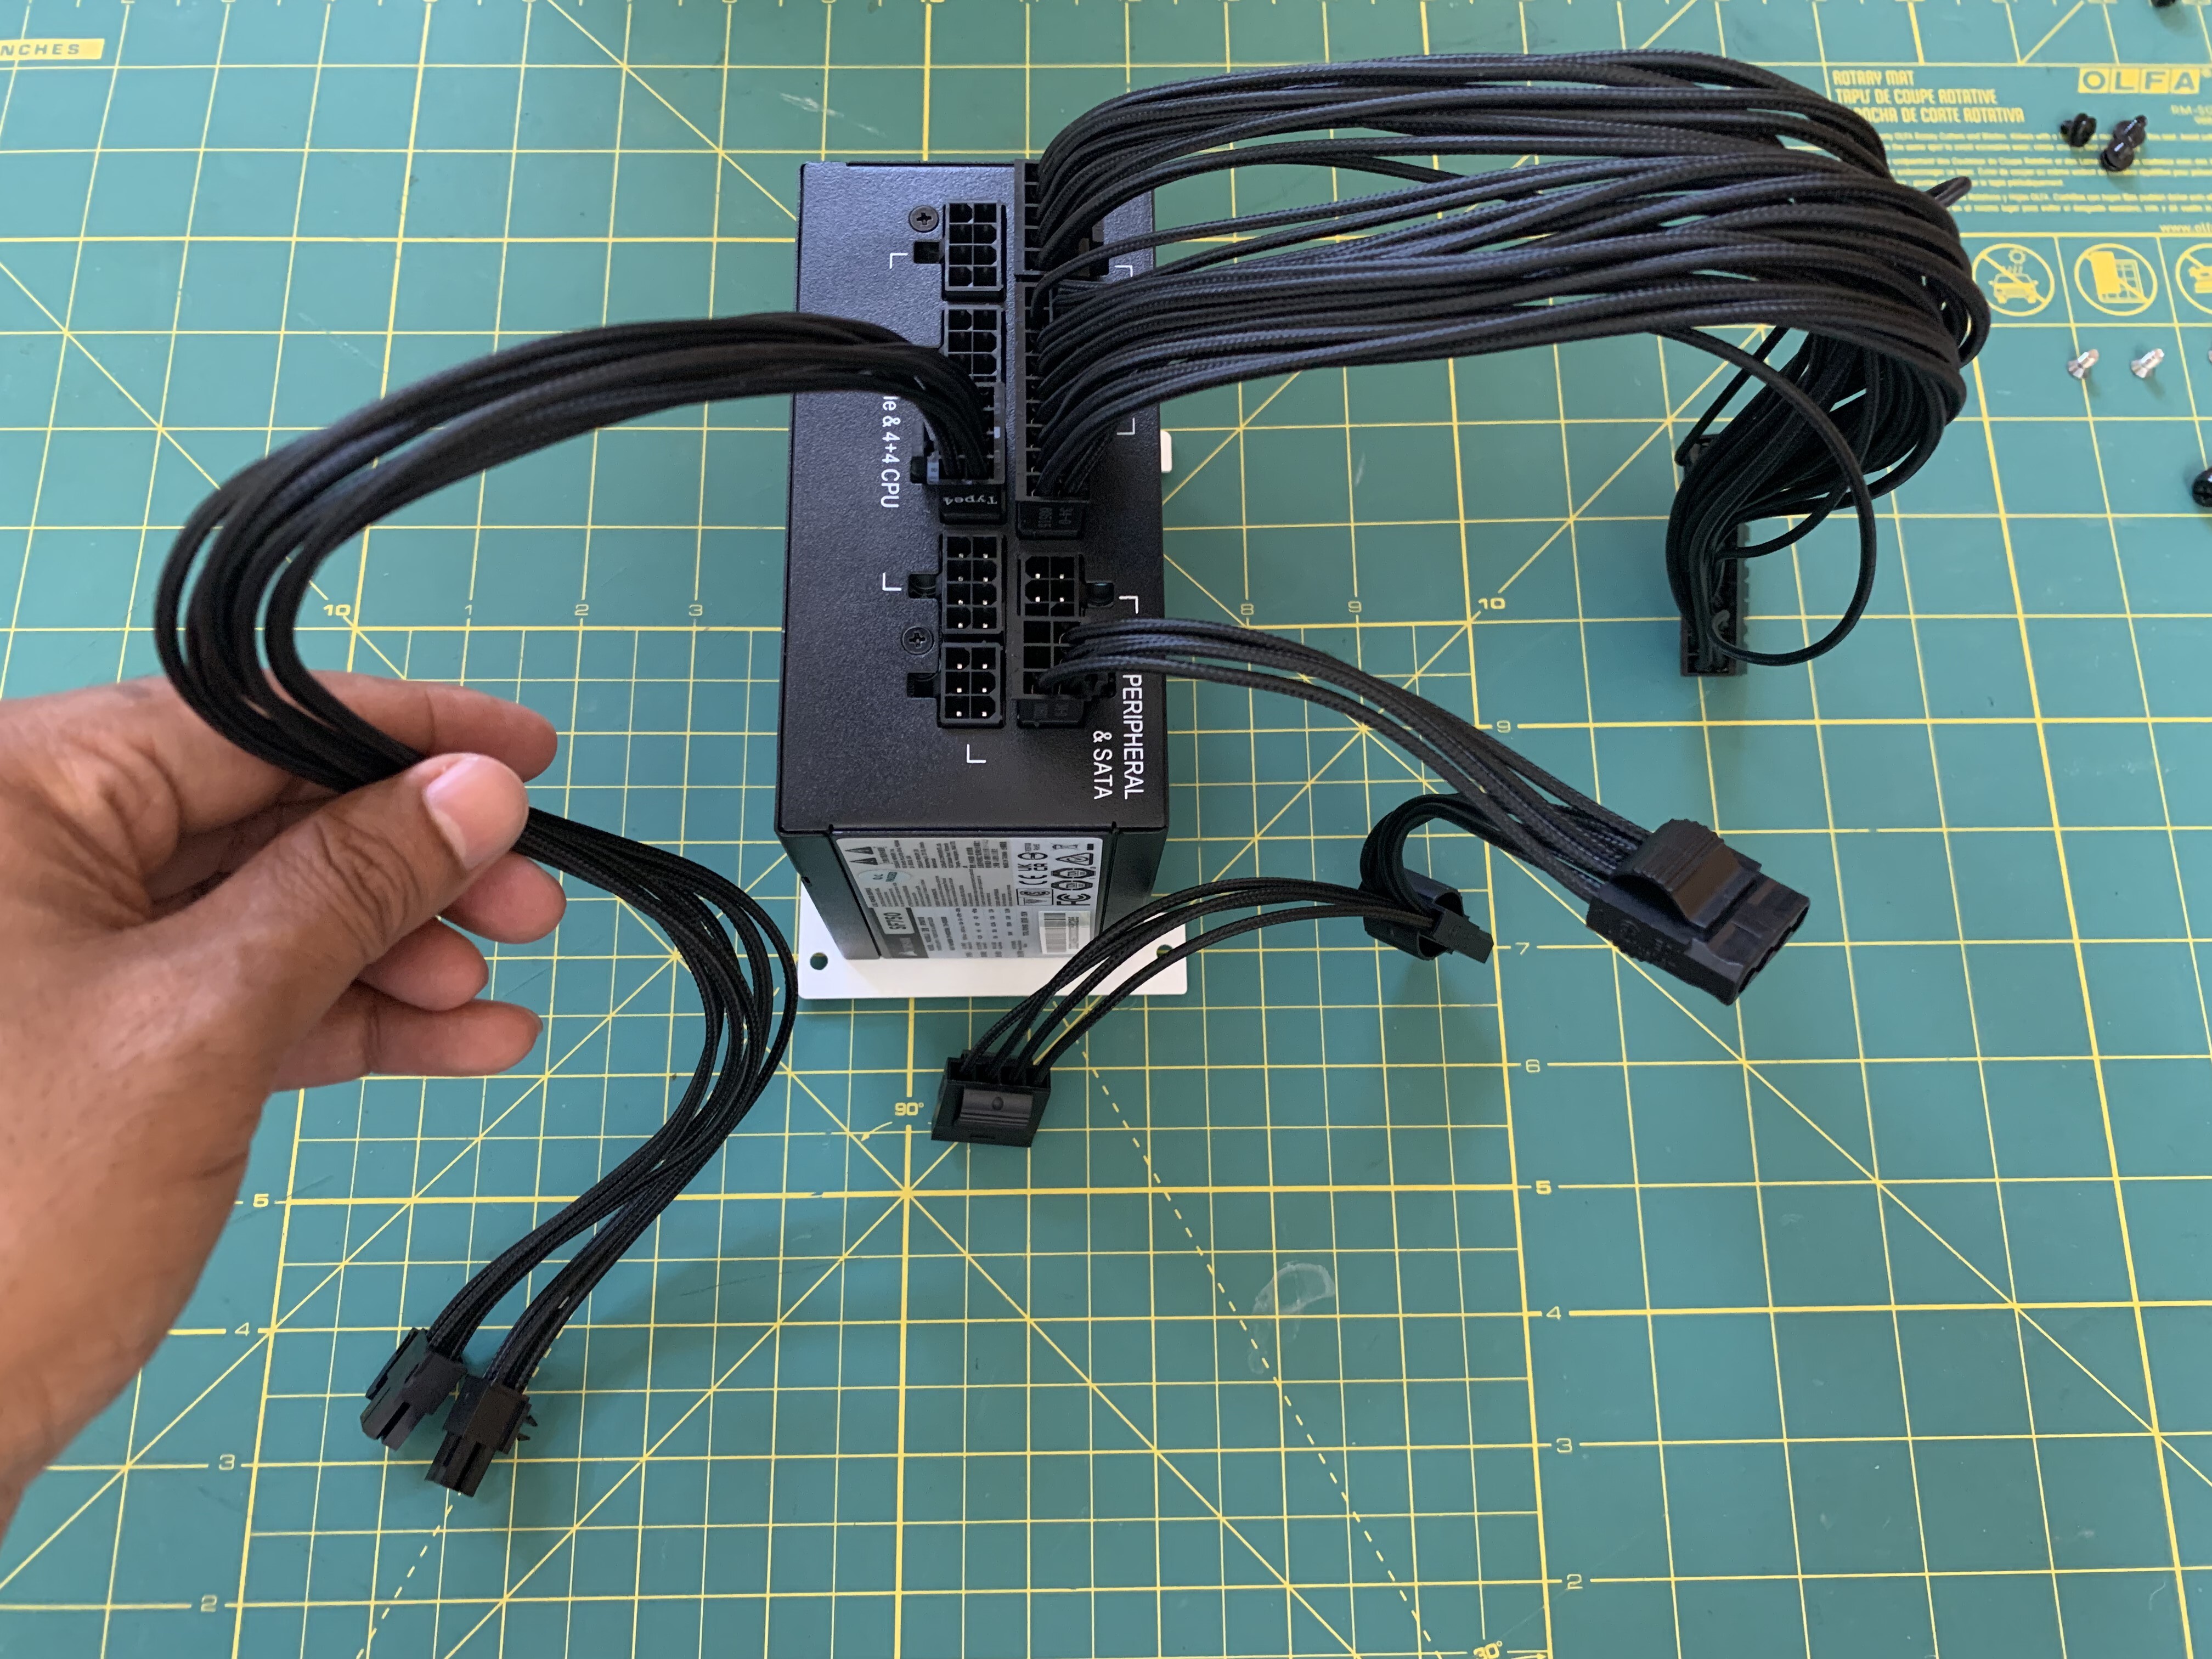
The power supply comes with a lot of cables and it took me a while to figure out which ones were needed. We only need 4 cables.
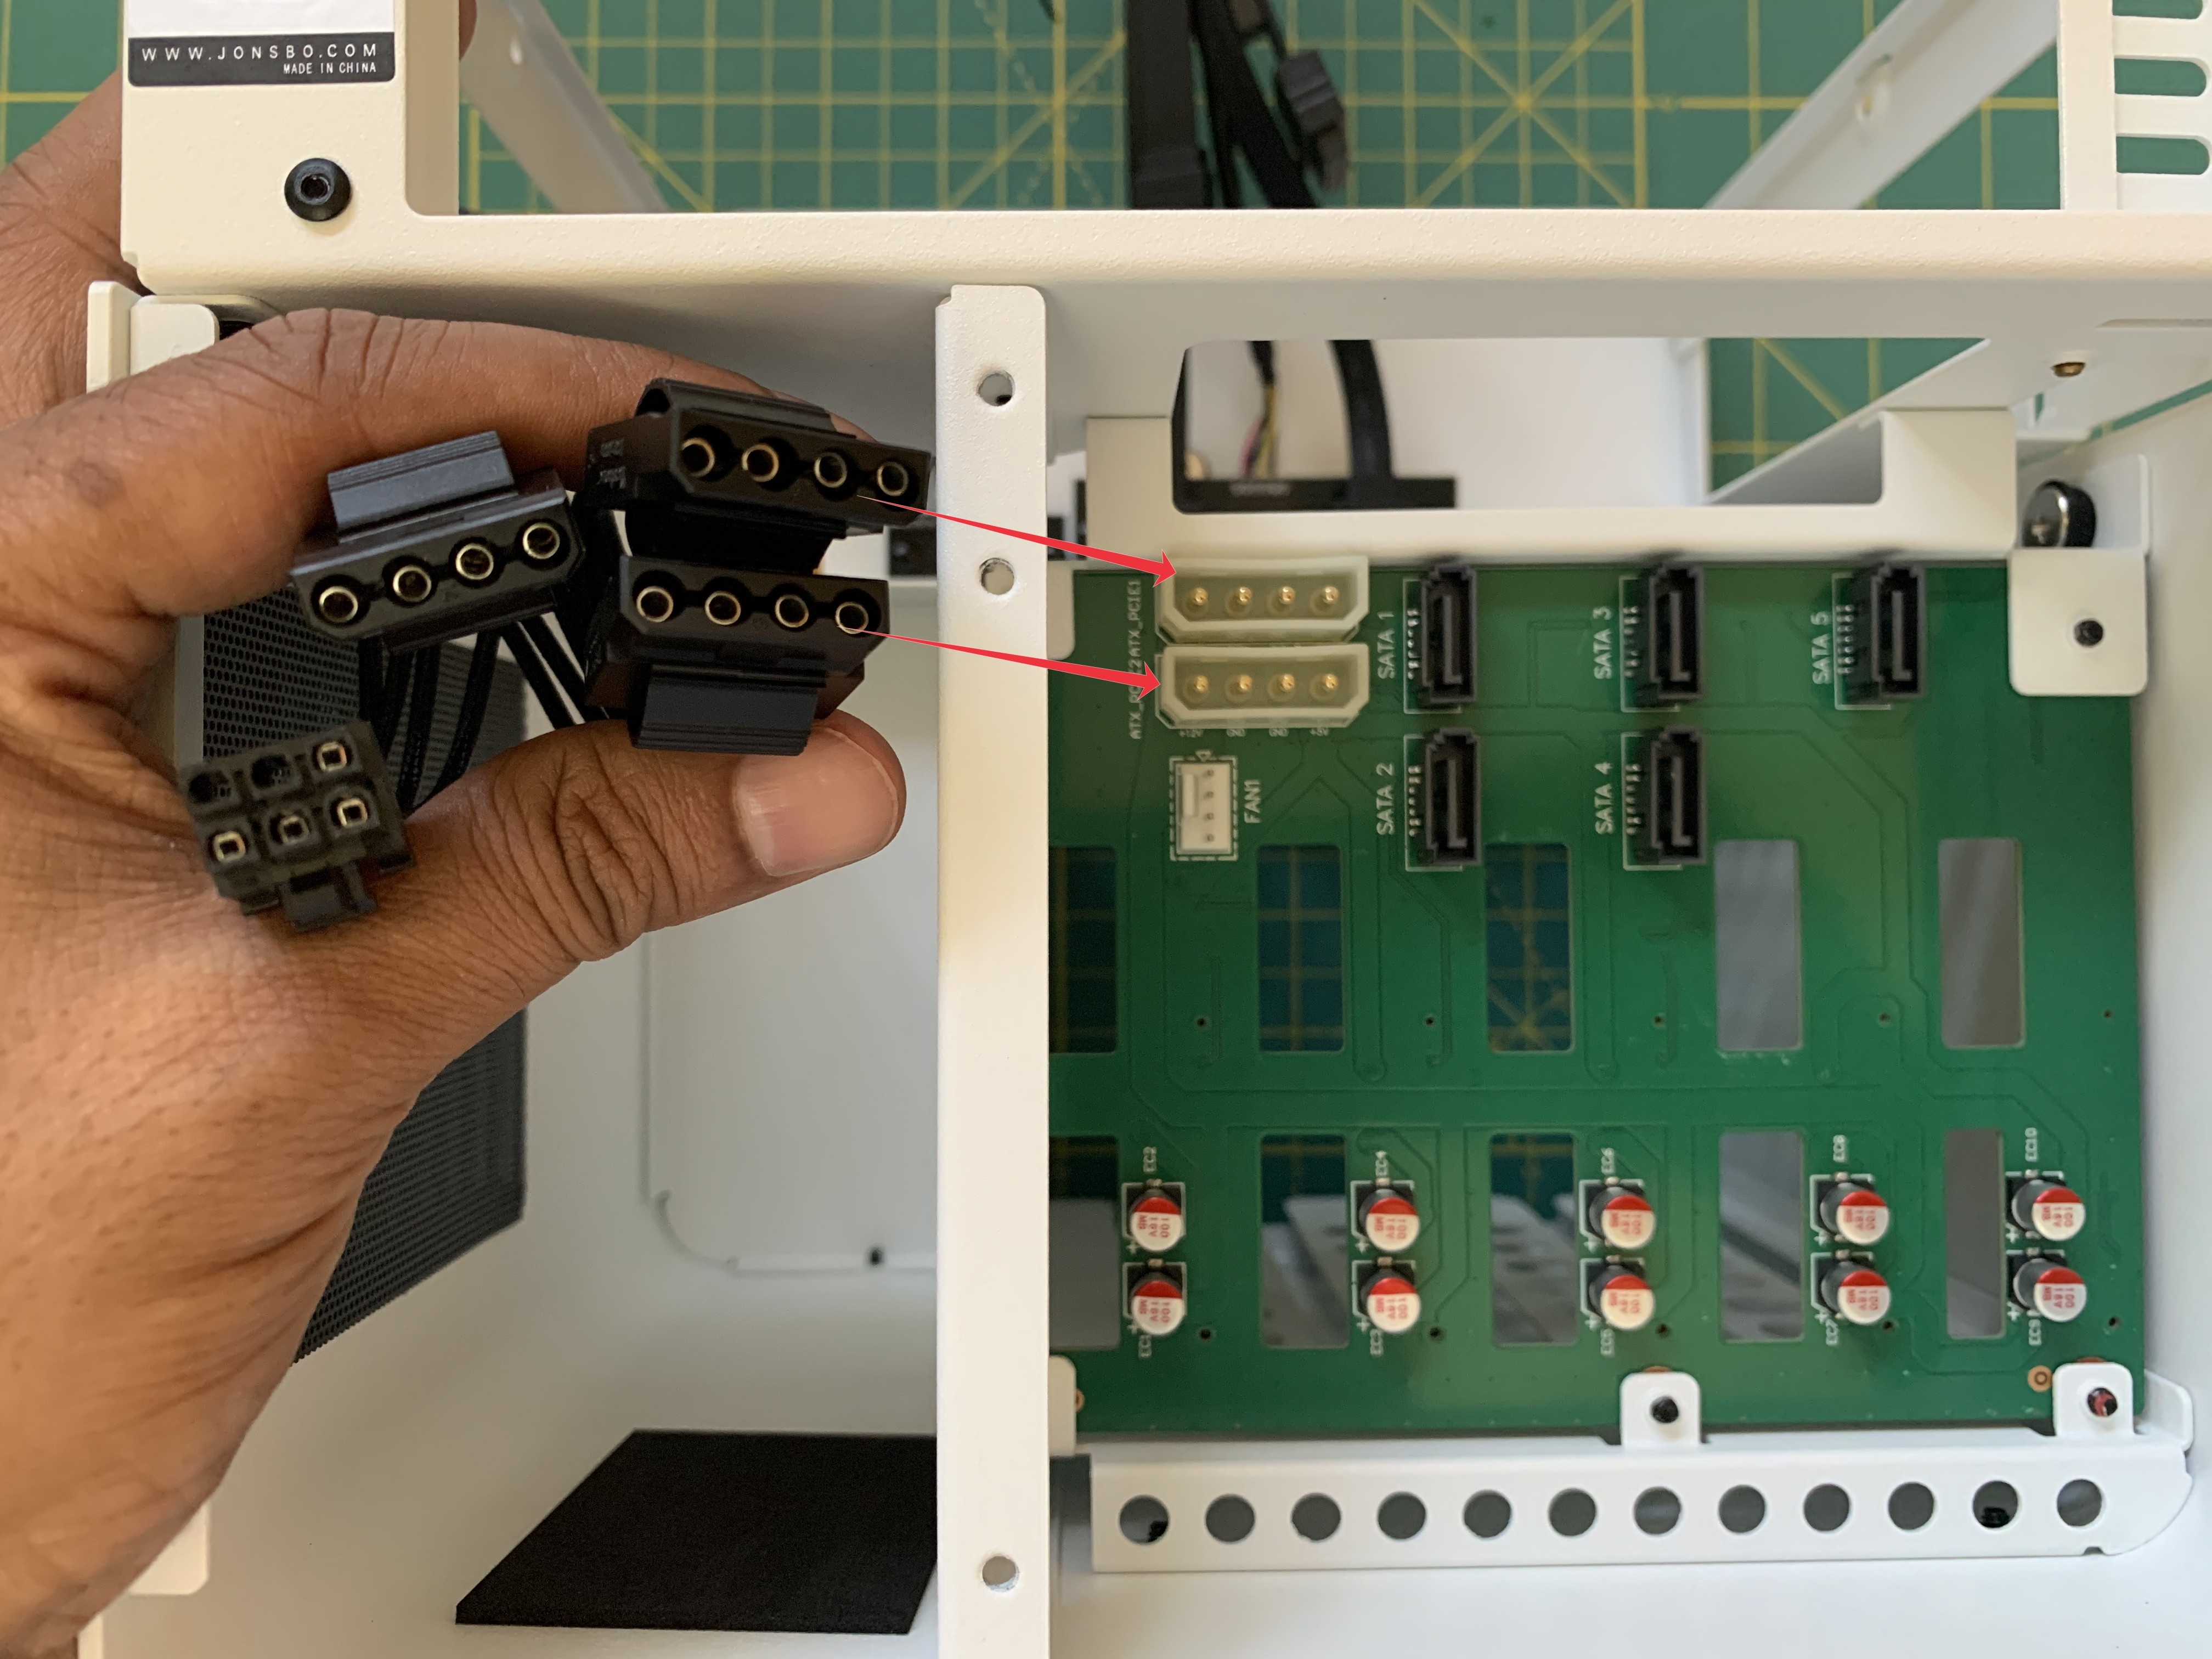
The first cable we’ll need has a bunch of molex connectors at one end and a 6-pin connector at the other end. See image below. Insert two of the molex connectors into the SATA backplane and the 6-pin connector at the other end of the cable into the back of the power supply. Any socket in the rear of the power supply where this 6-pin connector will fit is probably fine. I selected the socket which is closest to the two molex connectors on the SATA backplane.
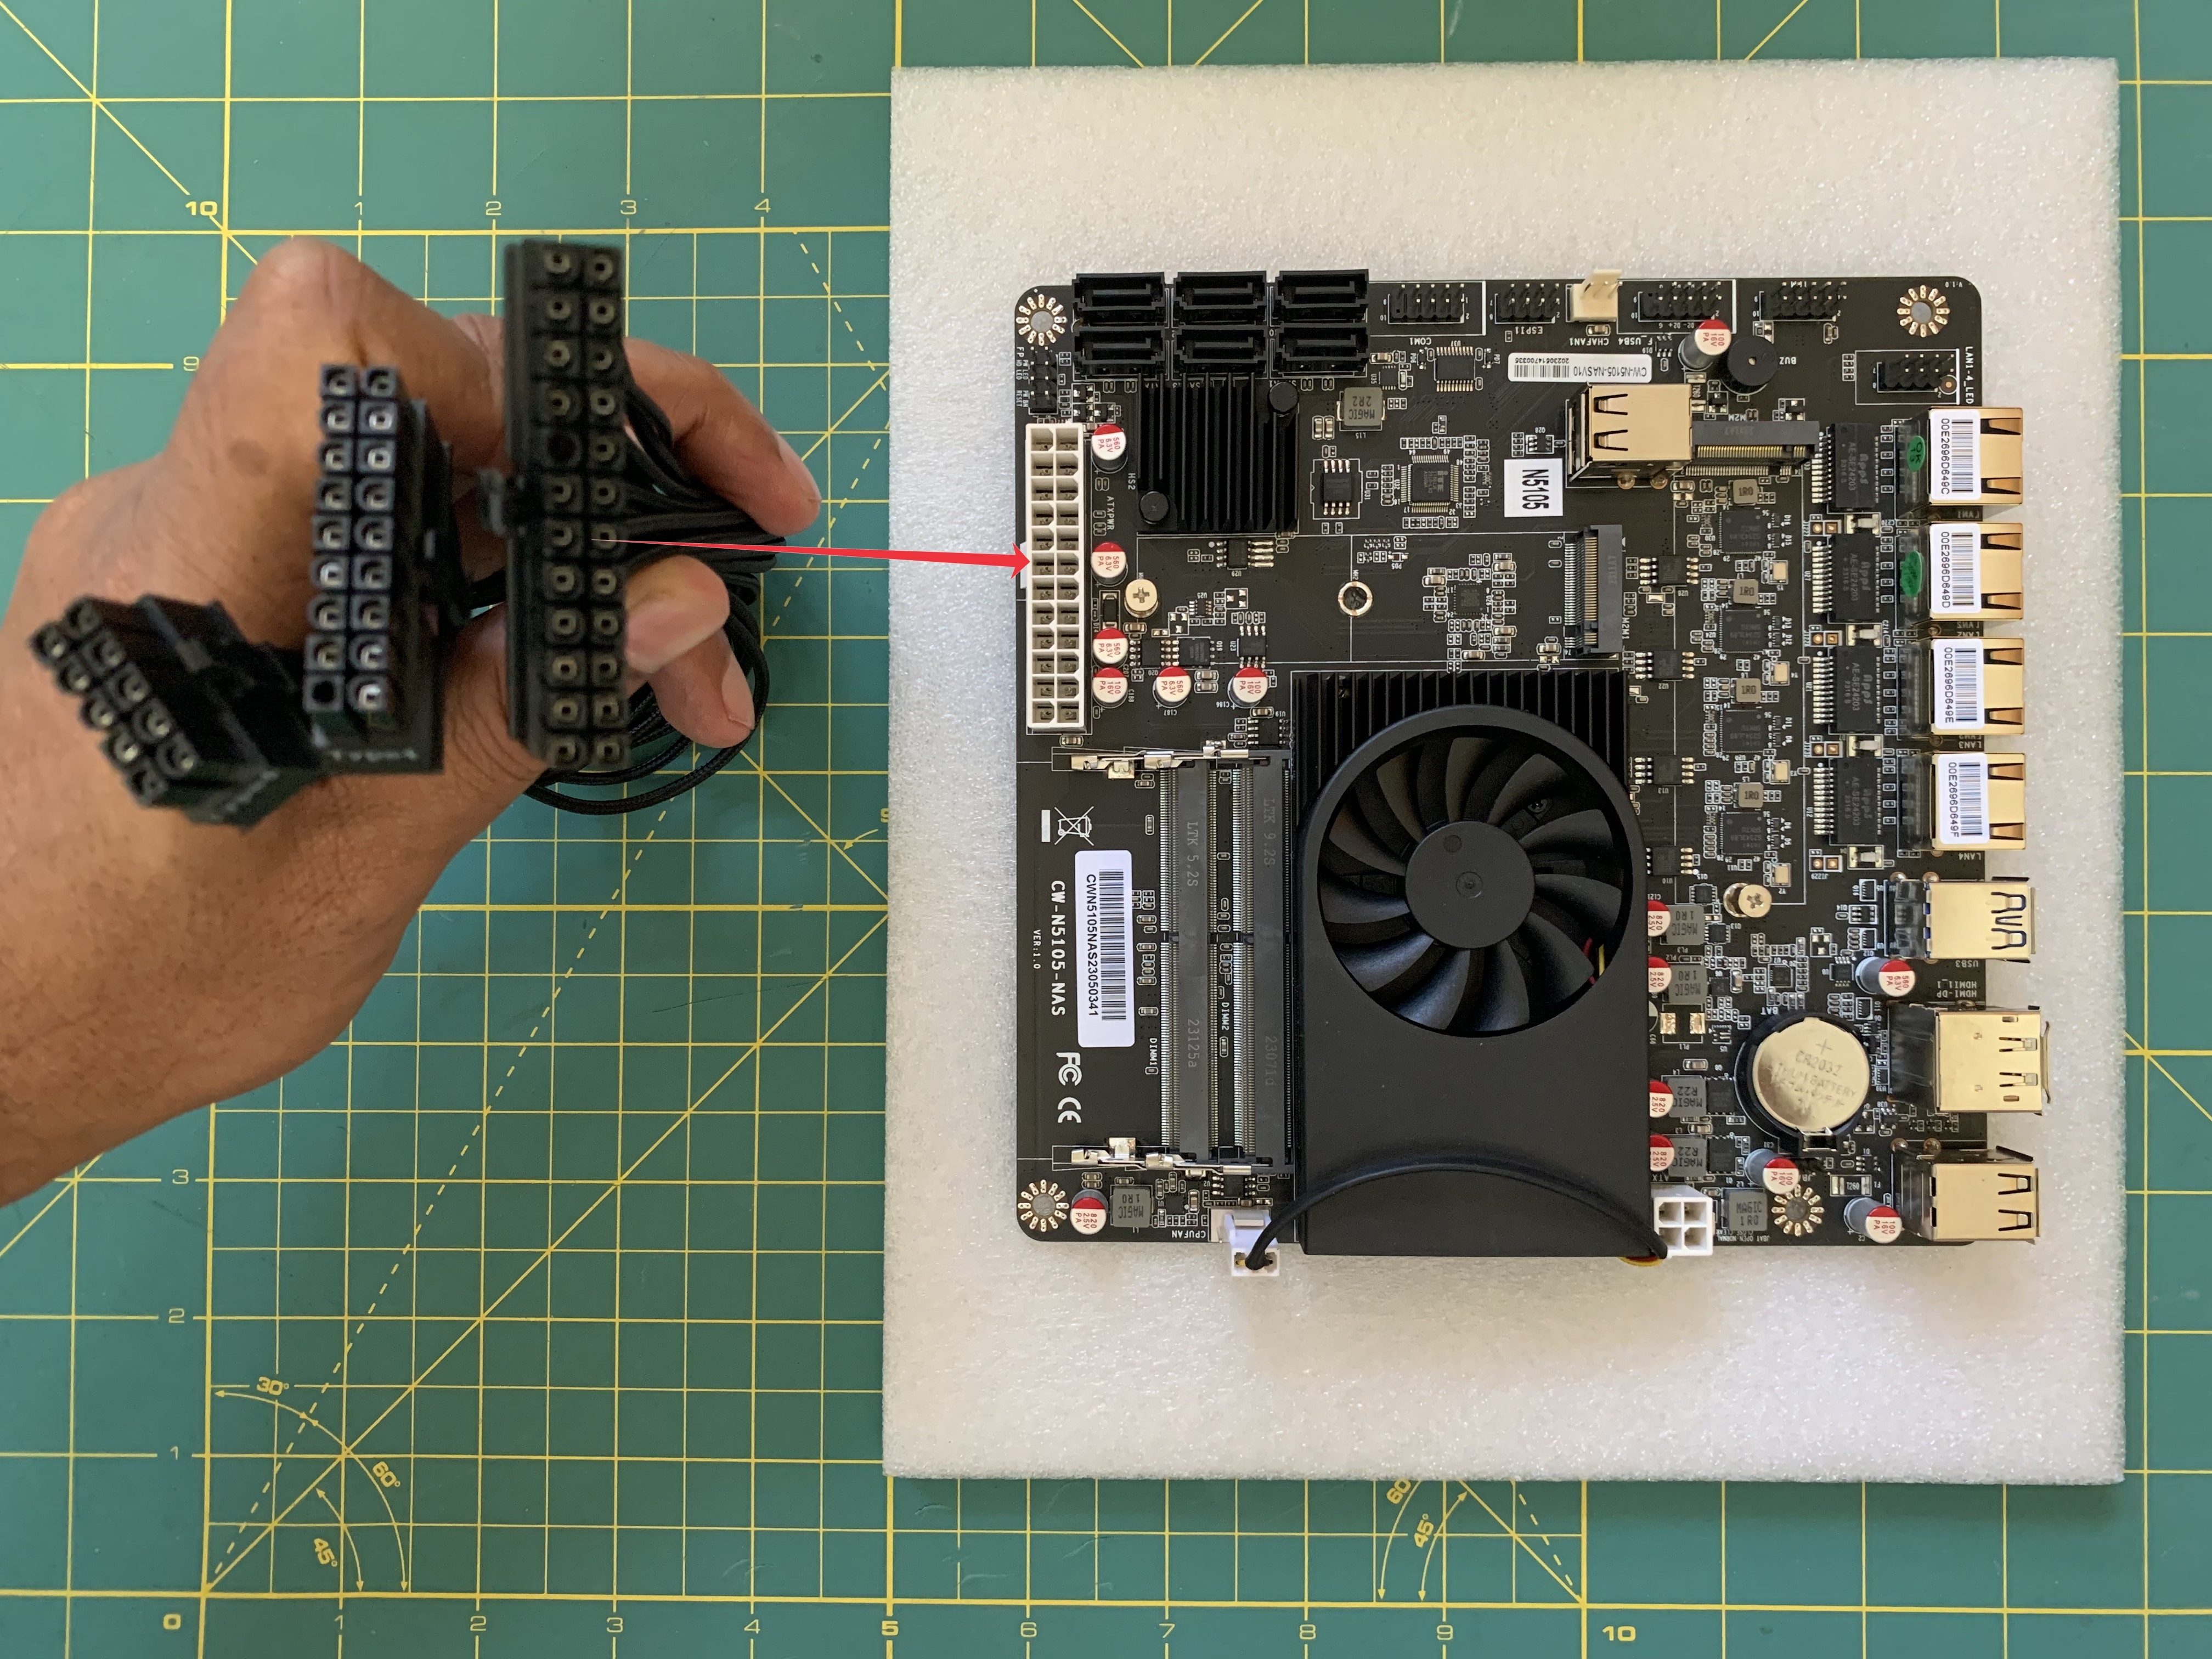
The second cable will have a 24-pin connector that will attach to a 24 pin header on the motherboard. There is likely only one such cable and corresponding connector on the motherboard. The other end of the cable will have two connectors that go to the back of the power supply. Again, for the power supply, any port the connectors fit into should be fine.
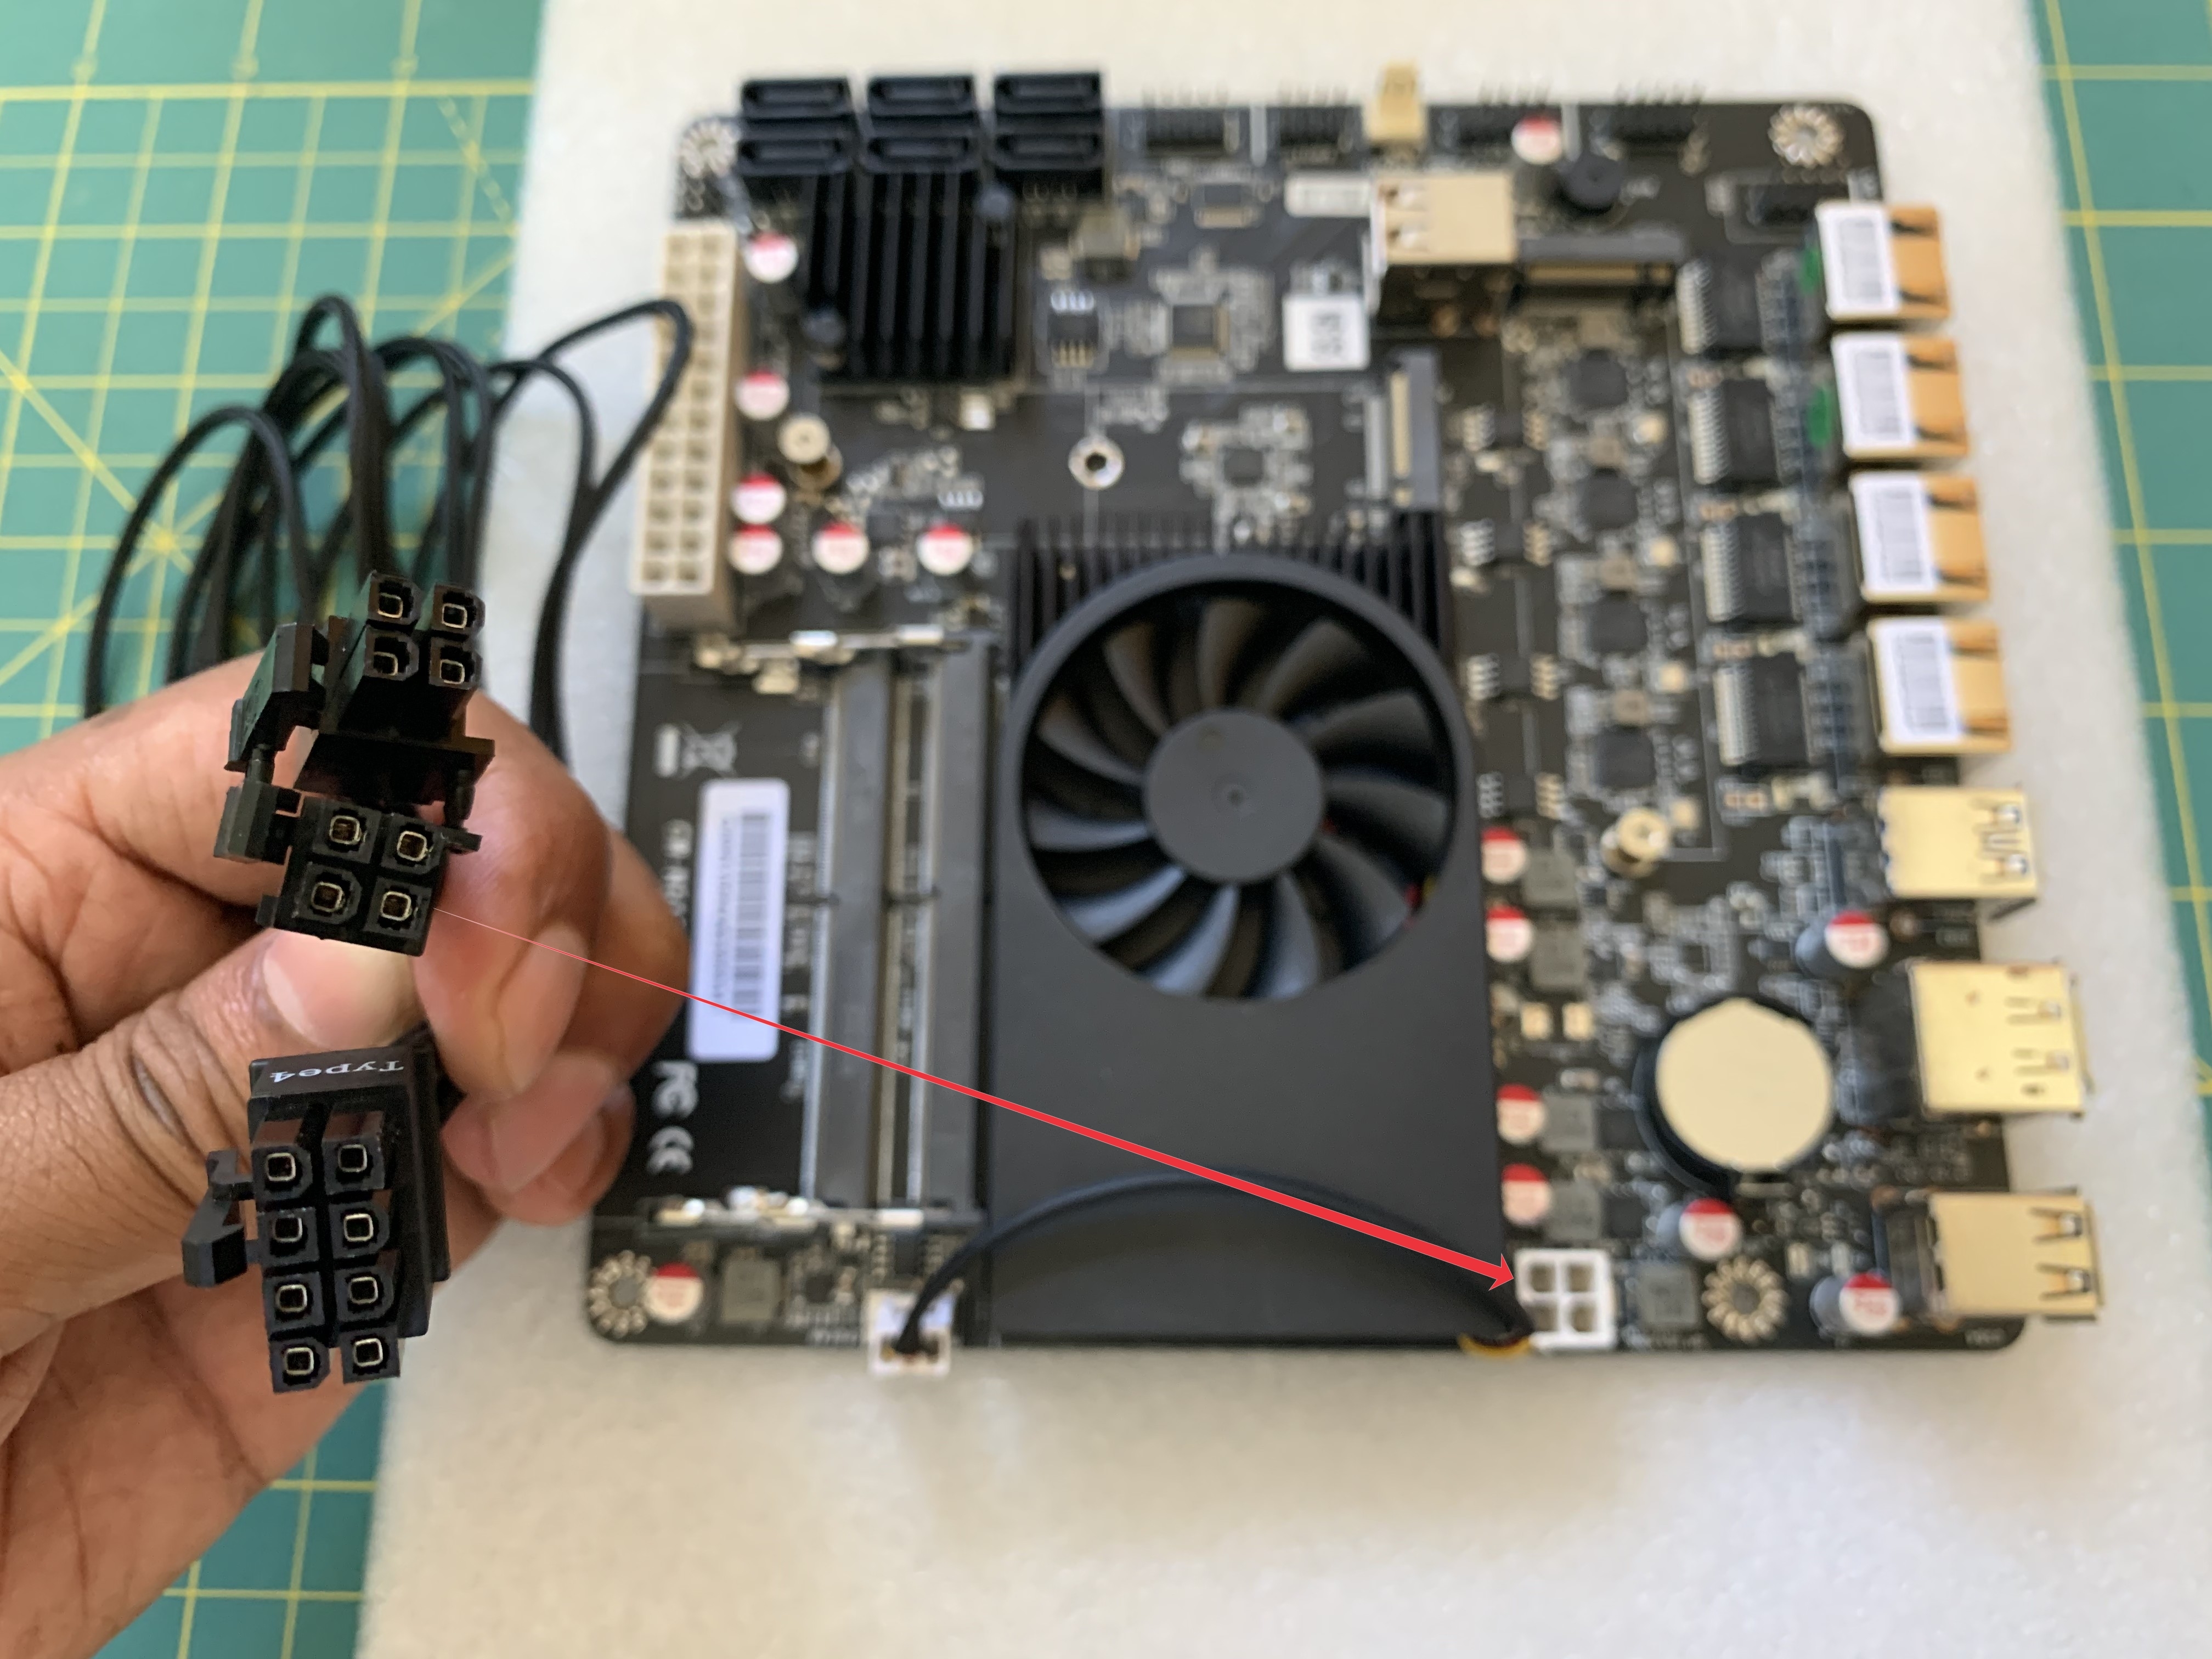
The third cable will have a pair of 4-pin connectors on one side and an 8-pin connector on the other side. Note that the pair of 4-pin connectors may come disguised as a single 8-pin connector that you need to “break apart”. Consult the manual of your power supply. The 8-pin connector will go to the power supply, while one of the 4-pin connectors will go to a corresponding port on the motherboard. The other 4-pin connector is not used.
Finally, an optional fourth cable to connect to the power supply unit would be a SATA cable needed for any 2.5" HDD you might install. Connect all these cables to the back of the power supply unit while it is still outside the case. In the photo below, you can see that I had forgotten to connect the aforementioned SATA cable for the 2.5" HDD. I realized this pretty late after the build was almost completed and had to take everything apart once again to connect the missing cable.
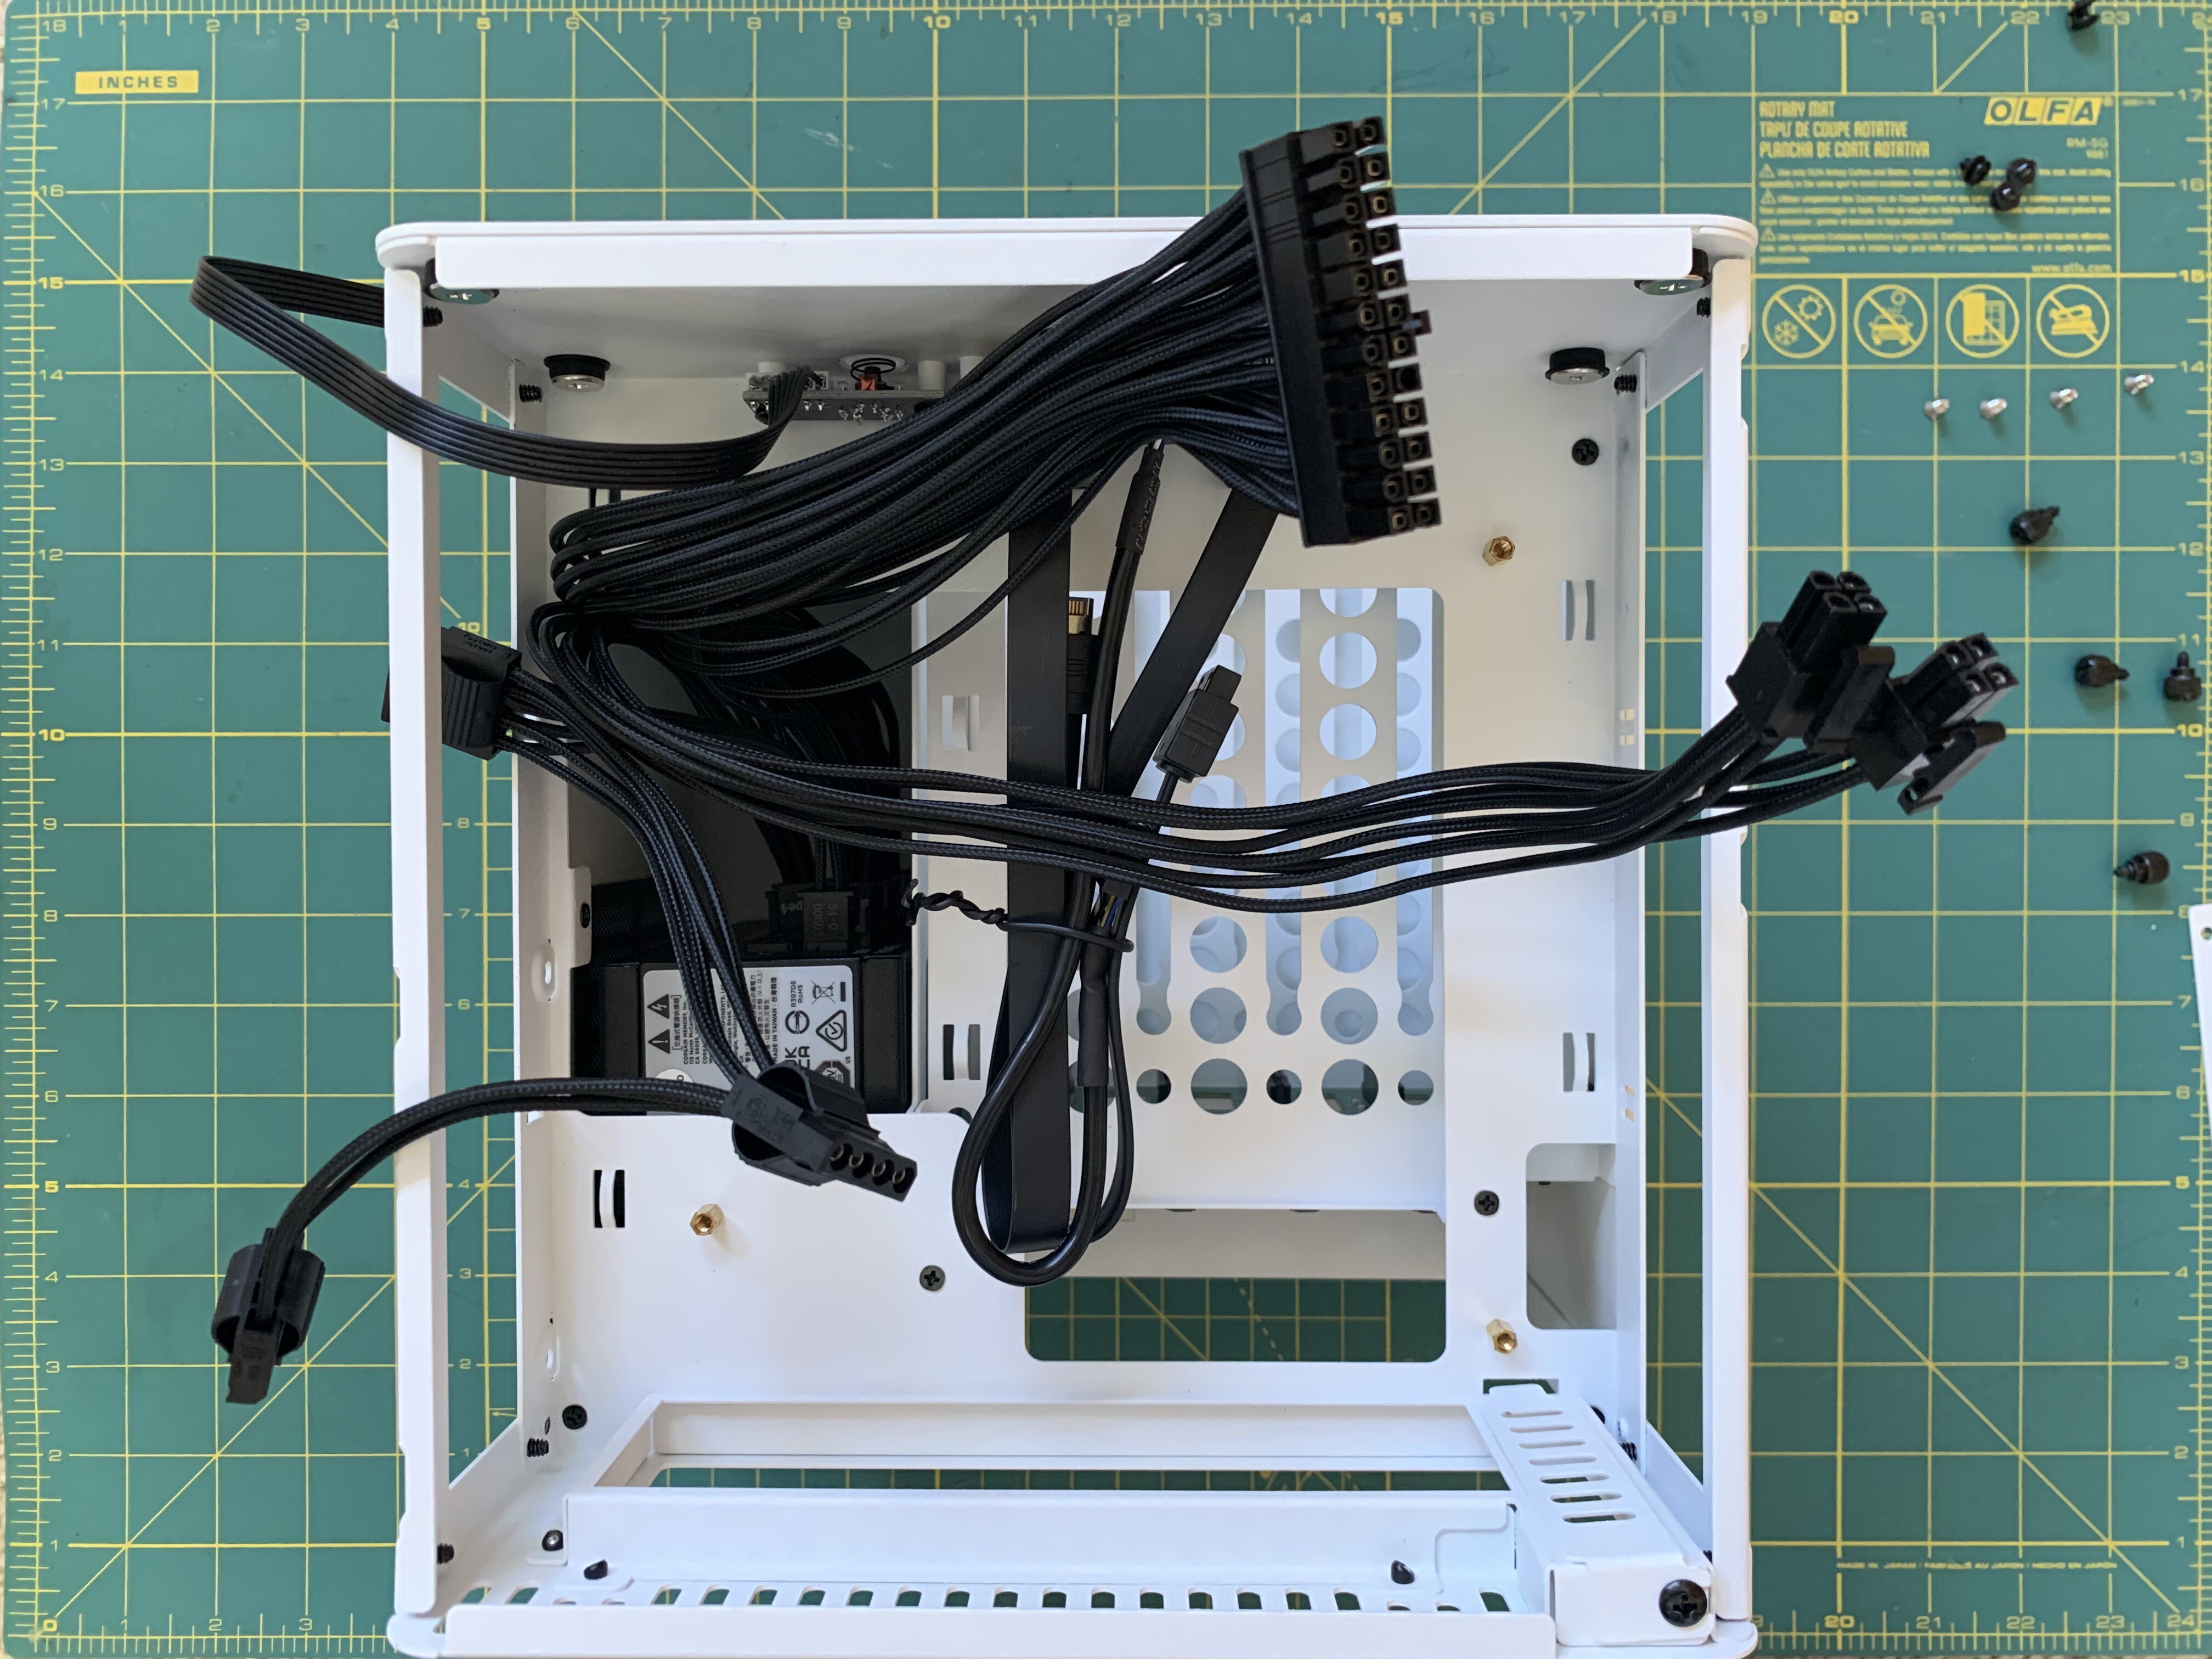
Once all the cables are connected, slide in the power supply into the case and pull out the cables through the space to the left.
Next, we plug in the molex connectors on the SATA backplane. In my case, the molex connectors that came with the power supply had a plastic “latch tab thingy” that prevented the connectors from going in side-by-side into the closely spaced molex connectors on the SATA backplane.
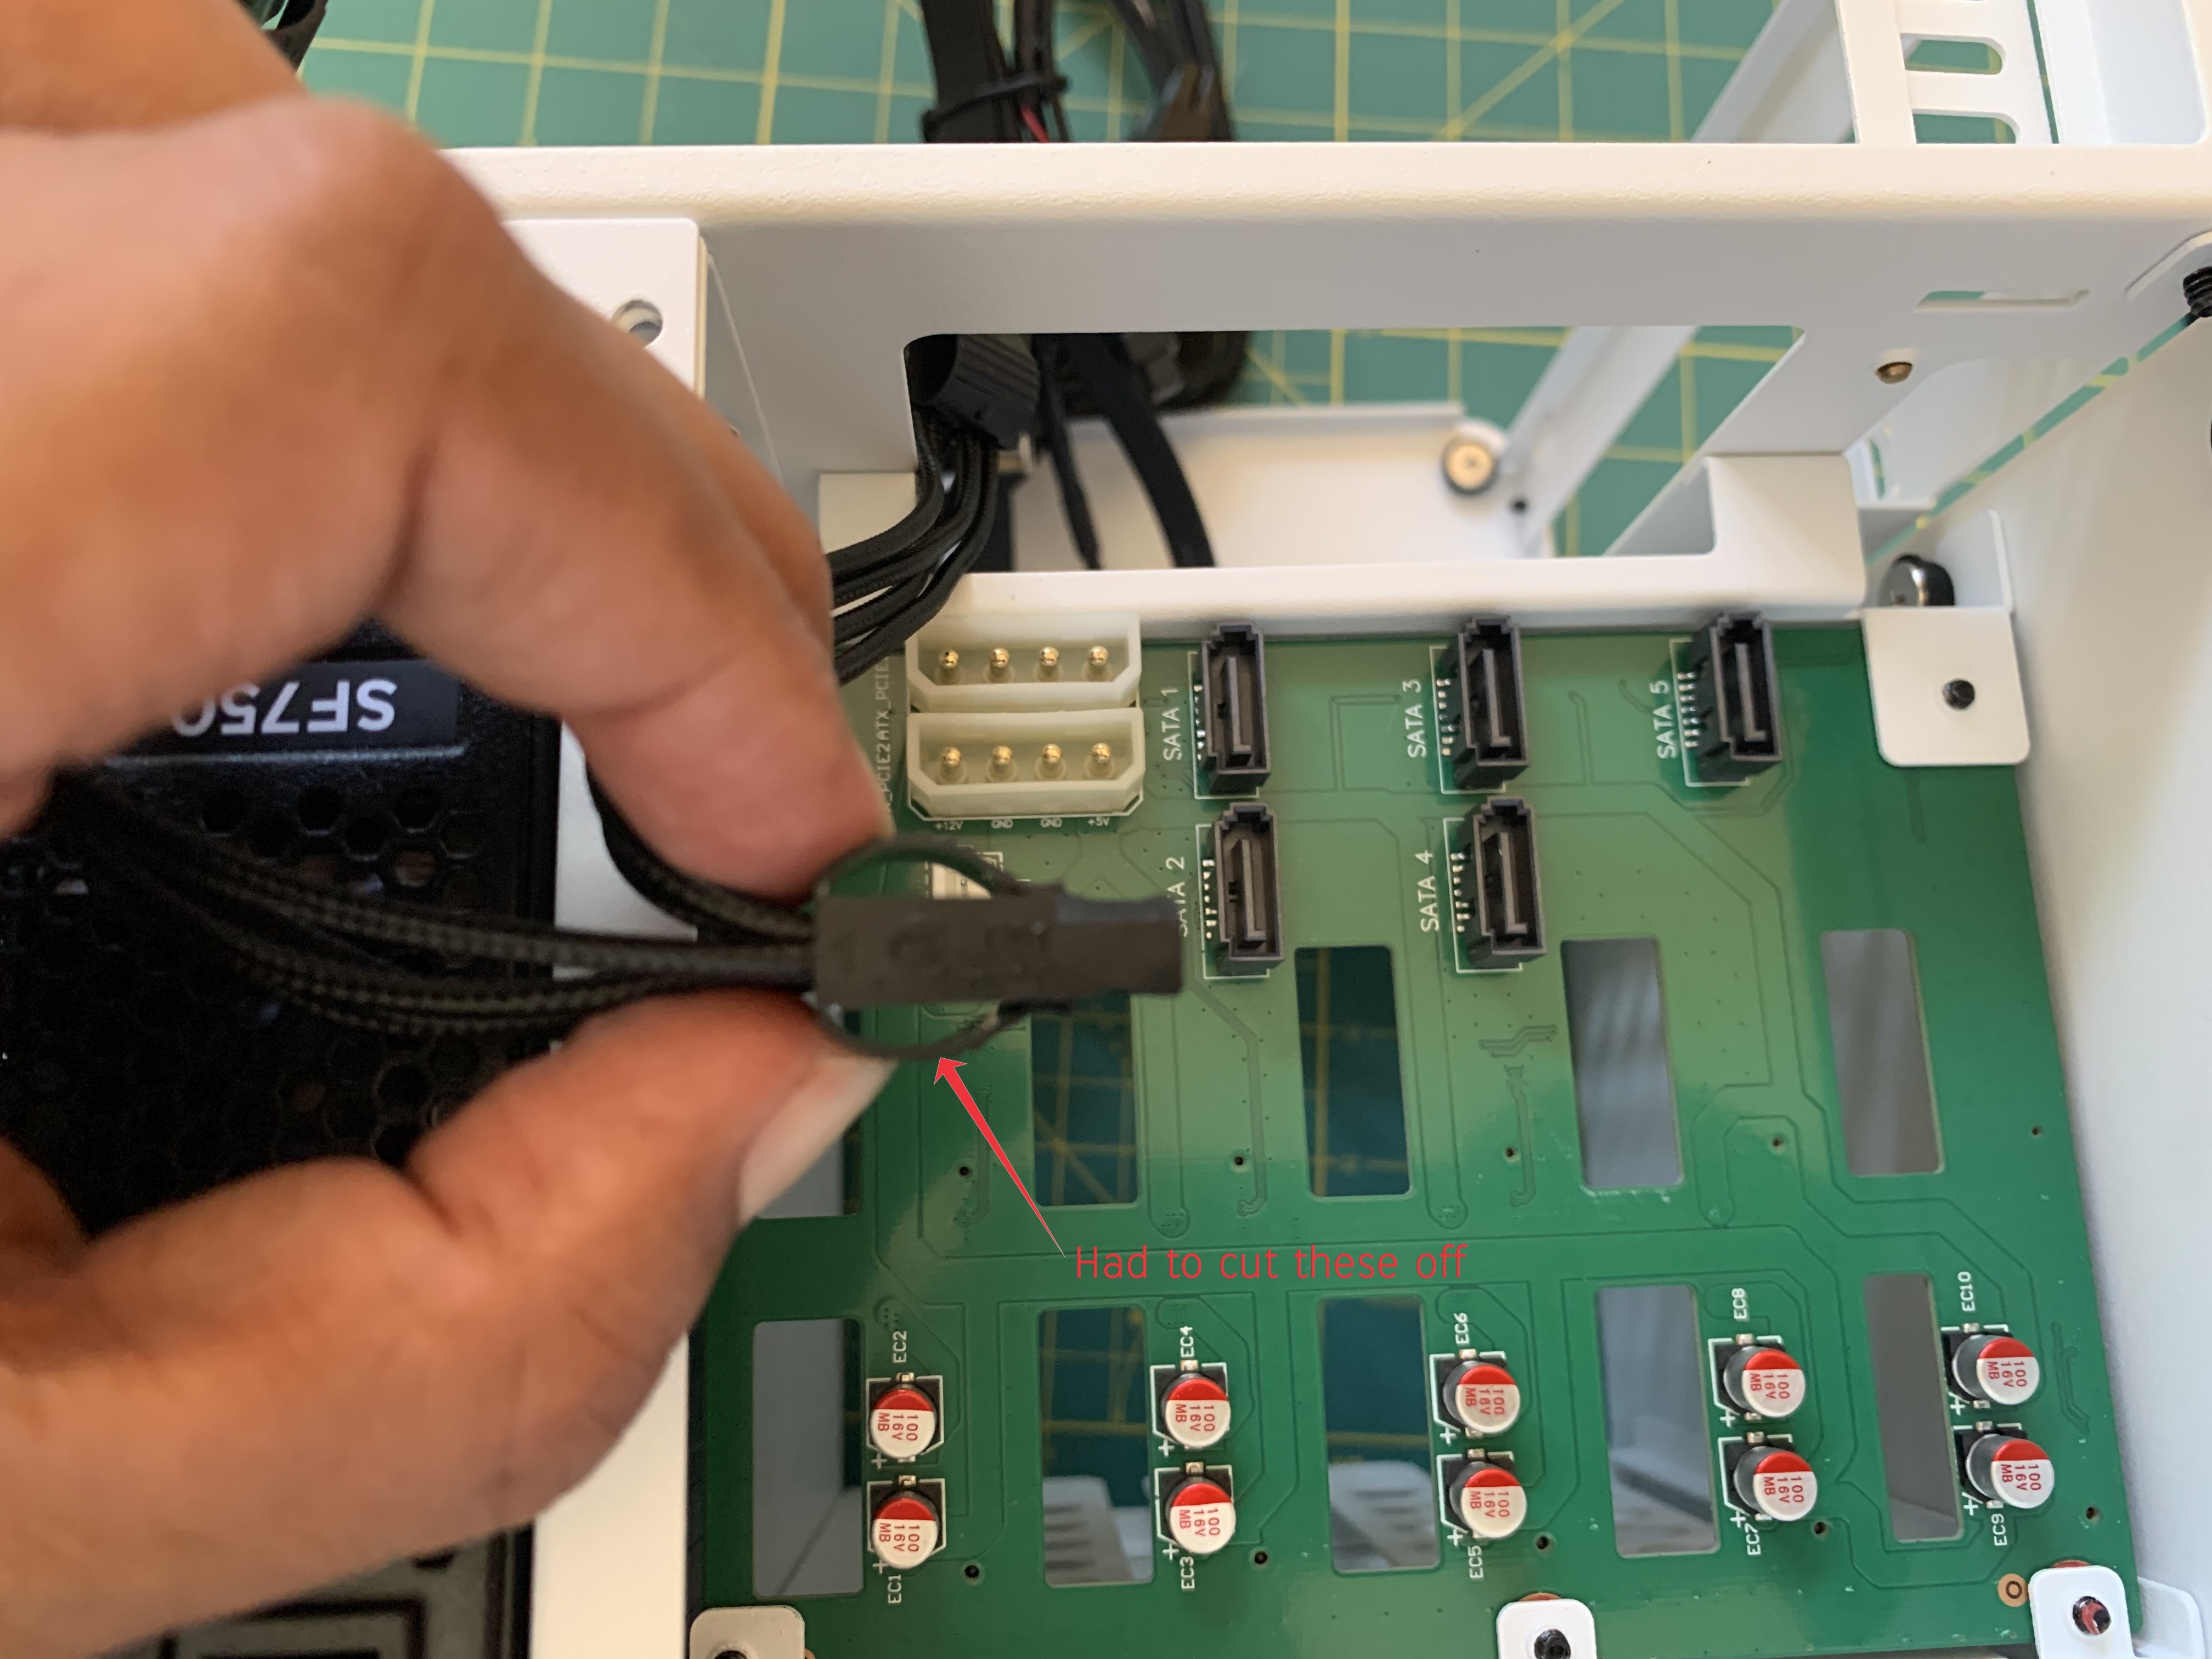
I had to cut off those tab thingys to make the connectors fit.
Fix the backplate that came with the motherboard to the case.
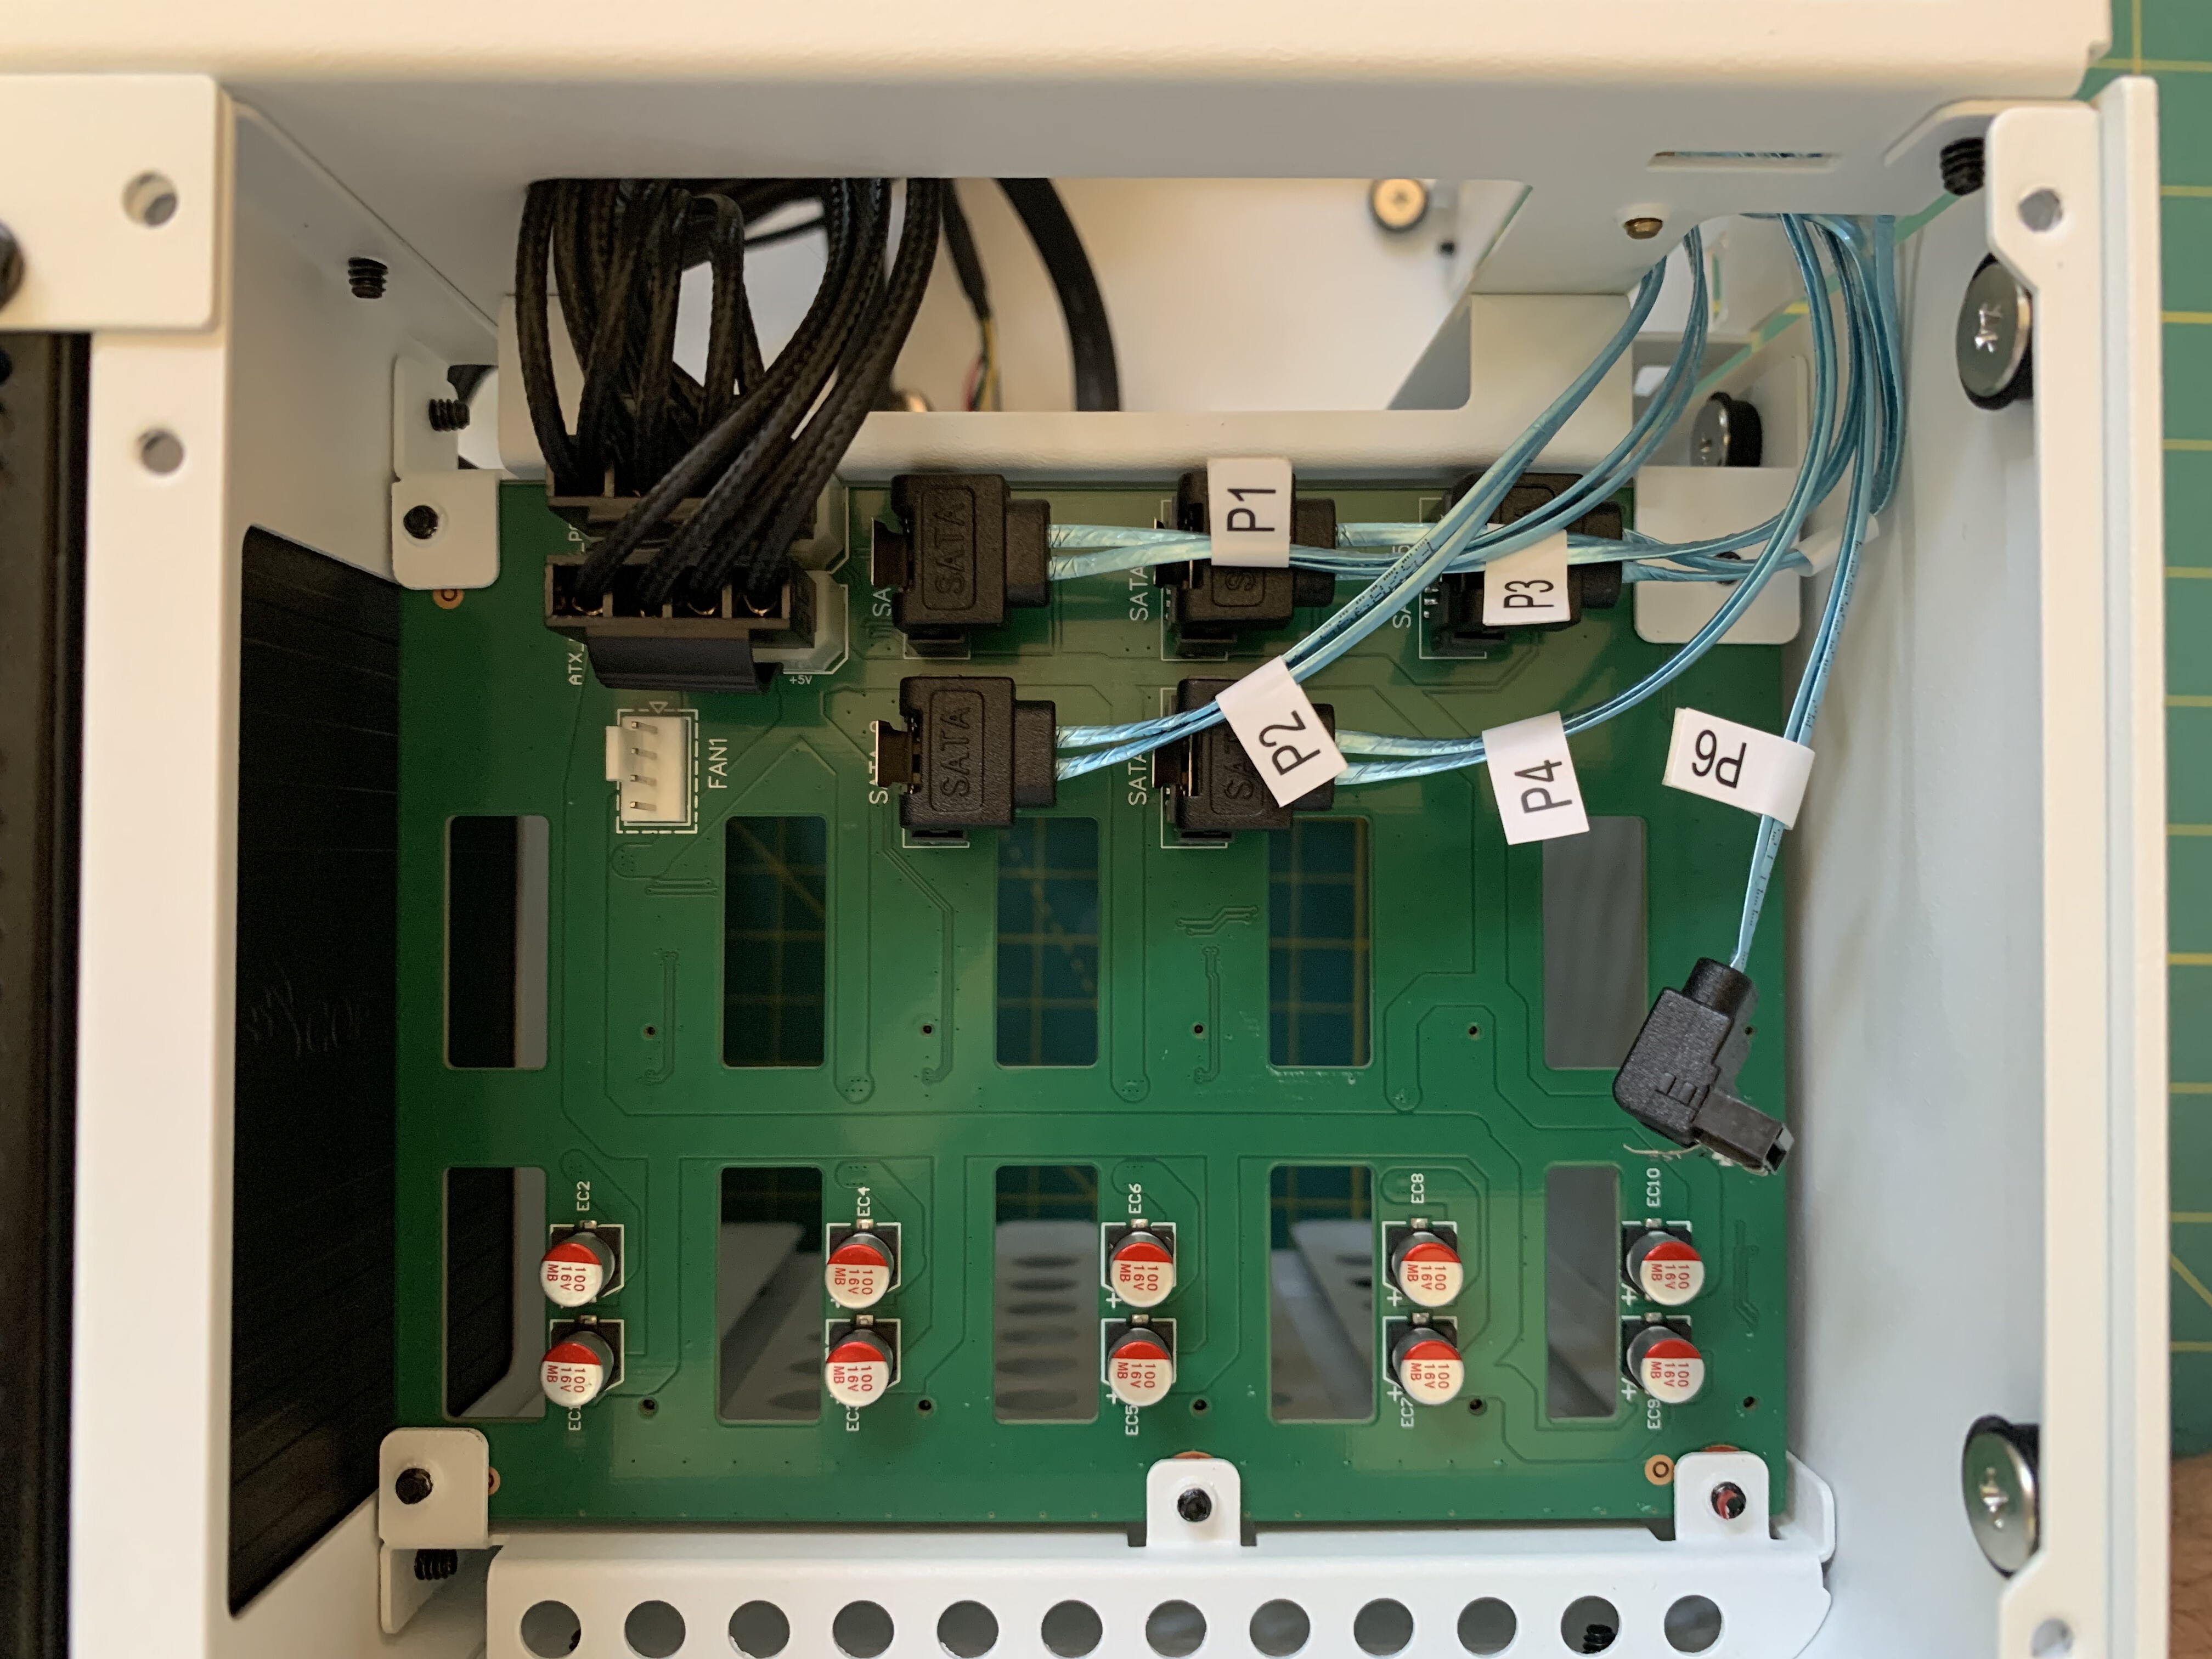
Connect the 90-degree SATA cables to five SATA ports on the backplane. Leave the sixth 90-degree SATA cable unconnected. Then gently thread the bunch of 6 SATA cables through the small hole in the case shown on the upper-right and into the top part of the case where the motherboard will be mounted.
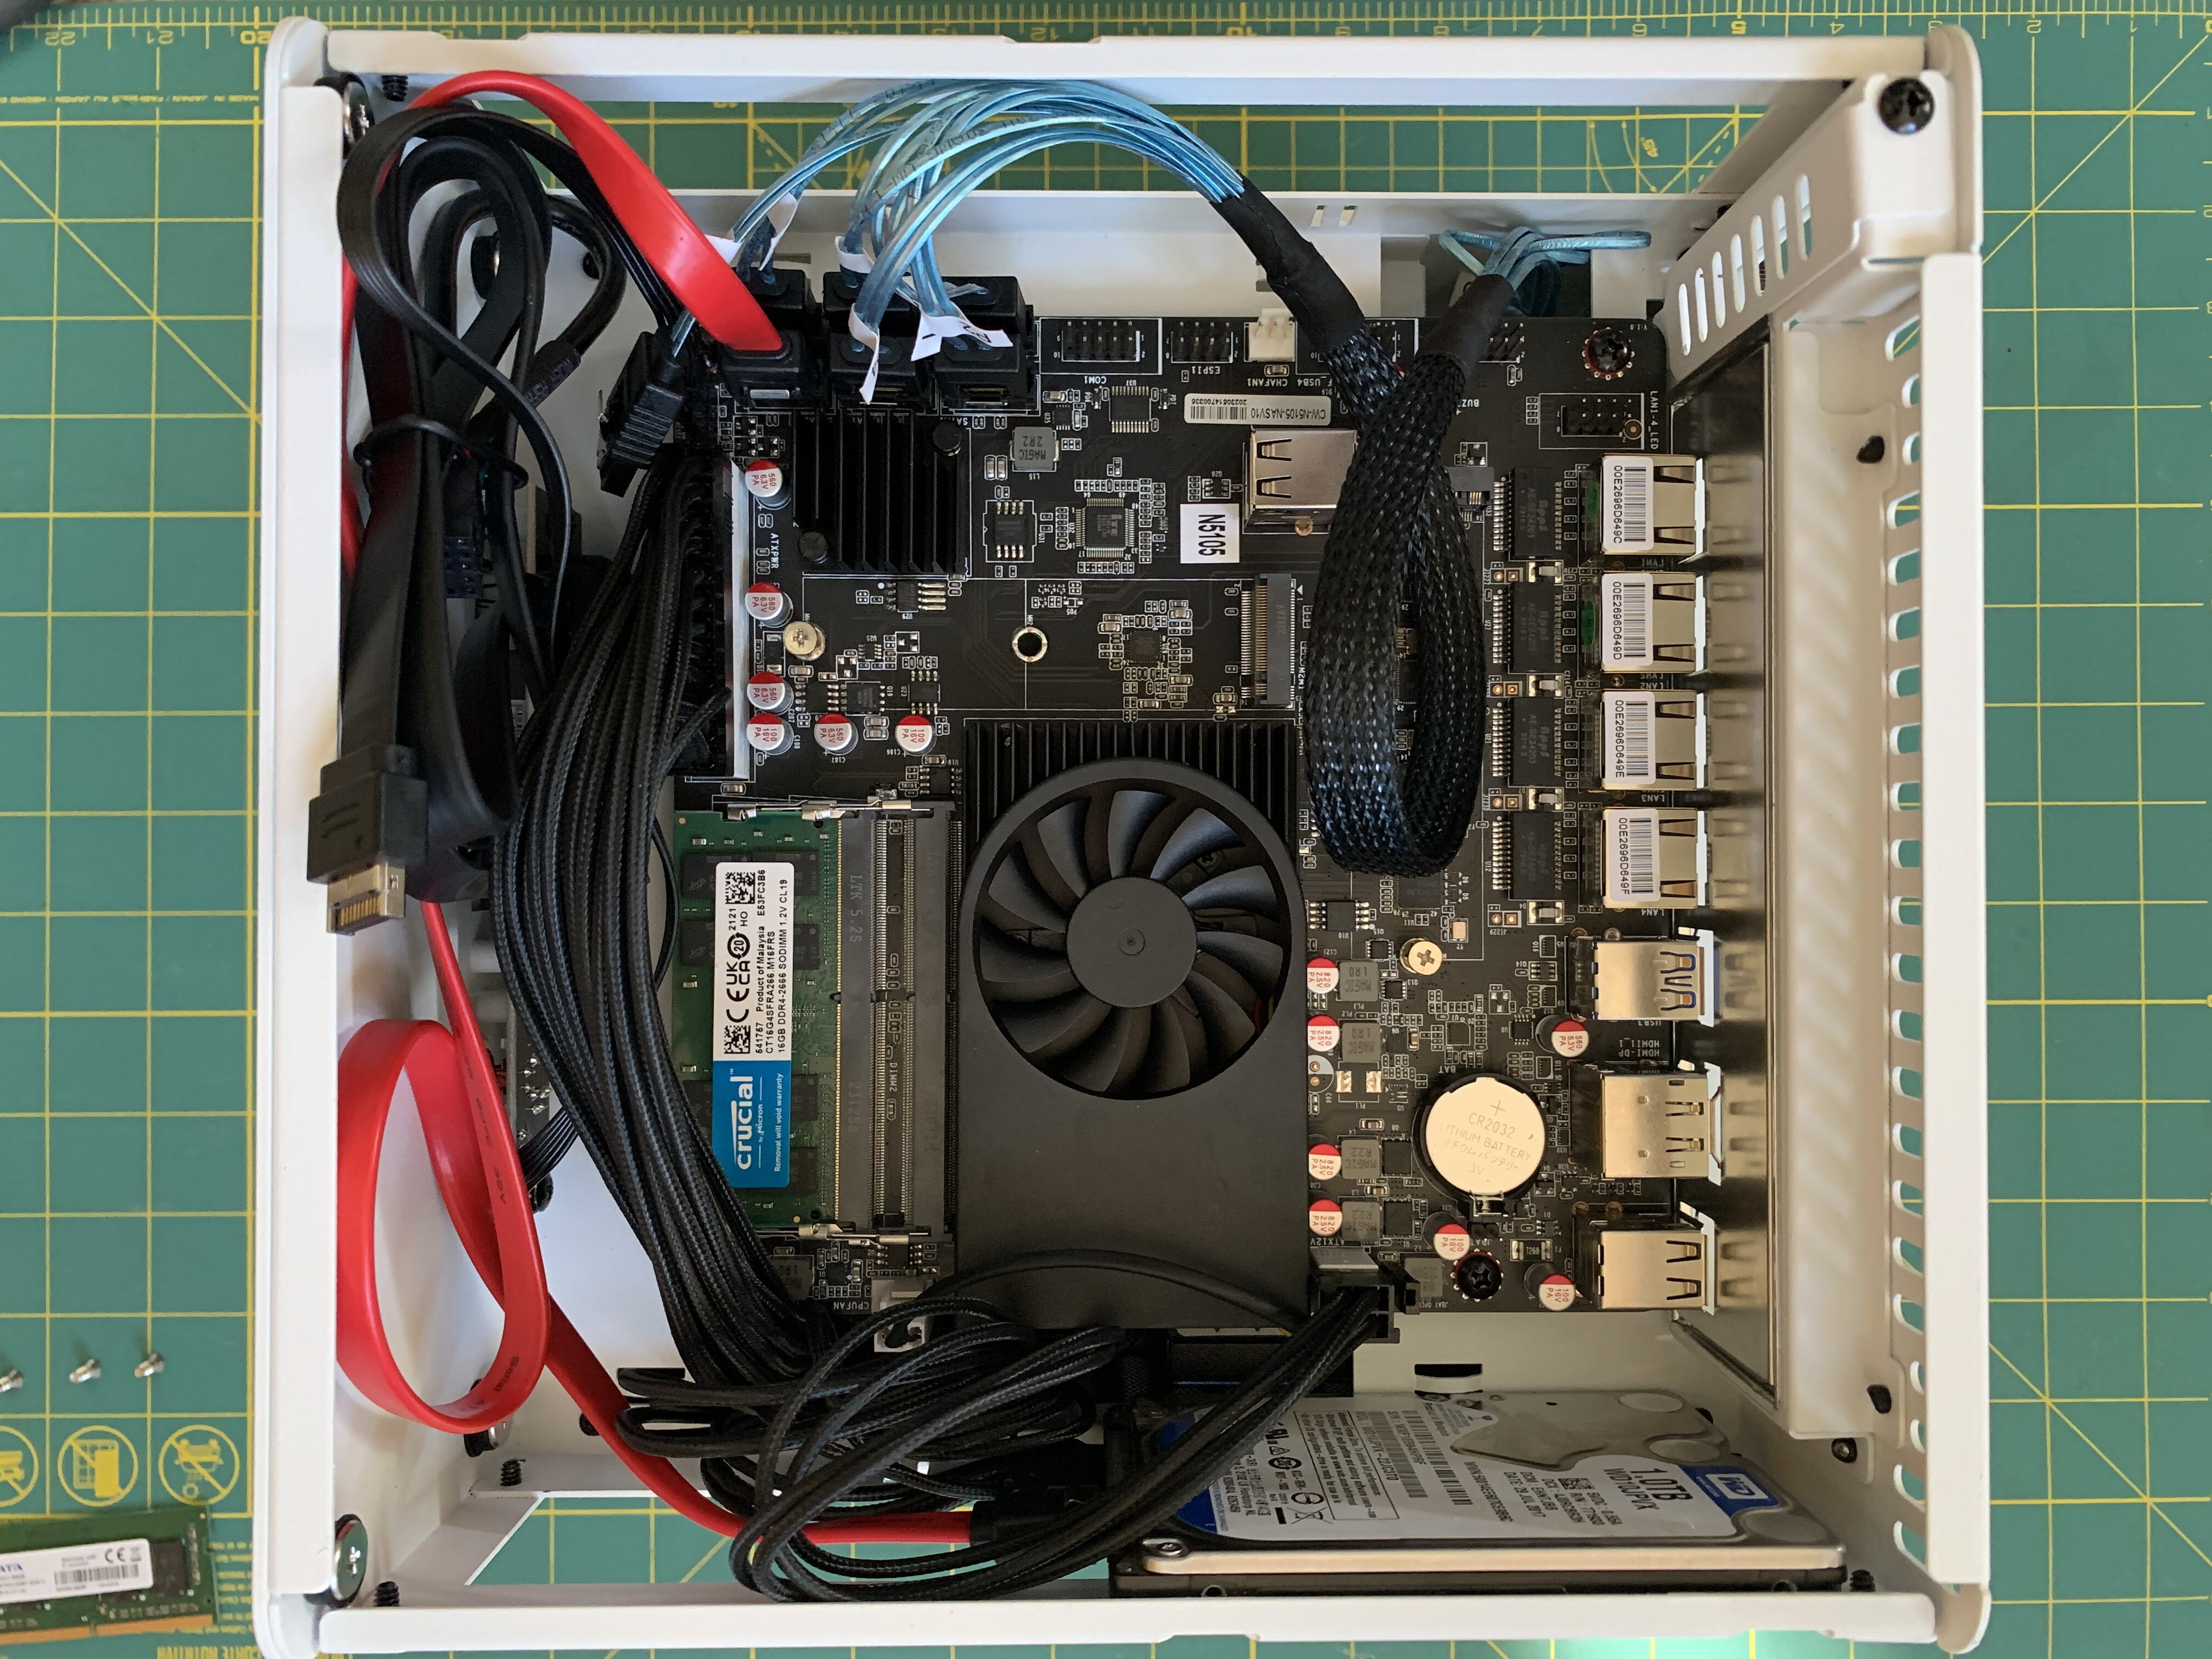
Mount the 2.5" HDD using the 4 mounting holes in the frame above the PSU. Gently place the motherboard into the case, align its mounting holes with the mounting risers already present in the case. Screw down the motherboard, taking care not to apply excess torque to the mounting screws. Connect the 24-pin, 4-pin, and SATA connectors. I had to use a separate SATA cable to connect to the 2.5" HDD (the red one in the photo below).
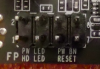
Also connect the case power switch, Power LED, and HDD LED connectors to the header on the board that is immediately next to the 24-pin connector. It took me a while to figure out how these should be connected. The pins are
1-2
3-4
5-6
7-8
Looking at the printing next to the header, the connections should be
HDD LED 1 (pos) 3(neg)
PW LED 2 (pos) 4(neg)
PWR SWITCH 6 and 8 <– The polarity for the switch should not matter, since it is a simple circuit closing mechanism
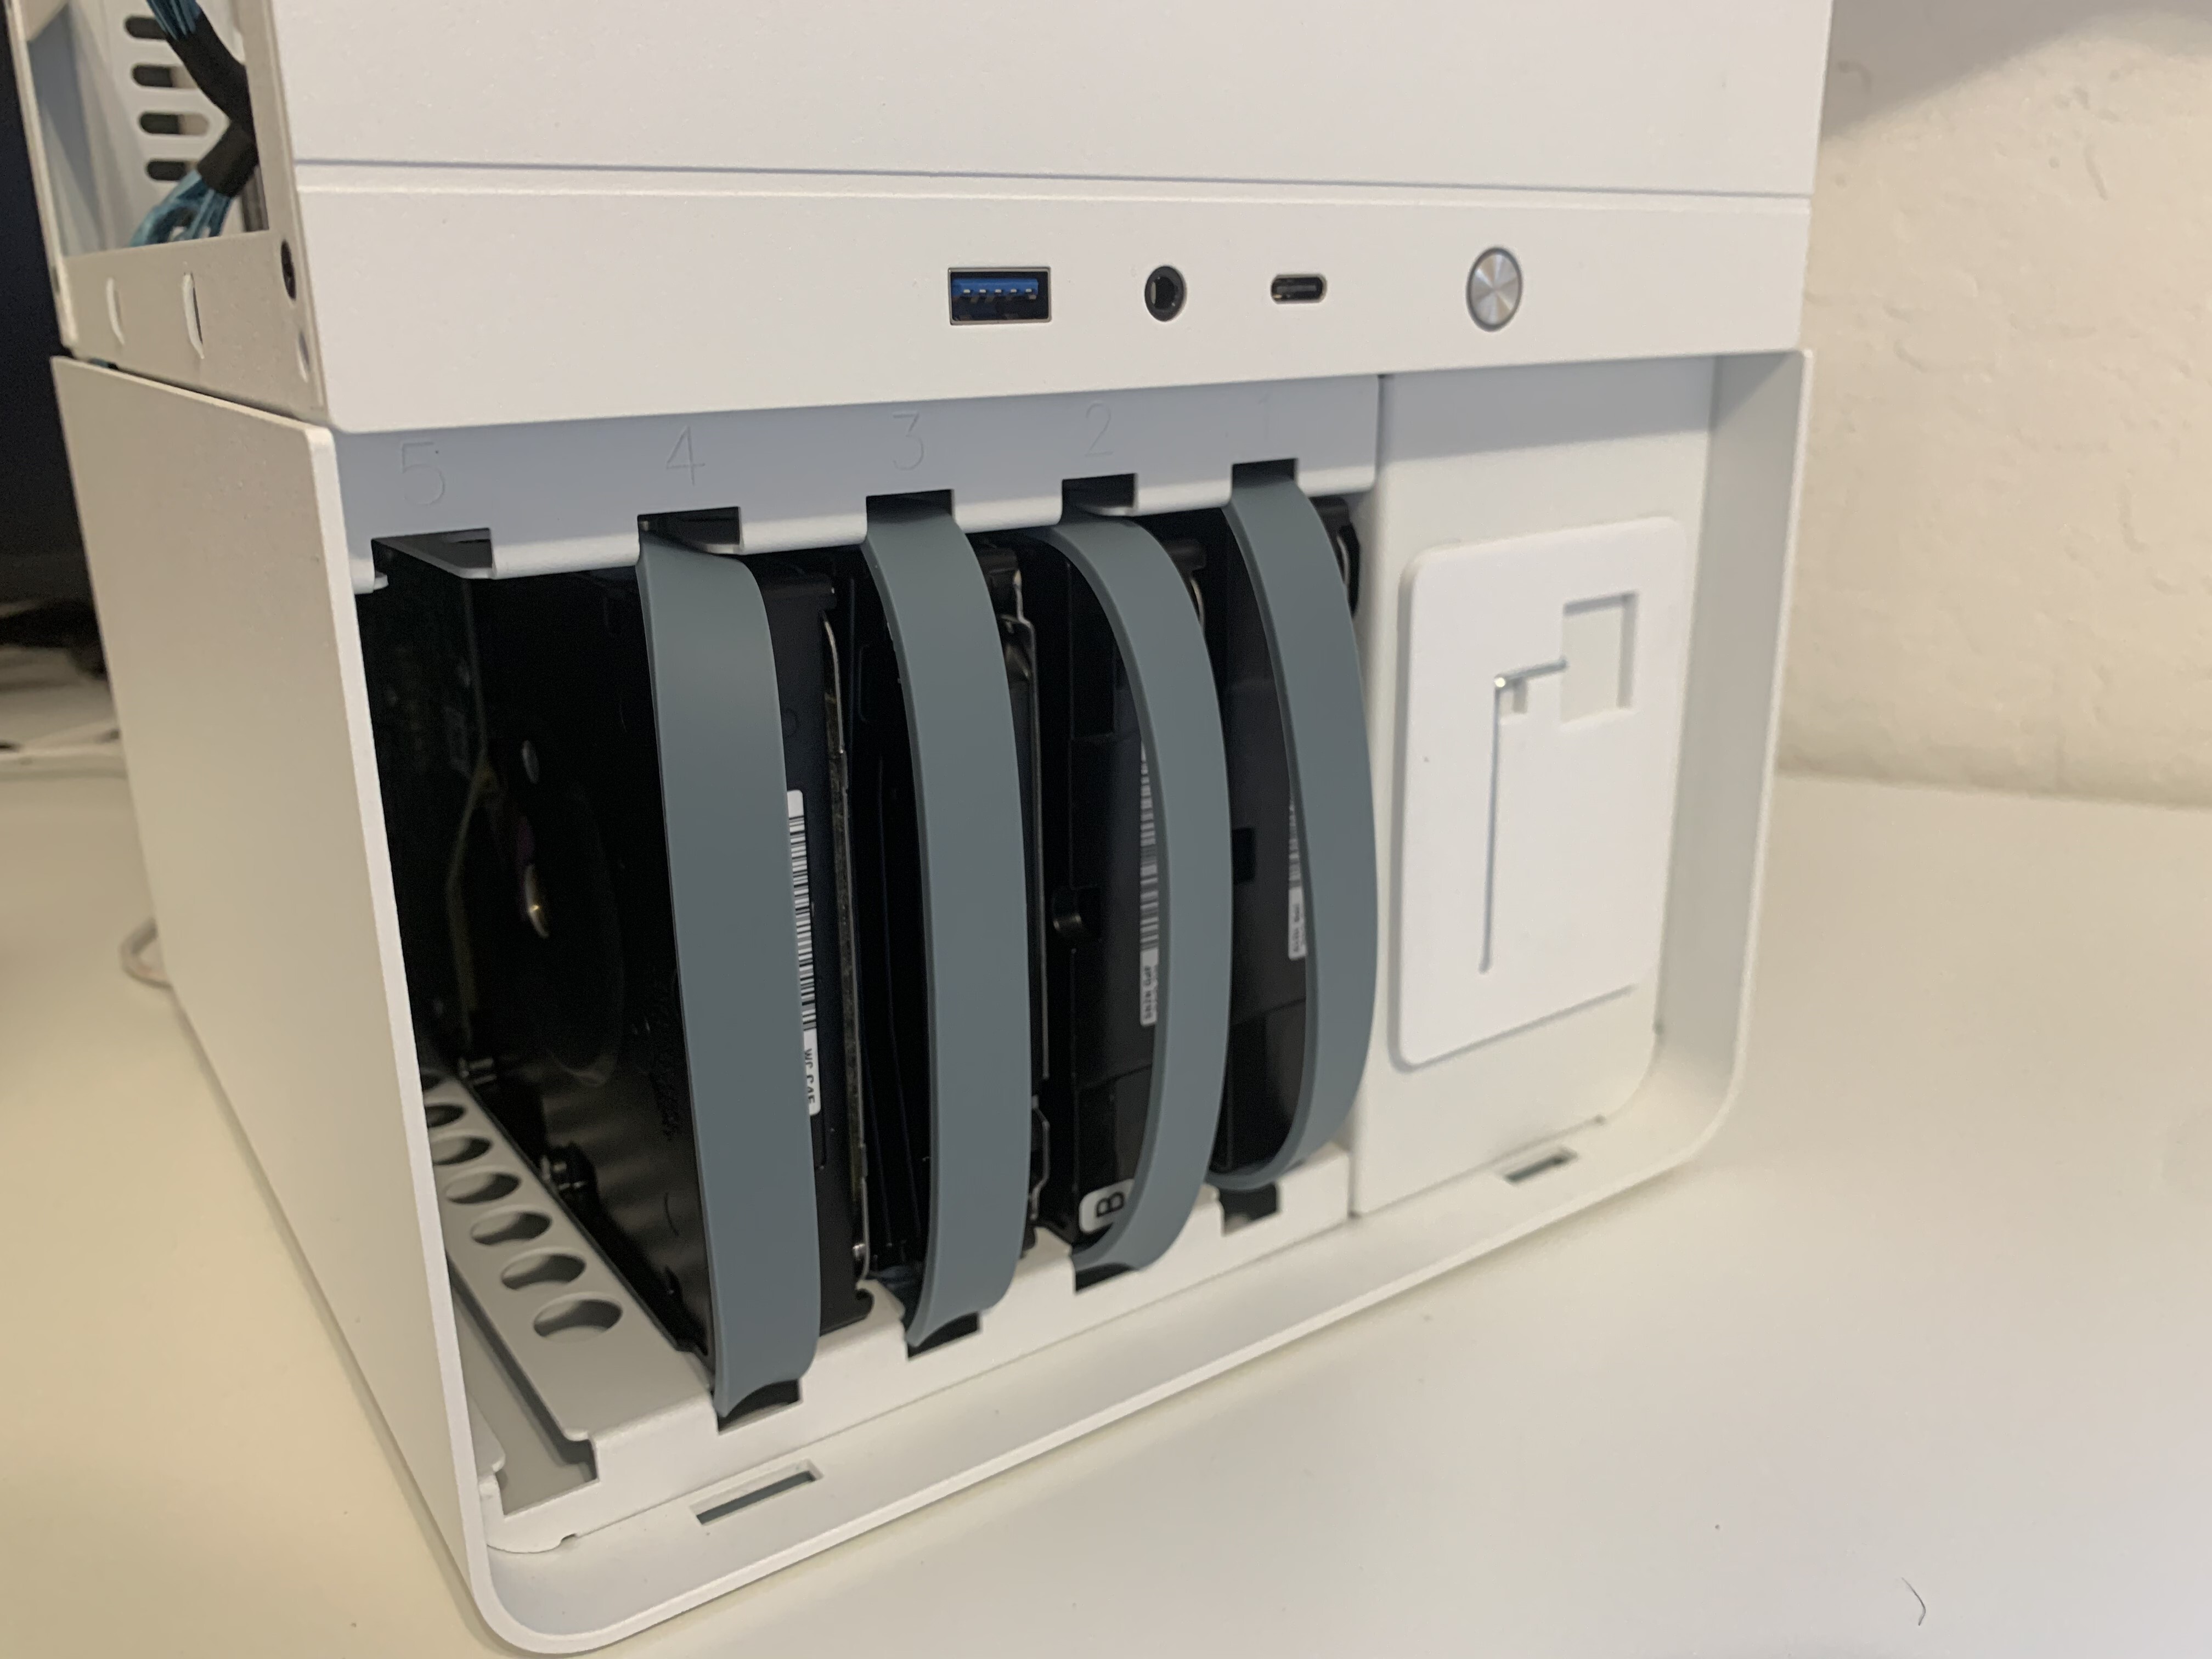
Next, I screwed rubber mounting grommets and silicone “pull handles” to 4 3.5" SATA disks and gently inserted them through the front of the case. I thought they went in correctly.. I even felt some resistance towards the very end which made me think that the drive SATA connectors were mating to the SATA connectors on the backplane. Turns out this was completely wrong and the drives were not in the correct orientation. Upon first boot, the 5 SATA drives were not detected.
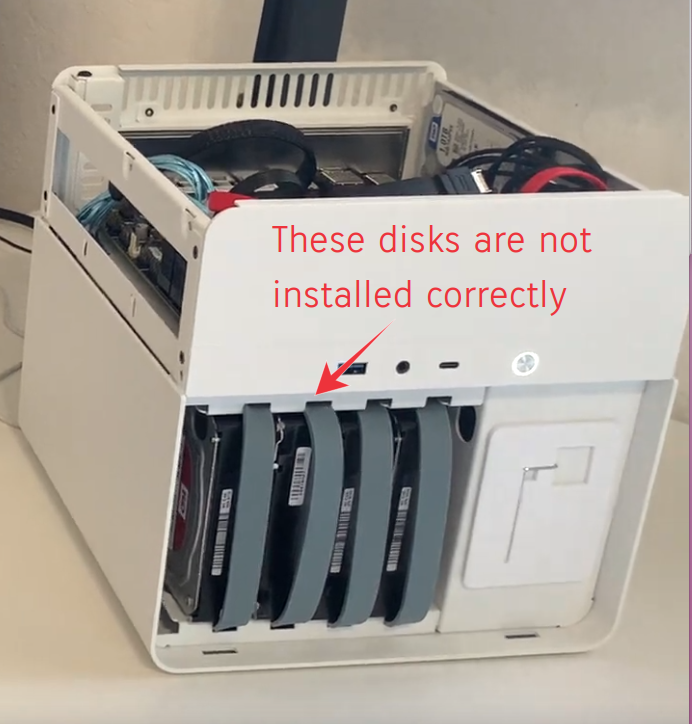
The HDDs should actually go in the other way. See picture below. In fact, when you push in the first drive to the extreme right, you can visually see the drive mating to the connector on the SATA backplane. After this change, all drives were detected correctly.
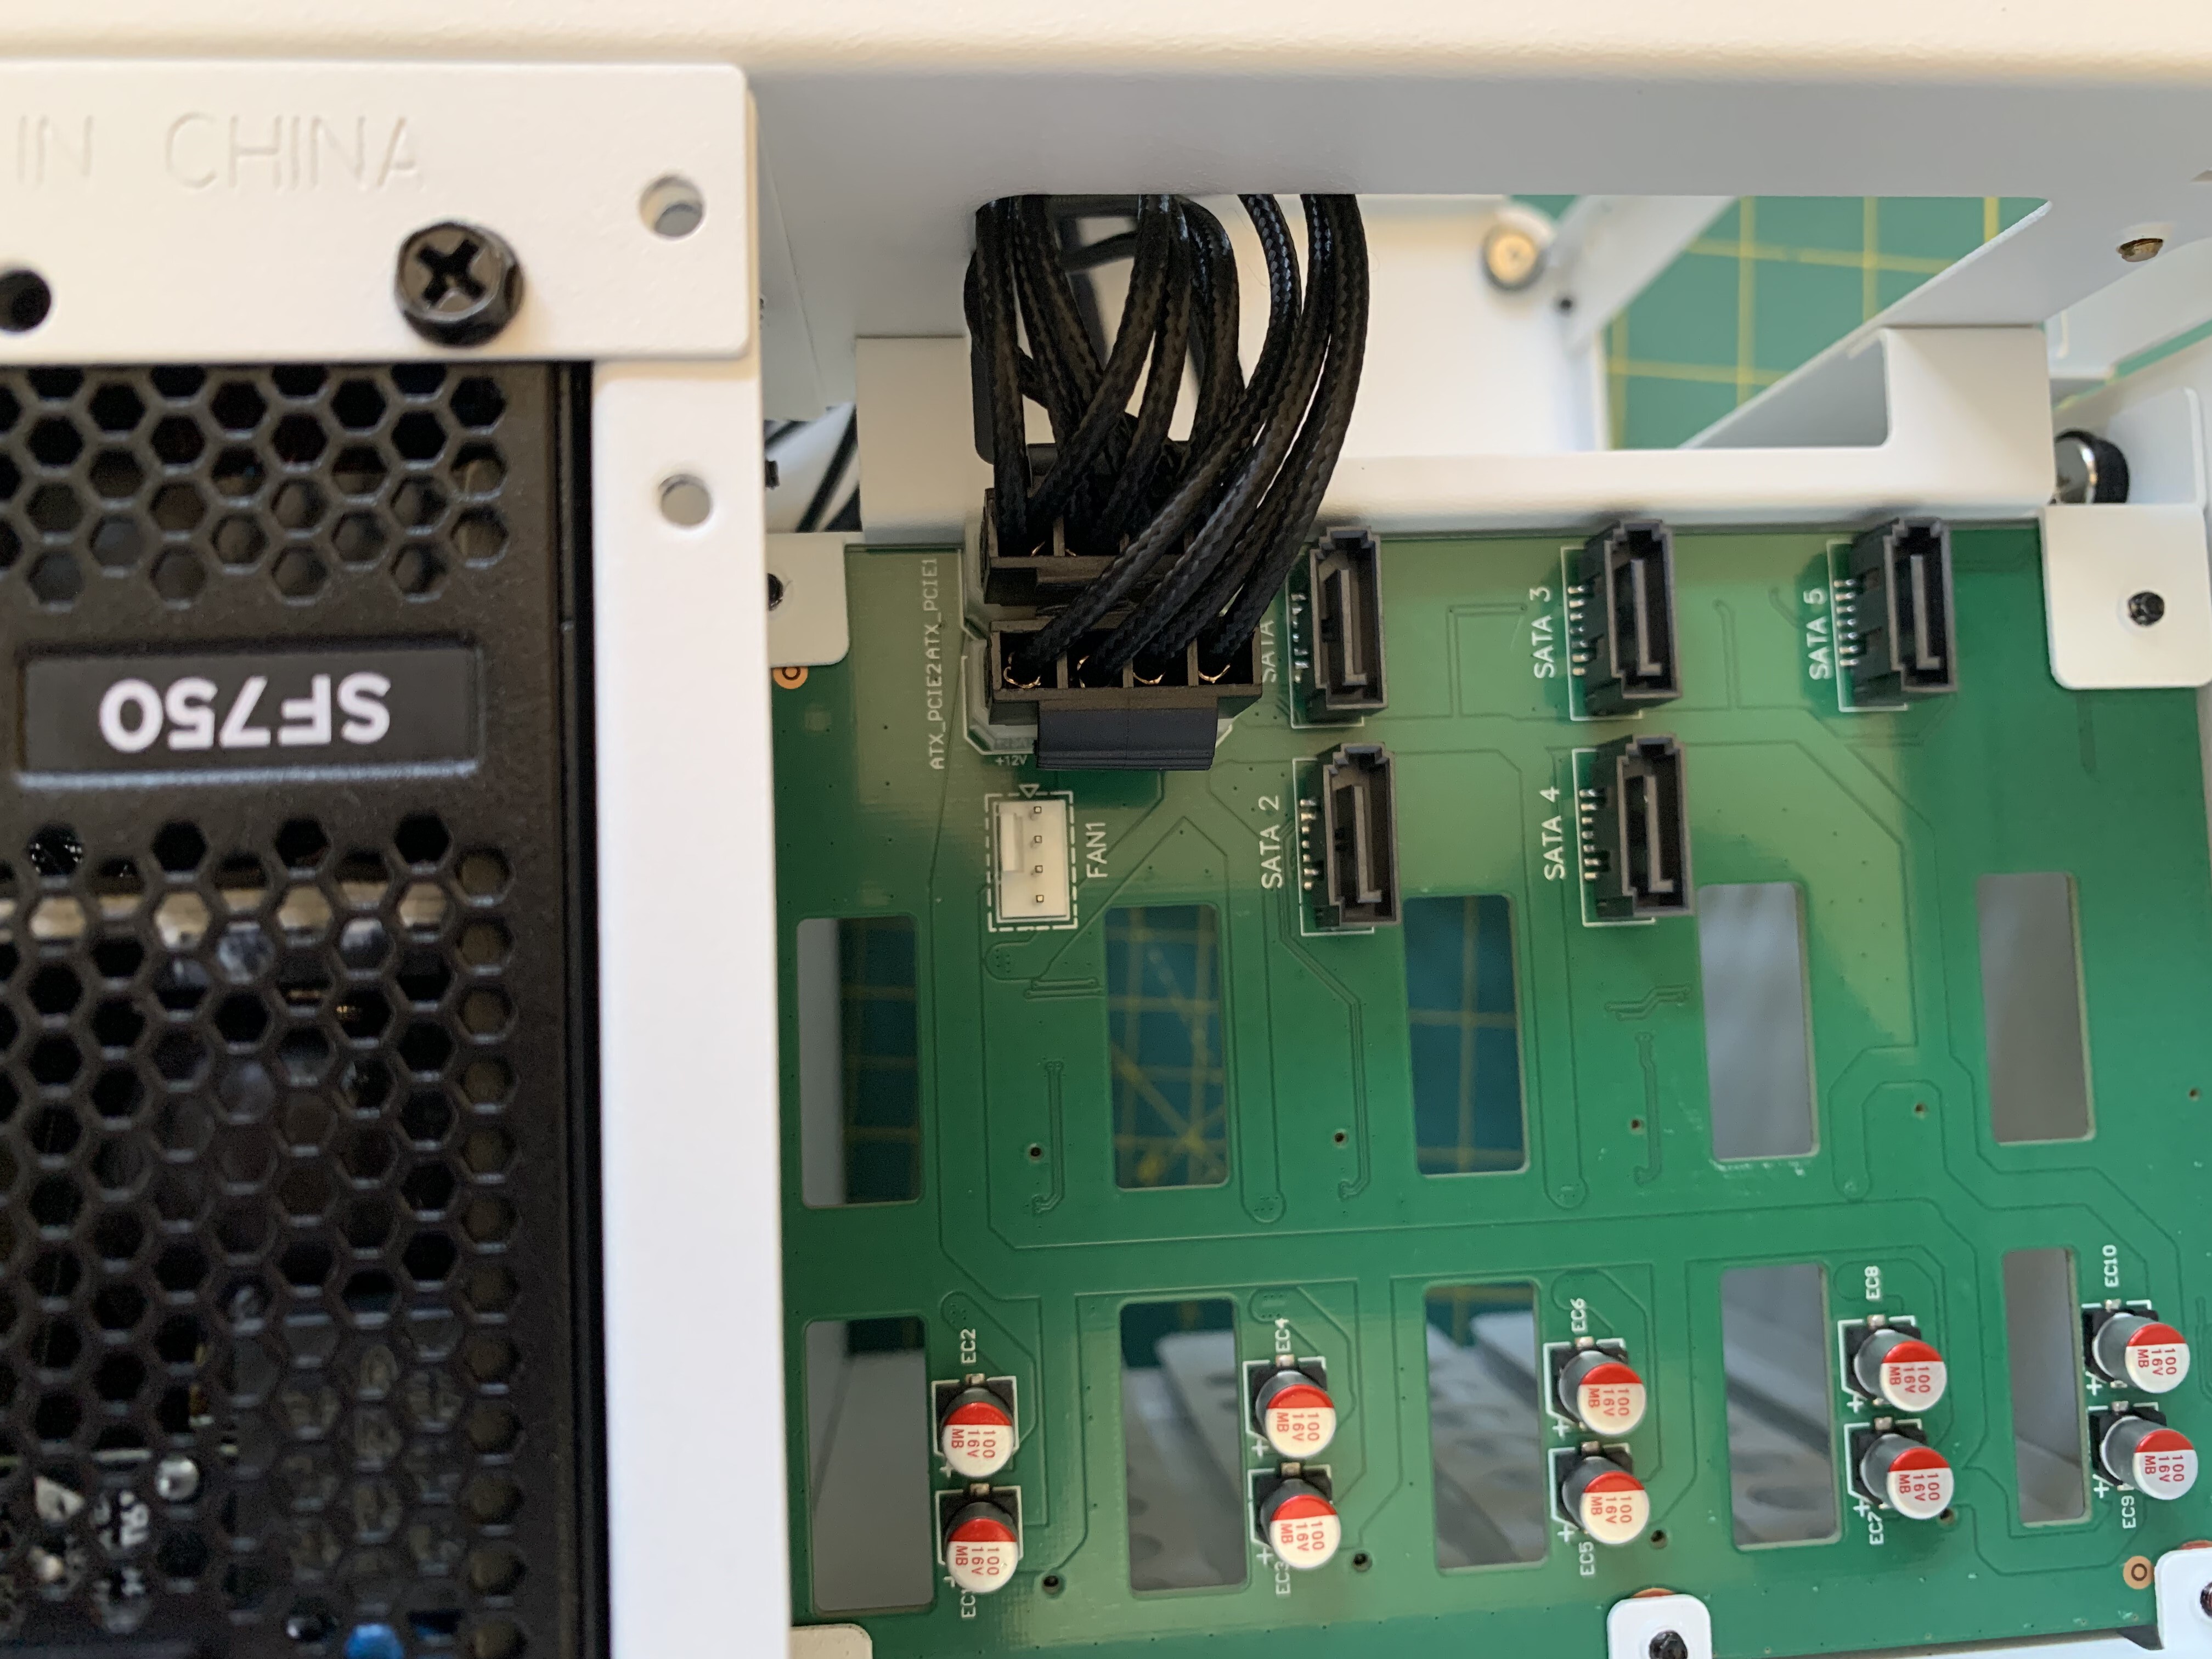
Finally, connect the case fan connector to the 3-pin FAN header on the SATA backplane. This is right next to the two molex connectors and is clearly labelled. There is only one way the connector from the fan goes in to the header. Since this is a 3-pin connector and not a 4-pin connector, there is no support for PWM speed control. So the case fan will spin at max speed whenever the NAS is powered on. Attach the case fan to the rear of the case, next to the power supply.
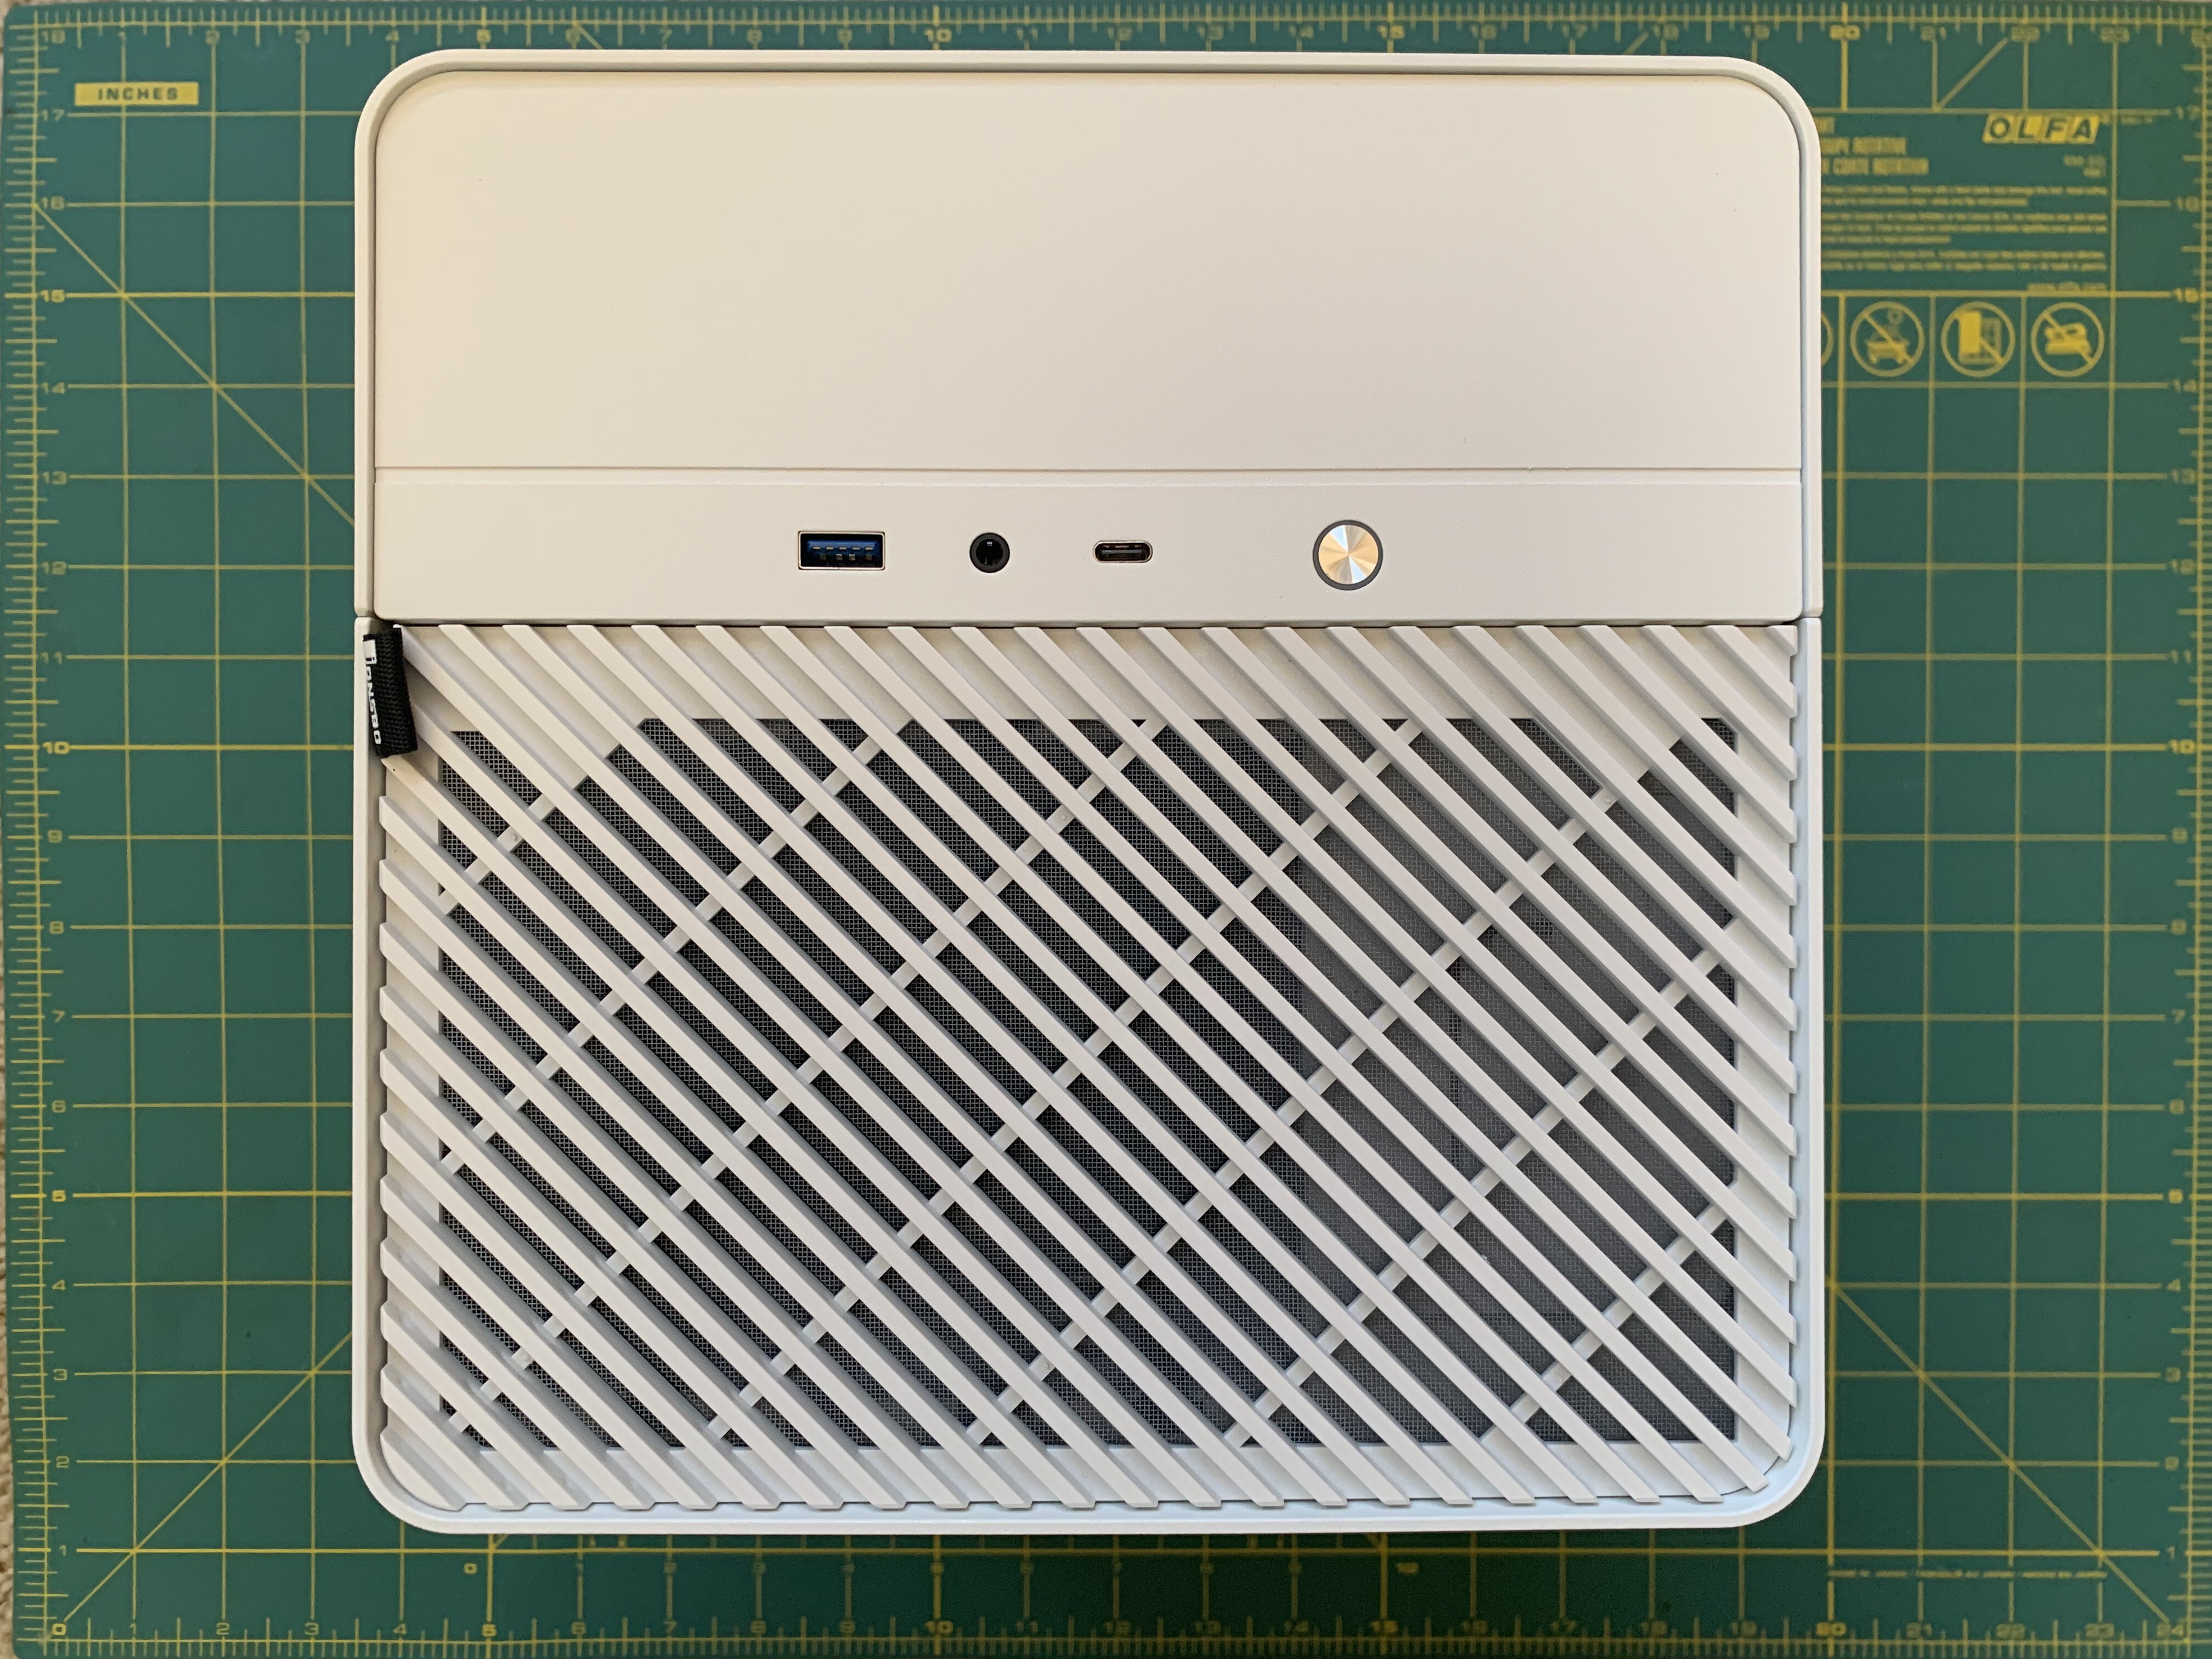
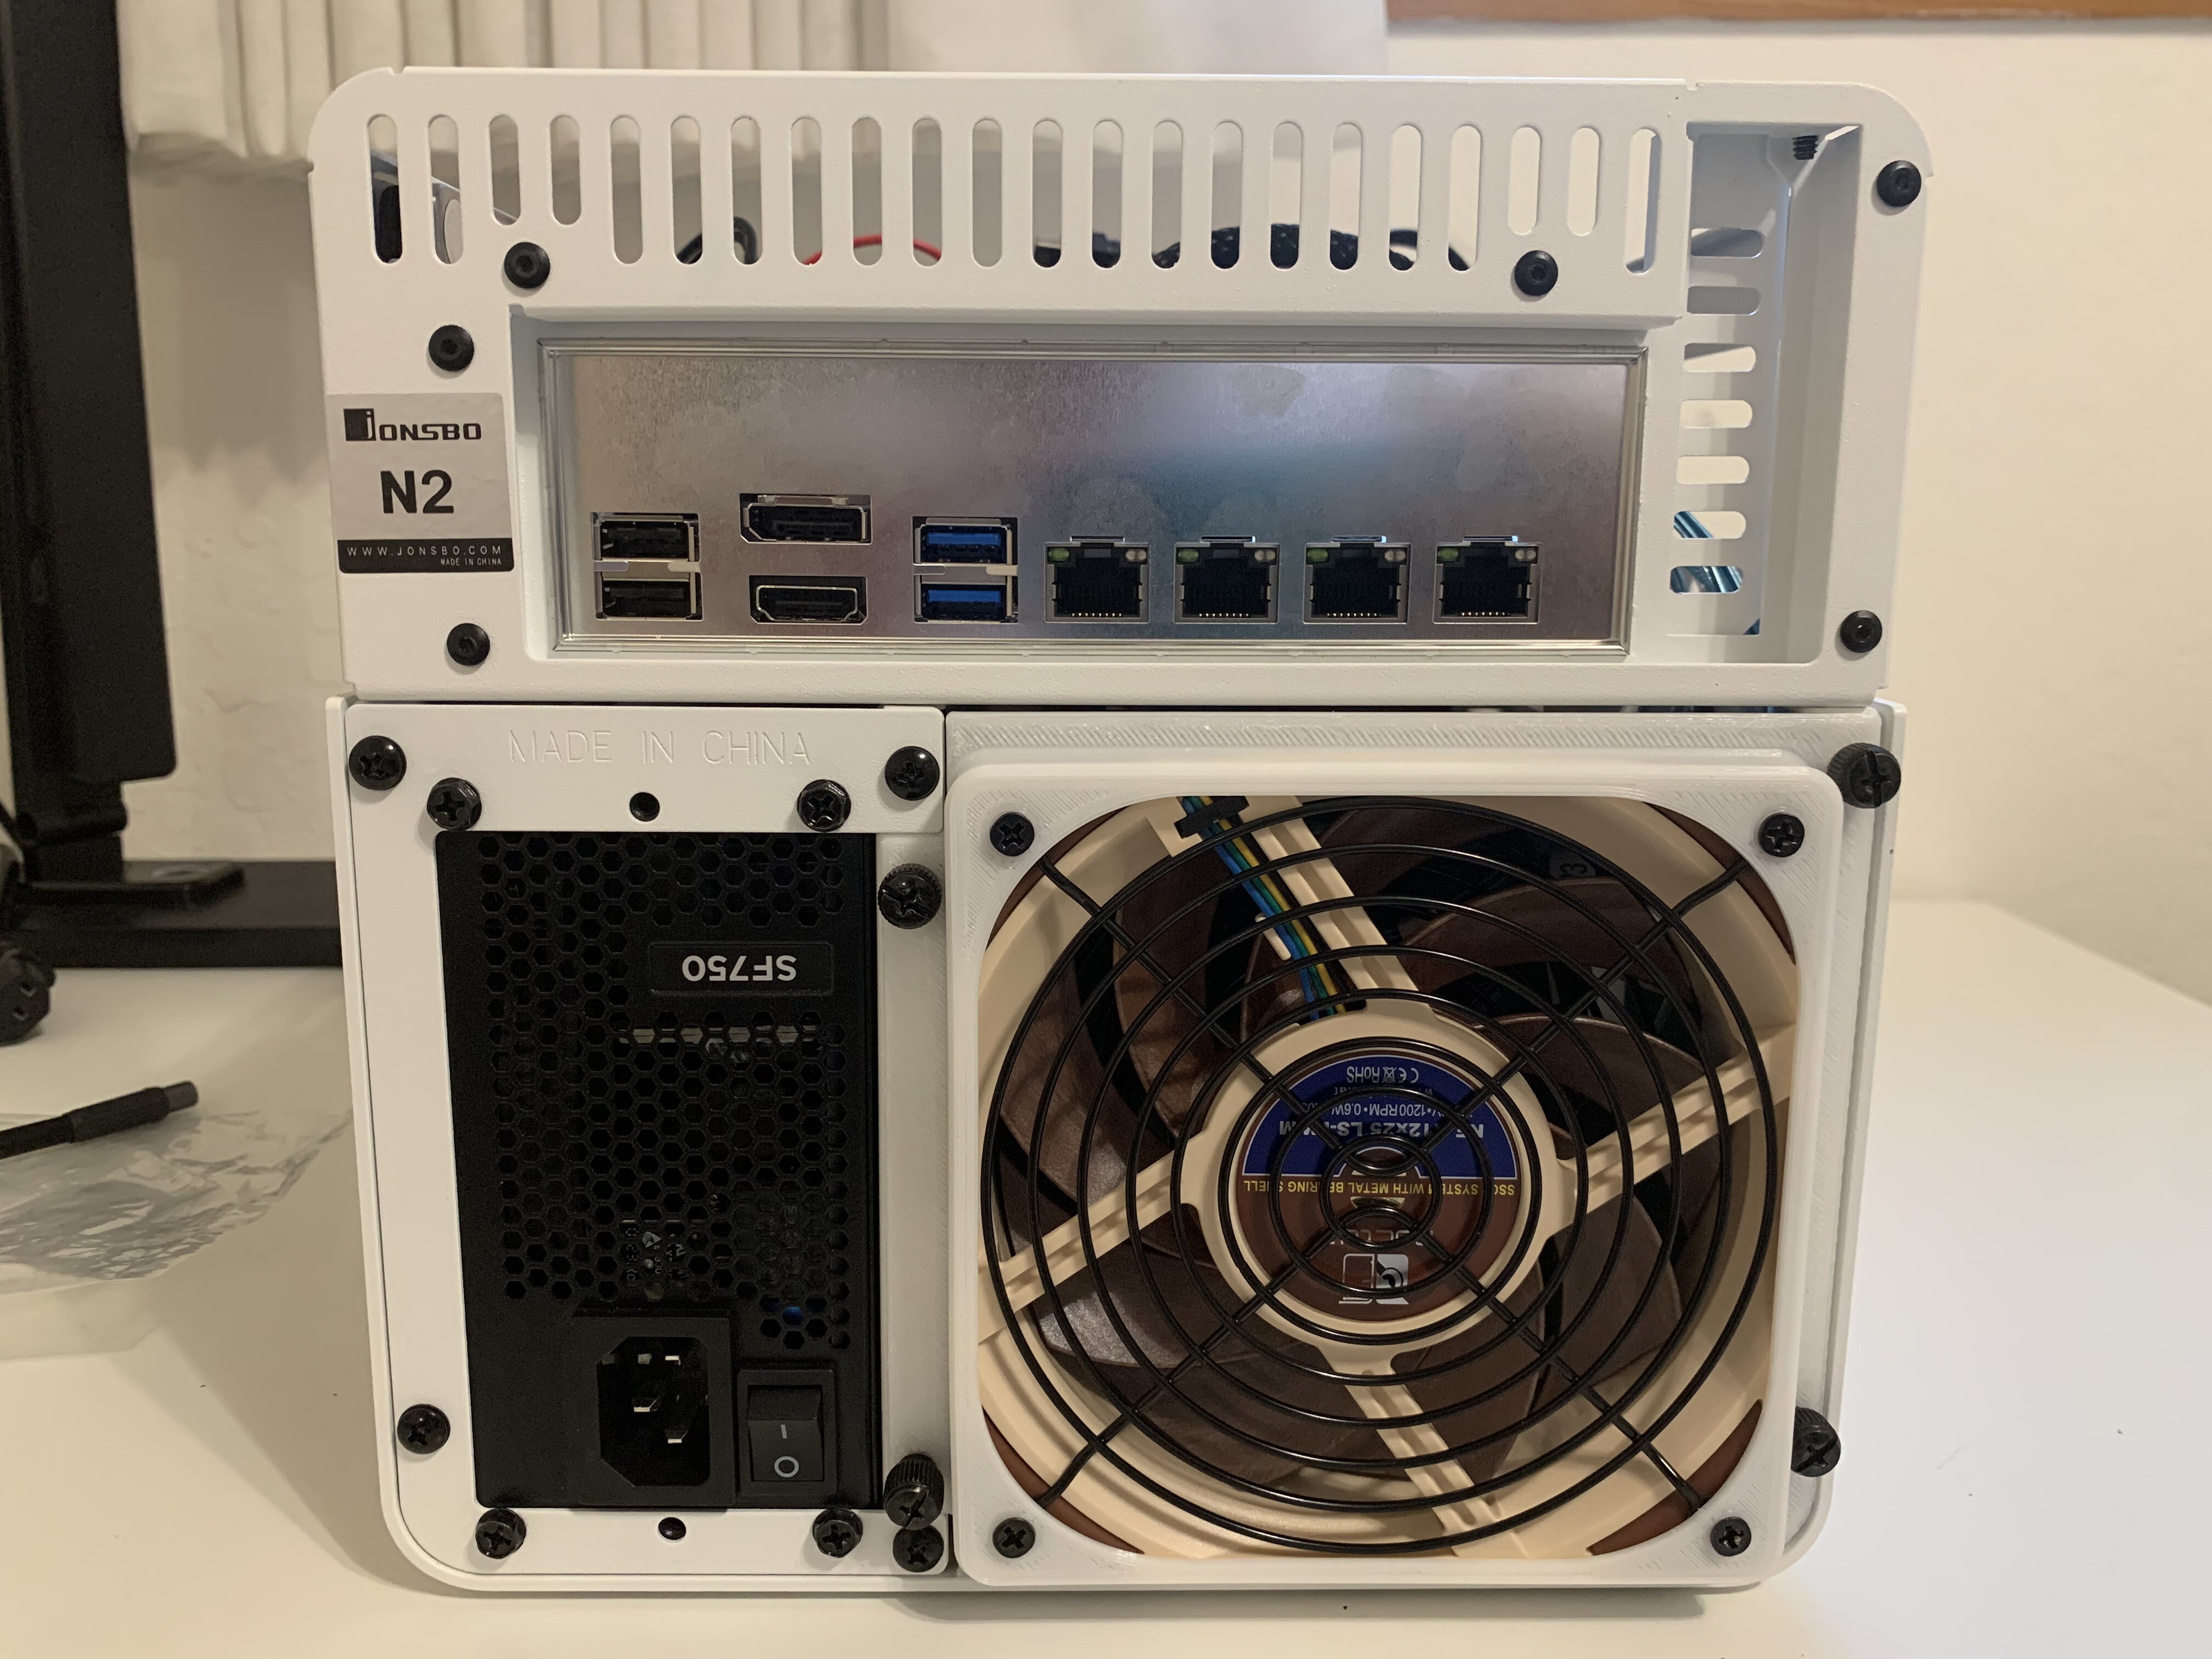
Case fan modification
The default fan that comes with the case felt unbearably loud to me. So I replaced it with the Noctua NF-A12x25 LS-PWM fan mentioned in the parts list above. This is a 25mm fan and it does not actually fit the case. Note that Noctua also makes a 120x15mm version of the fan which should fit without issue. However, I chose the 25mm version because the Noctua website shows that this fan is more quiet than the 15mm fan. To make the 25mm fan fit cleanly, I 3d printed the bracket that Thomas Moll mentioned in his blog post. The fan is attached to this bracket using self-tapping metal screws that come with the fan. Before fixing the fan to the bracket, I also inserted some finger grills to the front and back of the fan. I think these grills don’t look very nice and you can use the mesh-type grills that came with the case, as Thomas Moll did with his build. However, I’d run out of patience at this point and convinced myself that the wire grills might permit a tiny bit more airflow (and so cool the HDDs better) than the default mesh-type grills that come with the case fan. Since the NAS is hidden out of sight, the ugliness of the grills shouldn’t matter. I was slightly worried about dust-ingress, but it turns out that the fan pulls air from the front of the case and pushes it out from the back, through these grills. So it is not sucking in dust through these grills.
With the Noctua fan, the system barely makes any sound. In fact, the HDDs are louder than the case fan. This NAS is kept in our living room area and is absolutely inaudible during the day and mildly audible in the quiet of the night. So it meets the Wife Approval Factor (WAF) that the noisy default case fan absolutely did not ;-)
You can hear the difference between the default case fan and the Noctua fan in this video below
Software
The NAS runs the latest available version of OpenMediaVault. I did briefly consider running pure Ubuntu/Debian server on it, but OMV has most of what I need and little of what I don’t and the convenience it offers is valuable. My needs are fairly simple: All of my data resides on a single 4TB drive. There are two additional 4TB drives to which data is rsync’ed at different intervals via jobs scheduled in OMV. SMART monitoring and self-tests are scheduled to hopefully provide a heads-up that a disk is failing. Email notifications are enabled in OMV. Additionally, I occasionally rsync the data to an external USB 4TB drive for cold storage. Critical data is backed up to two different cloud storages via two different backup programs. I am currently investigating the value of btrfs scub and programs like cshatag or bitrot to explore protection against bit rot.
I intend to write a separate blog post on the software aspects of the NAS that includes the operating system, configuration, as well as various utilities used for monitoring the health and status.
Performance numbers
So far, the NAS has been up for about a week with no issues.
Disk write speeds are about 130 MB/s, which seem normal for the SATA disks in use.
CPU temperatures stay between 34C to 40C during normal operation and were between 43C to 50C during a 2 hour rsync job from a 4TB disk to another blank 4TB disk. With 4 3.5" HDDs in the front bay, the HDD temperatures stay between 35C to 40C. All of this at an ambient temperature of 27C.
Comparisons to commercial NAS offerings
For about $532 plus change, this NAS build sports 20 gigs of RAM, upto 6 SATA drives (5 3.5" plus 1 2.5"), 2 M.2 NVMe SSDs, 4 2.5gig LAN ports, and an Intel N5105 CPU that is rated at 10W TDP. It is not the cheapest of builds (merely using a lower wattage power supply can shave over $100 off). I was initially worried that 5 of the SATA ports hang off one single PCIe lane and share its bandwidth, but the disk speeds are enough to saturate the 2.5 gig LAN ports, so this is not a problem for my home use case. All parts of the NAS are individually upgradable.
At the time of this writing, the costs of somewhat equivalent 4+ bay NAS systems on Amazon are
| Device | Cost | Notes |
|---|---|---|
| Synology DS923+ 4-bay, 4 GB RAM | $598.49 | AMD Ryzen R1600 processor with no integrated GPU for media transcoding. |
| Synology DS1522+ 5-bay, 4 GB RAM | $699.99 | AMD Ryzen R1600 processor with no integrated GPU for media transcoding. |
| Asustor AS5405T 4-bay, 4 GB RAM | $529 | Same Celeron N5105 CPU. Supports fewer disks and installation of custom Linux distros. |
| QNAP TS-464-8G-US 4-bay, 8 GB RAM | $591.20 | Same Celeron N5105 CPU. Unclear if it supports installation of custom Linux distros. |
| Asustor Lockerstor 4 Gen2 AS6704T 4-bay, 4 GB RAM | $609 | Same Celeron N5105 CPU. |
| Terramaster F4-424 4-bay, 4 GB RAM | $499 | Similar Celeron N5095 CPU. Supports installation of custom Linux distros. |
If you do not want to build a NAS yourself, the Asustor and Terramaster devices may be good options, especially since they support the installation of Linux as the Operating System. To me, this is a critical necessity because none of these off-the-shelf devices support Full Disk Encryption that I deem a non-negotiable requirement for my use cases.
In any case, this DIY NAS build is cheaper and with higher specs (e.g. number of supported disks, RAM, number of LAN ports) than the comparable commercial offerings. It supports practically every NAS Operating System (TrueNAS, UnRAID, OpenMediaVault, plain old Linux distros) and can be tweaked to my exact requirements. Building this has been a rather satisfying experience.